Overview
In Groundwire Auctions for Salesforce version 3.0 the option to use Click & Pledge as a payment processor has been added. So now, at your auction your patrons can be pre-authorized then charged for their items purchased at the end of the event. Since this will be using the Click & Pledge Payment as a Serive App, receipts will be automatically emailed to patrons and the organization per usual. And the transaction will be recorded under the Contact's record.
In order to use Click and Pledge with Groundwire Auctions for Salesforce version 3.0 and higher you need to have:
- Install Auctions for Salesforce App & follow the installation instruction as provided by the application. [see documentation]
- Presumably you should already have a Click & Pledge Account and have installed the Click and Pledge Payment as a Service App on Salesforce. If you have not, you would need do this first.
- Created an Embedded Virtual Terminal within the Click and Pledge app
- Complete the 'After Installing' and 'Integrating with a Payment Processor' instructions also available within Groundwire's Install & Configuration Guide. For this you will need to add your Click & Pledge embedded virtual terminal ID and Click & Pledge account ID within custom settings.
Auctions Integration
Auctions integration consists of three steps:
- Integration
- Embedded Virtual Terminal creation
- Custom Settings
First Step: Integration
Step 1.1: Click & Pledge to Salesforce
To connect the Click & Pledge platform with Sf eVT, the connection needs to be added to both Click & Pledge and Salesforce.
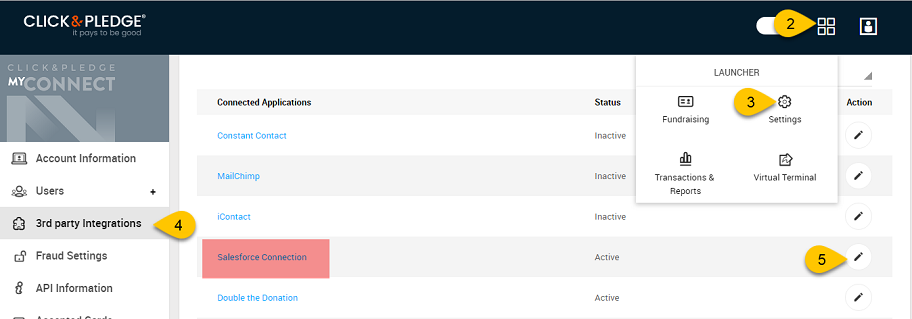
Login to your Connect account and click Launcher > Settings > 3rd party Integrations and Edit (Pencil icon) Salesforce Connection.
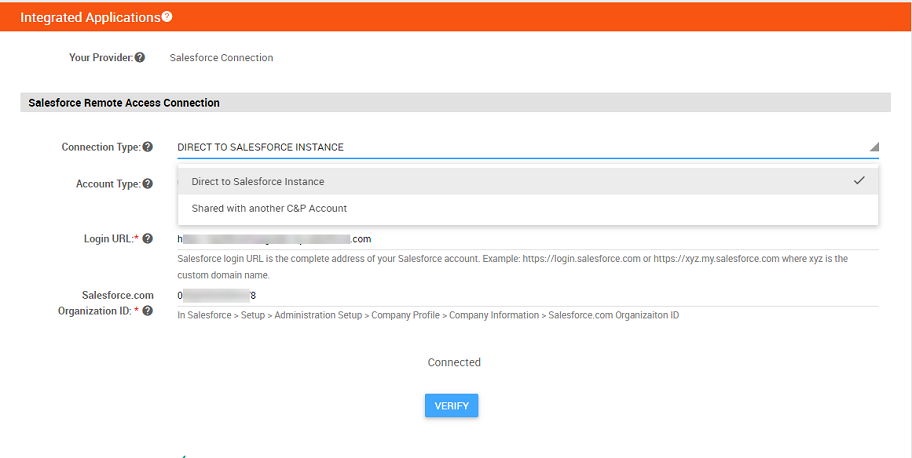
Connection Type: For multiple Connect Accounts only, this option will be available. set Connection Type for one account to 'Direct to Salesforce Instance', and any additional accounts to 'Shared with another C&P Account'
Account Type: Set Account Type to Production or Sandbox based upon the need. Production is nothing but Live and Sandbox is for Testing.
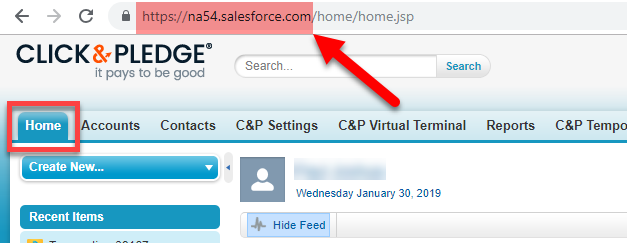
Login URL: Enter your Login URL. To know yours, login to your salesforce instance and click 'Home' to copy your login URL.
Salesforce.com Organization ID: To know your Organization ID, go to Setup > Administration Setup > Company Profile > Company Information > Salesforce.com Organization ID. Enter the Org ID and click Verify.After you Click on Verify: The browser will redirect to Salesforce allowing you to login to your Salesforce instance. Login using a System Administrator Salesforce user account. Once logged-in, a prompt will appear for allowing Click & Pledge to connect . Click on Allow.
Note: The login you use will be the Owner for all records created by Click&Pledge. To change the owner in Salesforce, return to this screen and login as a different user.
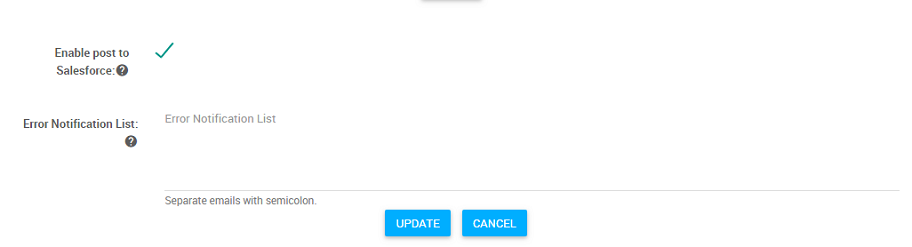
Enable post to Salesforce: Enable the checkbox to post the data to Salesforce.
Error Notification List: Enter email addresses that should receive notice if a problem occurs with the salesforce connection.
Second Step: Embedded Virtual Terminal Creation

Step 1: Click on the “C&P Embedded Virtual Terminal” tab. You will find the C&P Embedded Virtual Terminal under the Vault tab, which is located at the top right corner. Click on the 9 dots.
Step 2: Click on “New” to create one Embedded Virtual Terminal.
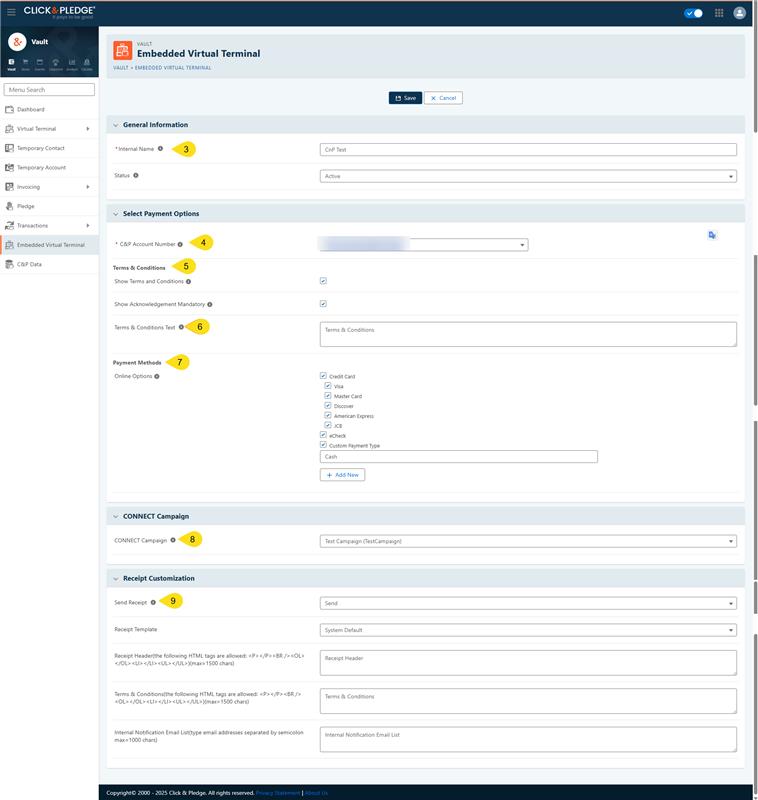
Step 3: Internal Name: Enter the desired Internal name.
Step 4: C&P Account Number: Select the desired C&P Account number from the drop-down menu.
NOTE: The drop-down menu will appear only when you have more than one C&P Account.
Step 5: Terms & Conditions:
Show Terms & Conditions: If this checkbox is enabled then terms & conditions will be displayed in the external page and vice versa.
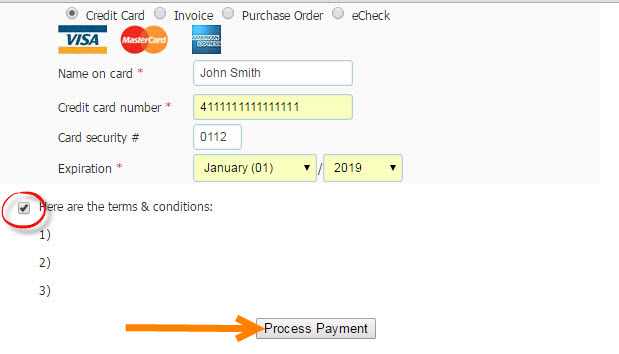
Show Acknowledgement Mandatory: If this checkbox is enabled then a checkbox will appear before Terms & Conditions in an external page. Only after enabling this checkbox, Process Payment button will be enabled.
Step 6: Terms & Conditions Text: The text which is entered here will be displayed in the external page (Only if the checkbox for “Show Terms & Conditions” is enabled in Step: 5).
Step 7: Payment Methods: Enable the checkbox for online payments to which you opted to display in the external page.
Step 8: CONNECT Campaign: Select the desired CONNECT Campaign from the drop-down menu.
Step 9: Receipt Customization: Whatever text given here will be seen in receipt mail.
NOTE: Receipt does not support images in the body of the text.
Step 10: After entering all the details, click on “Save” button. You will find “Base URL” in Page Information.
Third Step: Custom Settings
Login to Salesforce account and follow the path: Setup > App Setup > Develop > Custom Settings.
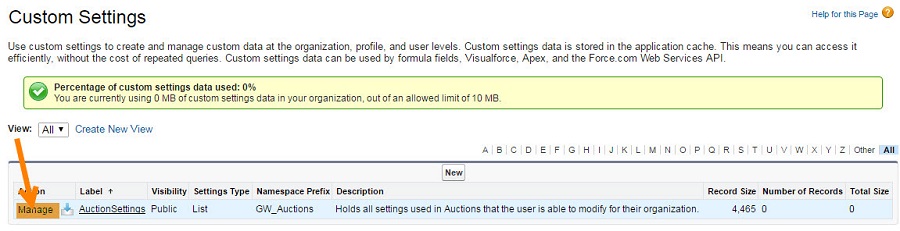
Click on “Manage” button then you will be redirected to the AuctionSettings page. Click on “New” button.

Step 1: Enter the desired name. It will be used when the custom settings data is referenced by Apex.
Step 2 & 3: Copy the URLs below and paste them under Step 2 & 3, ensuring you add the base URL to them.
Credit Card Validate URL Formula
https://paste-base-URL-of-your-instance/apex/CnP_Auction_Payment?SFContactID={0}&OppIDs={6}&b1=Auction%20Validation%20Only&up1=0&PreAuth=1
Credit Card Charge URL Formula
https://paste-base-URL-of-your-instance/apex/CnP_Auction_Payment?SFContactID={0}&OppIDs={6}&b1=Auction%20Purchases&up1={2}
Example:
Step 4: Opportunity Payment Method Field: It helps to know which payment type (Credit Card, eCheck, Cash) is using.
If the user has the NPSP they should leave it blank, and Auctions for Salesforce will automatically save the payment method on the Payments object (if they have NPSP payments enabled).
If the user is not using NPSP then follow the below procedure to know the Opportunity Payment Method Field: Login to the Salesforce account then Setup > App Setup > Customize > Opportunities > Fields > Opportunity Custom Fields & Relationships > New
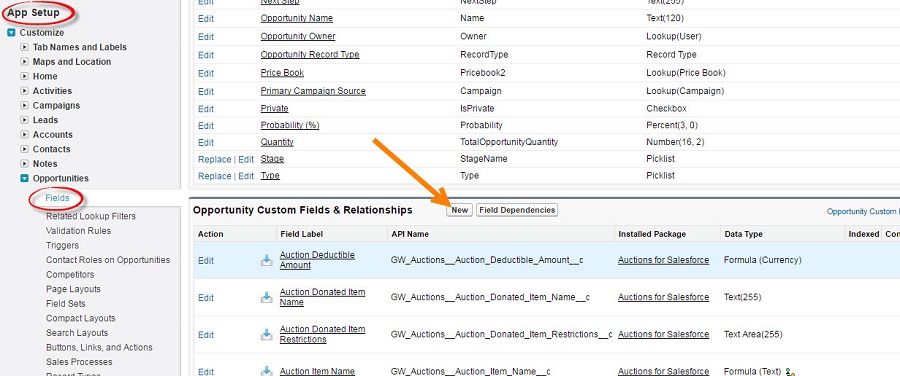
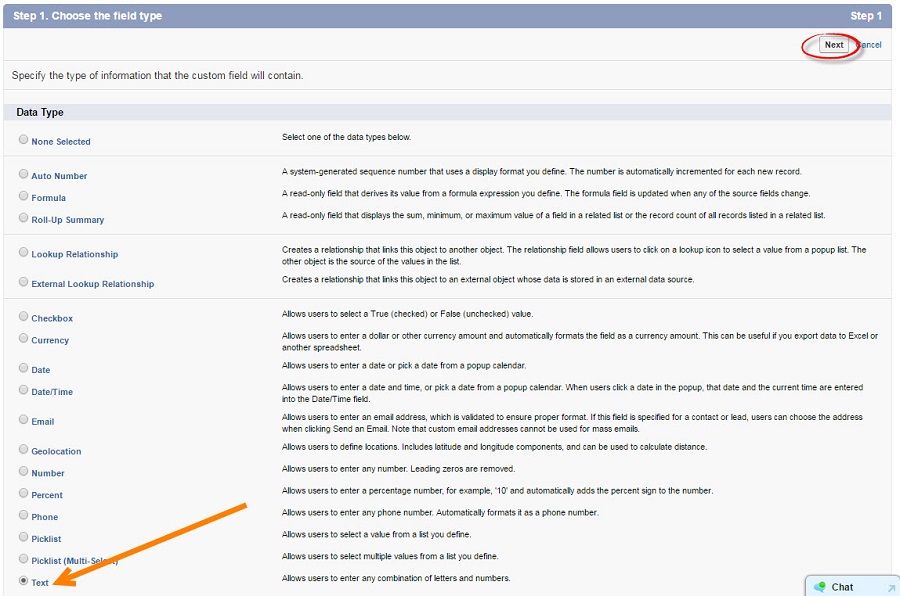
Step 4.1: Choose the field type
Select “Text” data type and click on “Next” button.
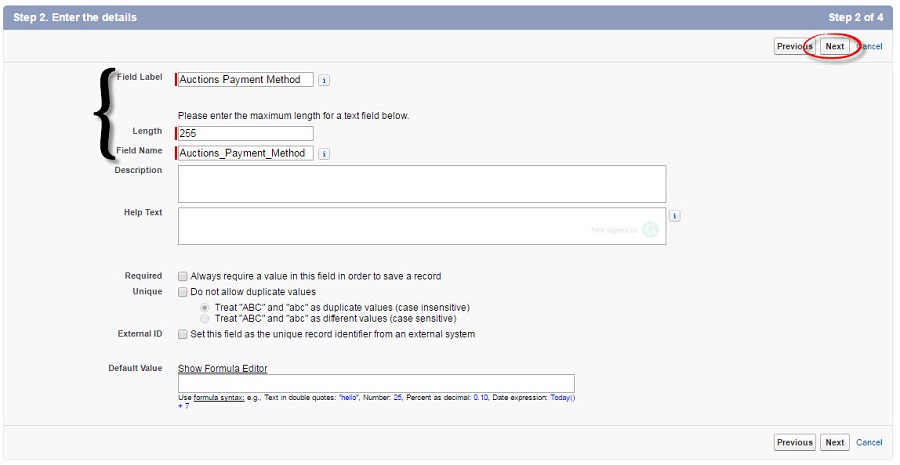
Step 4.2: Enter the details
Enter the desired field label. Make sure that the length should not exceed 255. The field label will be automatically considered as its field name.
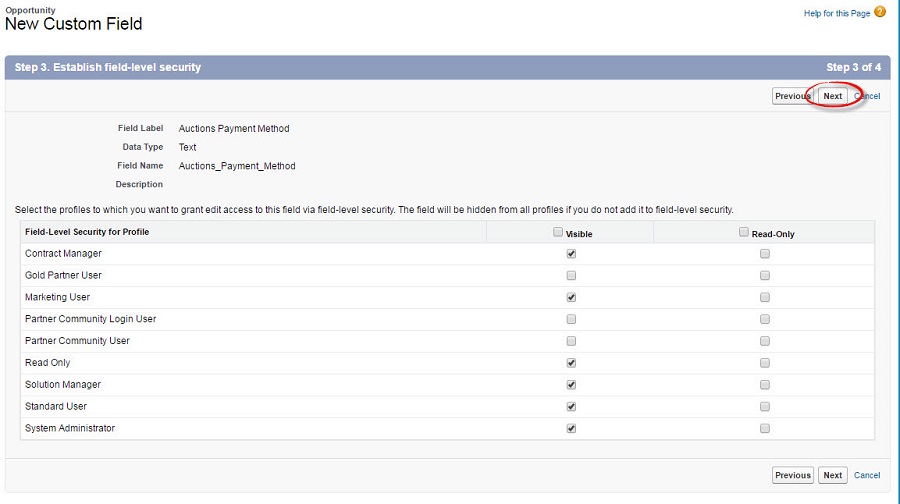
Step 4.3: Establish field-level security
Just click on “Next” button to advance to the final step.
Step 4.4: Add to page layouts
Click on “Save” button to save the settings.
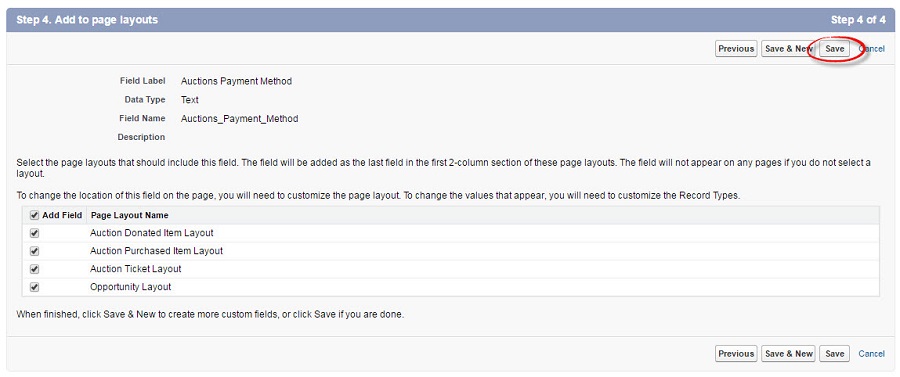
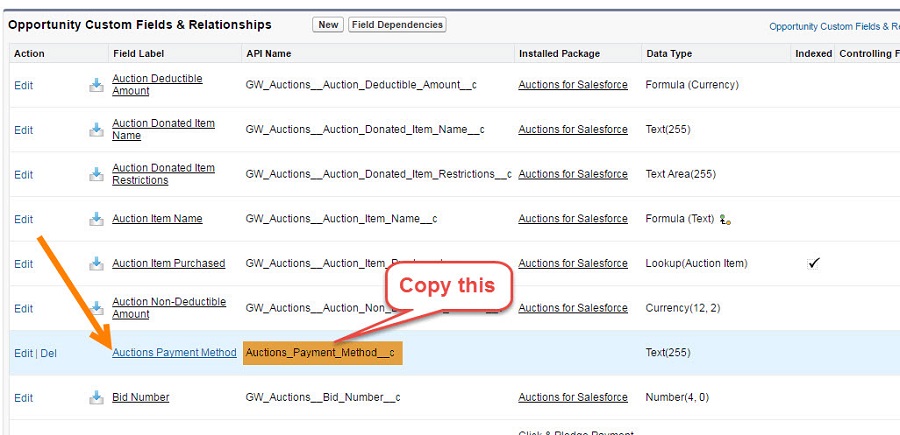
After clicking on “Save” button, you will be redirected to the “Opportunity Fields” page. Scroll down to find “Opportunity Custom Fields & Relationships” tab and you will find the newly created field label. Copy the “API name” and paste it in the “AuctionSettings Edit” page.
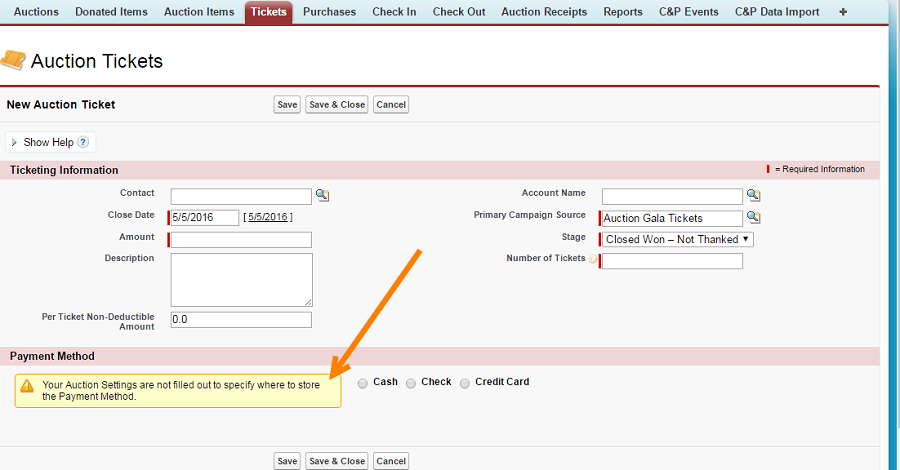
NOTE: If Opportunity Payment Method Field is empty then you will see the following error.
NOTE: If they want to track Payment Method on some other custom related object, they can't do it directly. Ie, A4S won't know how to write to a related record. They would need to have a custom field on Opportunity, which they specify as described above, and then they could use their own flow, process, or trigger to copy their Opportunity Payment Method field to their related object.
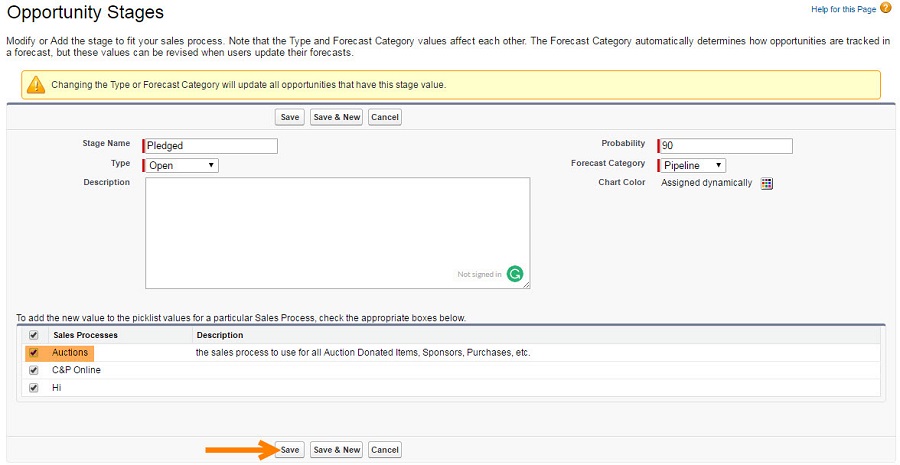
Step 5: Opportunity Stage Pledged: This opportunity stage will be used when the auction purchases are pledged, but not yet paid.
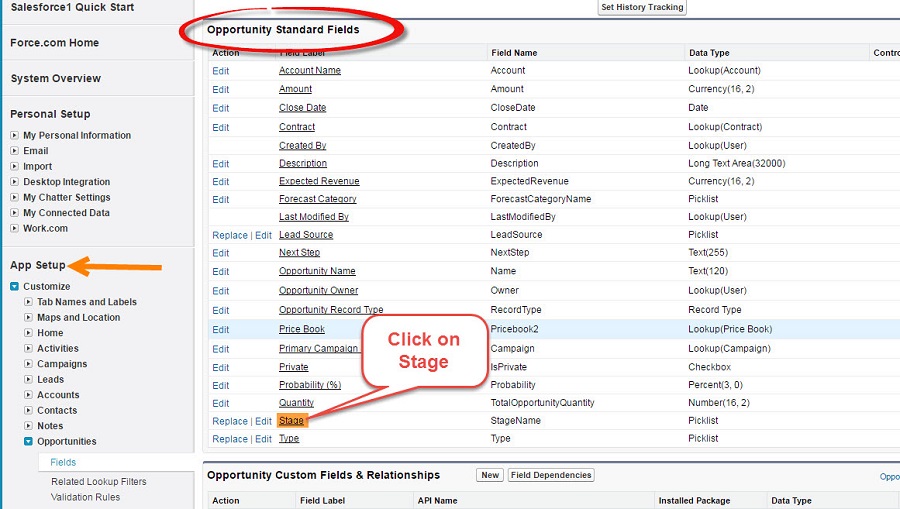
To see whether the stage name is correct or not, follow these steps: Setup > App Setup > Customize > Opportunity > Fields > Opportunity Standard Fields > Stage (Click on Stage) > Opportunity Stages Picklist Values. You will find the “Pledged” under Stage name category.
NOTE: Check whether the spelling “Pledged” in Opportunity Stages Picklist values and AuctionSettings Edit page is same.
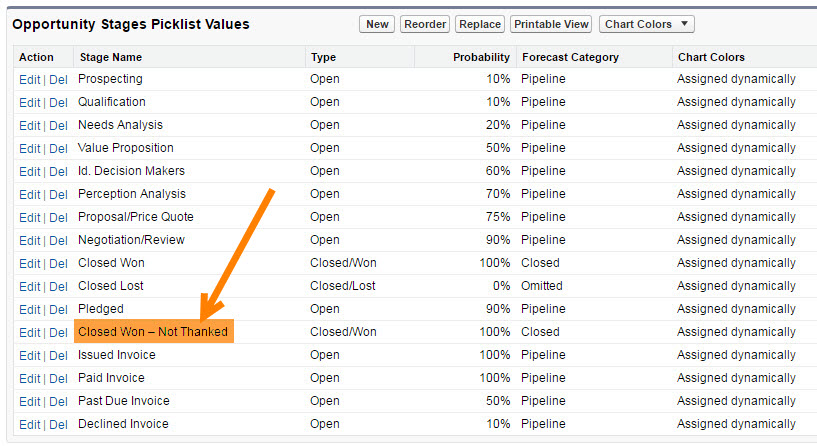
Step 6: Opportunity Stage Won Not Thanked: This opportunity stage will be used when the opportunities are paid but not thanked.
Follow the Step 5 guidelines to check whether the name is same in both Opportunity Stages Picklist Values and AuctionSettings Edit page.
NOTE: Make sure that the Hyphen size is same. It is recommended to copy the stage name from the Opportunity Stages Picklist Values and paste it in the AuctionSettings Edit page.
NOTE: There are two scenarios in which Pledged & Closed Won stages will not appear.
Case 1: When the stage is not even created in Salesforce:
To create stages follow this path: Setup > App Setup > Customize > Opportunities > Fields > Opportunity Standard Fields > Stage (Click on it) > Opportunity Stages Picklist Values > New
Enter the appropriate values to create a new stage. Make sure that the stage is added to Auctions in “Sales Processes” and click on “Save” button.
NOTE: If this is the scenario then no need to go for the Case: 2.
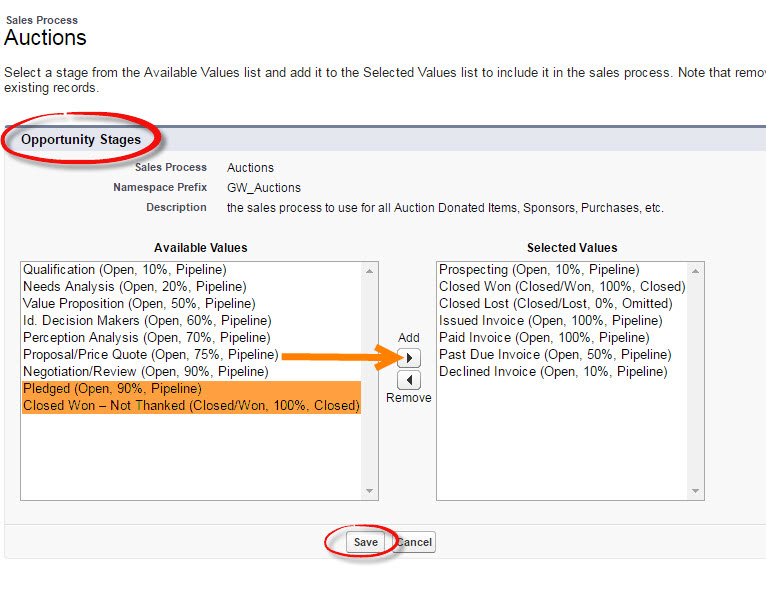
Case 2: when these stages were created but not added into Sales Processes of Opportunity from Salesforce:
If you want to see whether it is already created in Salesforce or not then follows this path: Setup > App Setup > Customize > Opportunities > Sales Processes > Auctions (Click on Auctions) > Opportunity Stages.
Select “Pledged” & “Closed Won – Not Thanked” from “Available Stages” section and click on “Add” button. Then those two will come under “Selected Values” section. Then click on “Save” button then these two stages will appear on the Auctions page.
Step 7: After entering the details, click on “Save” button to save the Custom Settings.
NOTE: If you need any support in installation process, please raise a ticket in the forum and grant us the access.
 Uploading ....