Home / Checkout Pages / easyPages

easyPages


easyPages are based on wizard driven checkout pages suitable for accepting donations (Classic & friend designs) or selling a single product with options in the case of the friendly design.  There are 2 types of easyPages:
Both designs follow a step-by-step wizard as discussed below:

easyPage wizard step 2
Page status:
  • Active:  All pages have to be active prior to accepting payment.  ONLY active pages process payments with "real" credit cards.
  • Inactive:  Inactive pages will display an inactive message and will NOT process any payments.  The checkout page will be replaced with an inactive message.
  • Test:  Designed to help with testing a checkout page prior to going live.  Test mode pages process test credit cards ONLY and will decline any number other than the test card [test credit card #:  4111111111111111 [4 and 15x1's], Expiration date:  any future date, CV2: any 3 digit number (e.g. 123).
  • Redirect:  Any checkout page may be redirected to any other checkout page.  Checkout pages are uniquely identified by WID (Window ID) and any page may be redirected to another WID by selecting redirect as its status.  Redirects are not limited to an account and pages may be redirected to checkout pages in other accounts.
Default page:
Addressing a checkout page is done through referring to its WID.  For example:  https://co.clickandpledge.com/default.aspx?wid=26867.  Through this URL a single checkout page with WID = 26867 will always be displayed.  Once the page is a DEFAULT page the same page may be addressed with account number:  https://co.clickandpledge.com/default.aspx?id=2447

Changing WID to ID and using the account number will show the page whose default page is set to true.  Changing the status of a page to default will rest the status of the previously set default page.  An advantage of using the default page is dynamic changing of the page without changing the link on the site.  The same link is capable of opening any page whose status is set to default.

Page title:
The title that appears in the browser's title area.  The name of the organization or 3-4 descriptive words are best suited for this field.

Select a campaign:
Campaigns are internal means of managing donations originating in specific pages.  A campaign may be created through the Campaign section with a set target as well as an effective period.  For example setting a target of $1000 to be raised between January 1, 2011 and ending February 1, 2011.  The campaign will start recording campaign name as part of the transaction at the start date and will end either when the target has reached or on the end date.

Cover sheet:
A PDF document with a size of up to 500 KB may be uploaded for each checkout page.  the cover sheet will be sent as attachment to all receipts originating from this checkout page.

Header image:
Header image appears as the banner for the checkout page.

Colors:
Various sections of the page may be customized with different colors as picked through the color picker.  Click on the "More Colors" icon and select the color that best matches your design.  Hex color values may also be entered.


-
easyPage wizard step 3
Donation Name:
Enter the name that appears above the donation field.
SKU:
SKU (Stock-Keeping Unit) may be added as unique identifier to donation. Must be alphanumeric and may include one or more hyphens. 
Section 1 -6:
The radio button options that appear in the donation area as shown below:
Classic design - donation area

Labels may be added to the form to replace the amounts.  If a label is added then the text shown in the label area will appear in the form as shown below.  When adding labels make sure to include the amount the option represents in the label area.

easyPage donation area with text label

Maximum Donation Amount:
Designed with political campaigns in mind, the maximum donation amount will not allow a donation to be processed if the amount entered exceeds the limit specified in this field.  The limit is enforced for the donation and not for the history of the donor.  Since users do not login to a specific account the system has no way of knowing if the person has donated before.

Select a recurring policy.
The default recurring policies may be customized in the "Recurring Policy" section of the portal [Account Info > Recurring Policy].  By default the recurring periods are:  2 weeks, 1 month, 2 months, quarter, 6 months, and year.  The pull down menu option offers the default policies as well as any customized policies defined in the Recurring Policy tab.


-
easyPage wizard - step 4 - friendly design
Step 4 applies to the Friendly design ONLY.

Products area:
The Friendly design offers the option for selling a single product with multiple options.  Step 4 customizes the products area as shown below:

Friendly design product area

Product Header Text: 

The title that appears above the product section.


Product Name:

The name that appears on the form, which identifies the product.


Header Image:

Product image (.gif or .jpg) will show in the product image area.


Product Description:

A short description of the product.


Add Product Option:

Price & tax deductible portion (optional). Each option should have a name and a price.


-
easyPages wizard step 5
Custom Questions:

Customized text boxes may include questions that you wish to ask your patron. Friendly easyPage allows for six custom form fields. Answering these questions may be optional or mandatory.

A few examples of questions are:

  • Employer & occupation; for political campaigns.

  • Graduating class; for reunion events.
  • Type of meal for events food services.

The questions, as well as their respective replies, will be included on the receipt and in the downloadable reports

The following sample area shows how the custom questions field will show in the checkout page. If a response is required, the patron must enter at least one character in the field before the payment can be finalized


Classic design custom questions


-
easyPage wizard - Step 6
Terms & Conditions / 3rd Party Integrations:
Terms & Conditions are most often used by political campaigns for satisfying Federal Election Commission campaign financing rules. The text entered in this field will display in the checkout page for the patron to read. If made required, the patron must acknowledge reading the text by marking a checkbox which is provided at the top of the text.

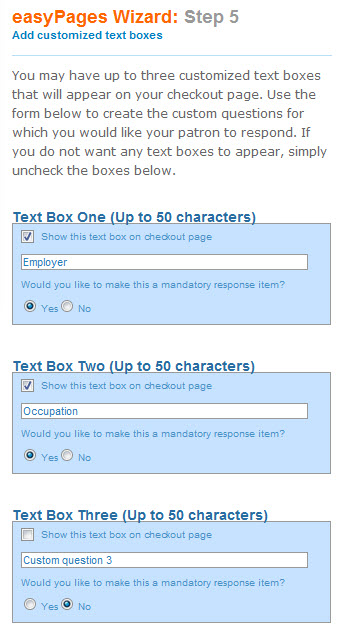
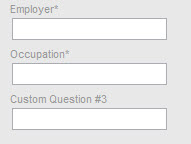
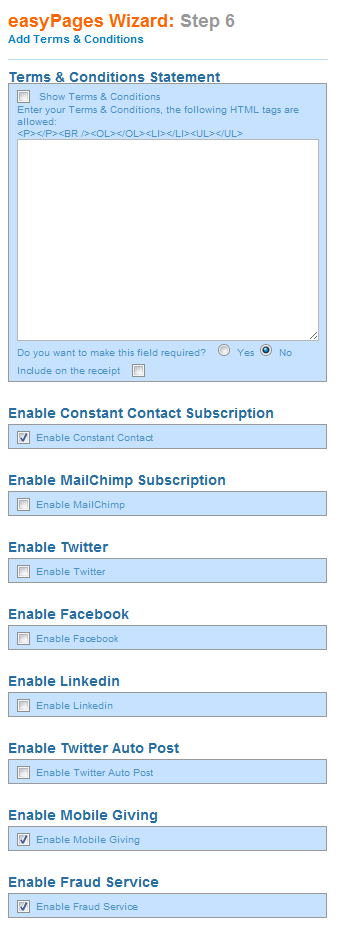
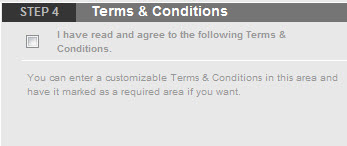
Show Terms & Conditions: If unchecked, the text will NOT appear on the checkout page. To have the text show on the checkout page, the box must be checked.

Do you want to make this field required? If yes is selected, the patron has to acknowledge that he/she has read the text by checking a box at the top of the form.

Include on the receipt:  If checked, the Terms & Conditions will be included in the email receipt.

The following section appears in the easyPage once the Terms & Conditions Statement is set to Show.

Terms & Conditions - Step 4

The following integration options are available for each checkout page.  Before any of the following appears in this section the appropriate account setting needs to be completed in the 3rd Party section of the Account Info section.

Constant Contact

Listed newsletters will appear as part of the checkout process.  Patrons may choose to subscribe to any or all of the newsletters.  Patron's name and email address will automatically post to the Constant Contact account listed in the 3rd Party tab.

MailChimp

Listed newsletters will appear as part of the checkout process.  Patrons may choose to subscribe to any or all of the newsletters.  Patron's name and email address will automatically post to the MailChimp account listed in the 3rd Party tab.

Salesforce

All donor information as well as purchase records will post to the Salesforce account listed in the 3rd Party tab.  Using the FREE Click & Pledge Donor Management module in AppExchange will empower Salesforce with a number of enhancements including reports, etc.  See the Salesforce Donor Management section for details.

Twitter

The preset message as set in the 3rd Party section will be posted to Twitter account.  A similar message will also post to the Click & Pledge Payment account at: http://twitter.com/clicknpledgeNow

Facebook

Links to the Facebook fan page as listed in the 3rd Party tab will be provided in the Thank You page once a payment authorizes.

LinkedIn

Links to the LinkedIn page as listed in the 3rd Party tab will be provided in the Thank You page once a payment authorizes.

Mobile Giving

Patrons may activate their mobile phones for future giving.  Mobile giving has to be enabled in the Account Info section prior to this option becoming available.

Fraud Service

Fraud service is activated by default.  It is highly recommended that this option stays enabled since a number of fraud algorithms will review each transaction for fraudulent patters.  Once disabled no fraud inspection will be performed on the transaction.


-
easyPage wizard - Step 7
Thank you Message:
The message that appears in the Thank you page as well as the receipt upon payment authorization.
Address / Organizational Information

The address information that appears in the receipt.  Each checkout page may be customized with a different address and organization information.

Notification Mailing List

Email address(es) that should receive a copy of the receipt for payments transacted on this checkout page.  This list is in addition to the global recipients of receipts as set in the Account Info section.


-


     RSS of this page