Requirements: - Gravity Forms requires a minimum of WordPress version 3.7+
Download:
NOTE 1: Default_Socket_Timeout should be more than 60 seconds.
Click & Pledge also supports Gravity Forms Populate Anything. For more information, click here. To know about pricing, click here.
Setup: - Go to ‘plugins->Installed Plugins’ enable the ‘Gravity Forms Click & Pledge’
Assigning From to process through Click & Pledge:
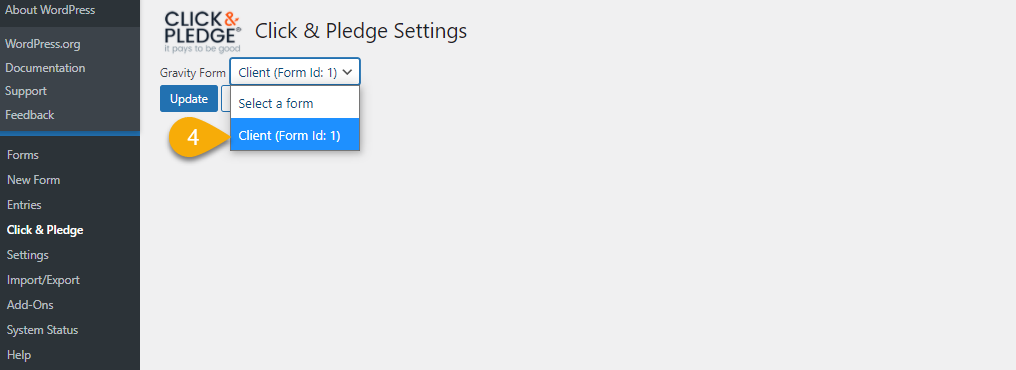
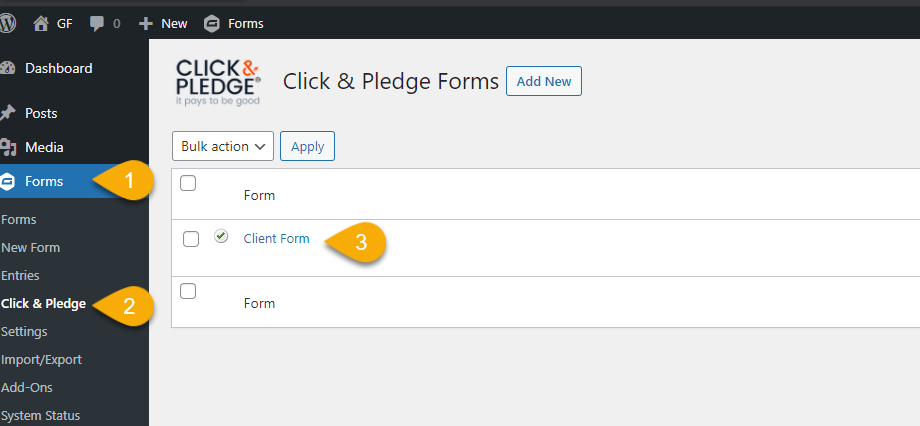
- Click on ‘Forms->Click & Pledge’ to display all available forms
- Select the ‘Gravity Form’ to process then click on ‘Save’ button
The settings which are made in this section will affect to the total gravity forms. To change the settings, follow the below steps:
- Login to Gravity Forms and click ‘Forms’.
- Click ‘Settings’.
- Select ‘Click & Pledge’.
NOTE: Detailed information is given under every field to follow.
We can login to new user directly with CONNECT platform through OAuth Connection. To do so, simply login with the desired CONNECT User Name.
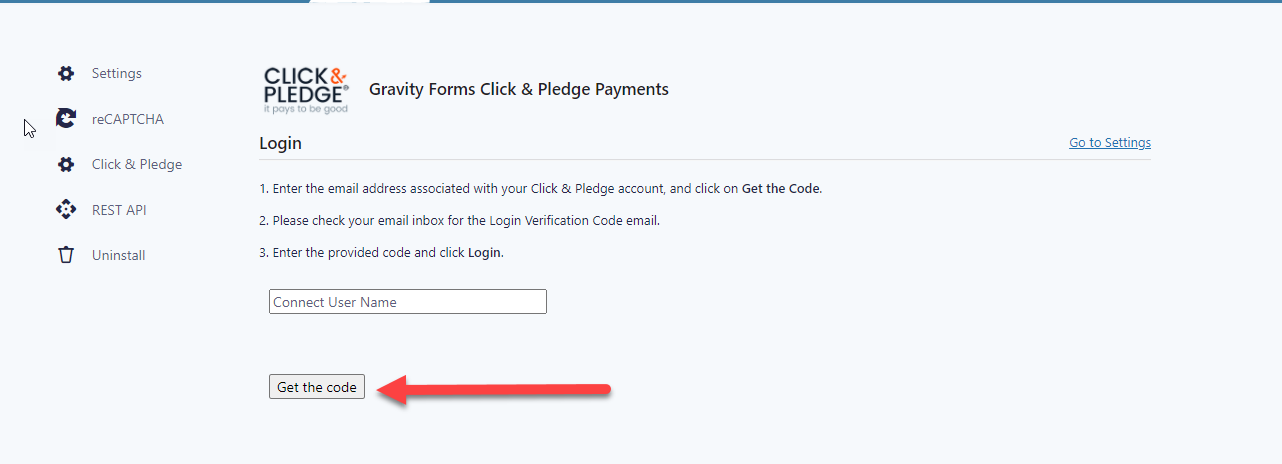
Enter the CONNECT User Name associated with your Click & Pledge account and click on Get the Code. Please check your email inbox for the email. Copy the Code.

Paste the copied code and click Login.

The CONNECT Payment settings will be replicated here. Only Custom Payment can be edited here. Please login to Portal and go to Account Info > Accepted Cards to enable the payment type settings. Enable/Disable Send Receipt to Patron to send/stop the default receipt to the patron. To send the custom receipt to the patron, add the CONNECT Campaign URL Alias to the form. To change the user, click on Change User.
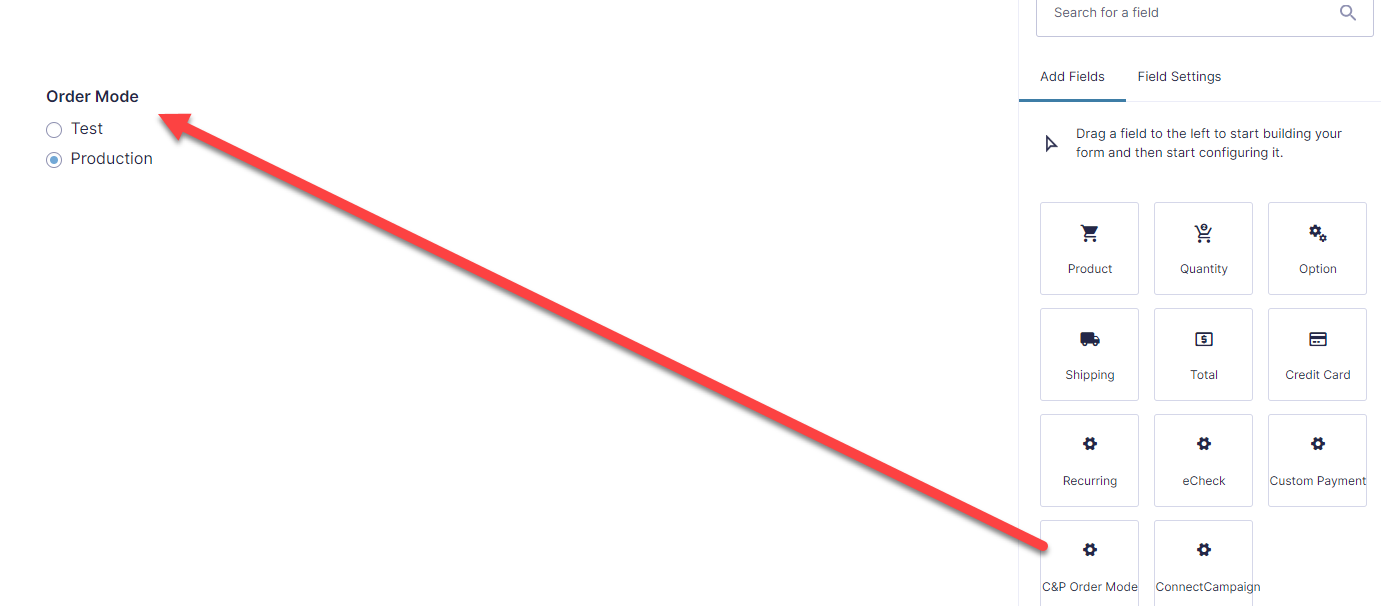
Adding C&P Order Mode to the Form
From version 3.700.000, C&P Order Mode is removed from the general settings. So, in order to test the form, drag and drop the ‘C&P Order Mode’ button from ‘Pricing Fields’ sections. Enter the field label, description and select the mode before updating the form.
Mode may be set either to Test or Production. Test mode is used to test the transactions. No amount will be deducted from the payment. Production mode is nothing but live payment form wherein the given amount will be deducted from the selected payment type.
NOTE: If C&P Order Mode is not selected, by default the mode is set to Production.
Setting SKU and GAU for a Product
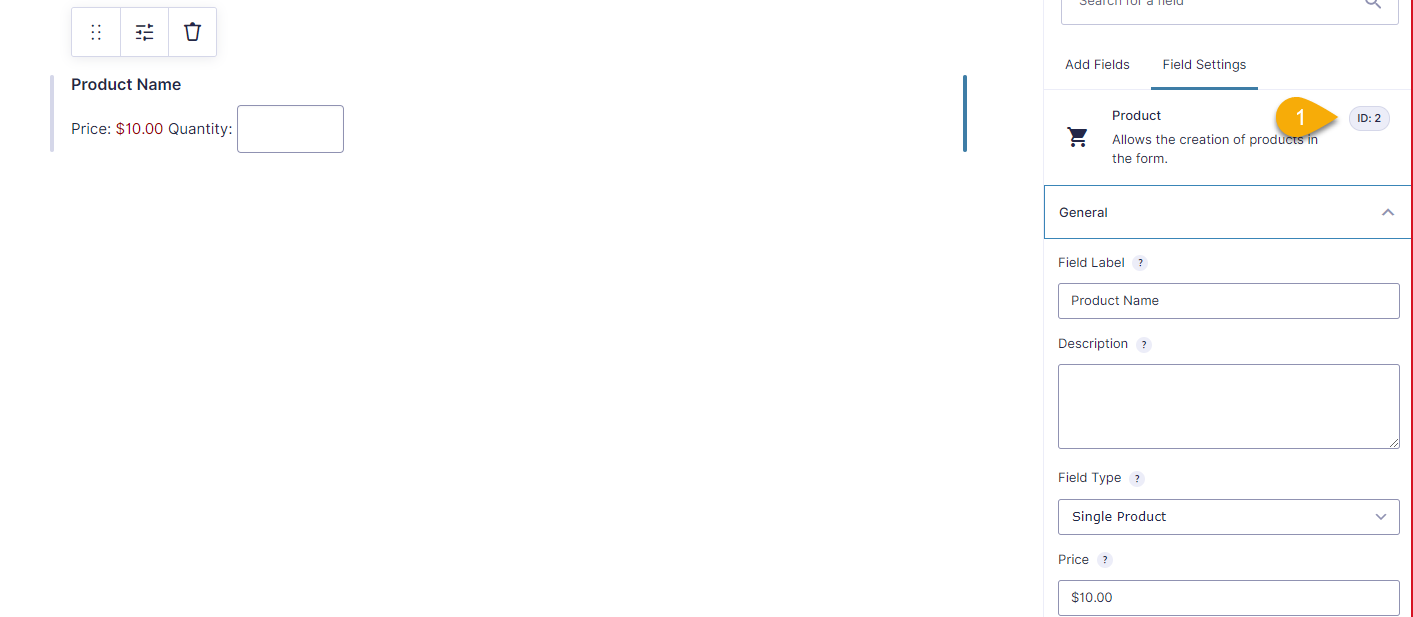
SKU's and GAU are added for each item and option as a hidden field. The following example shows how to add SKU to a single item as well as one with options. (The same process applies when assigning GAU.)
Example 1: T-Shirt with SKU=abc-123
Item definition:
NOTE: In the above example the Field id for the item is shown as: Field ID 2.
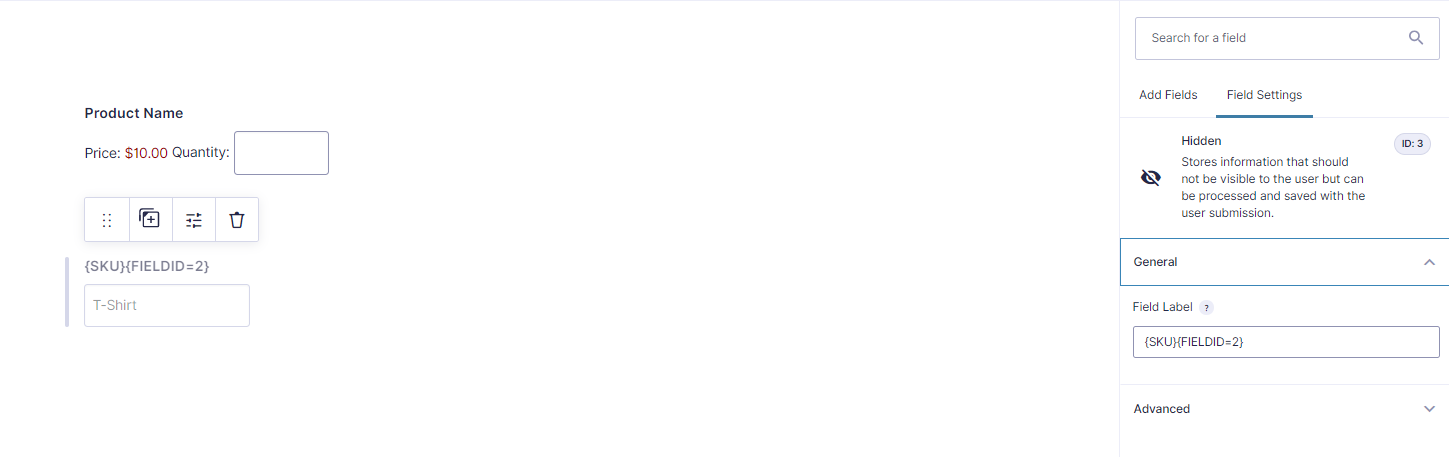
Add a hidden field:
Set up the hidden field referencing the Field ID as in the Product setting:
Properties field label: {SKU}{FIELDID=2} OR {GAU}{FIELDID=2} - Please note that all fields are case sensitive - SKU/GAU & FIELDID should be in all caps.
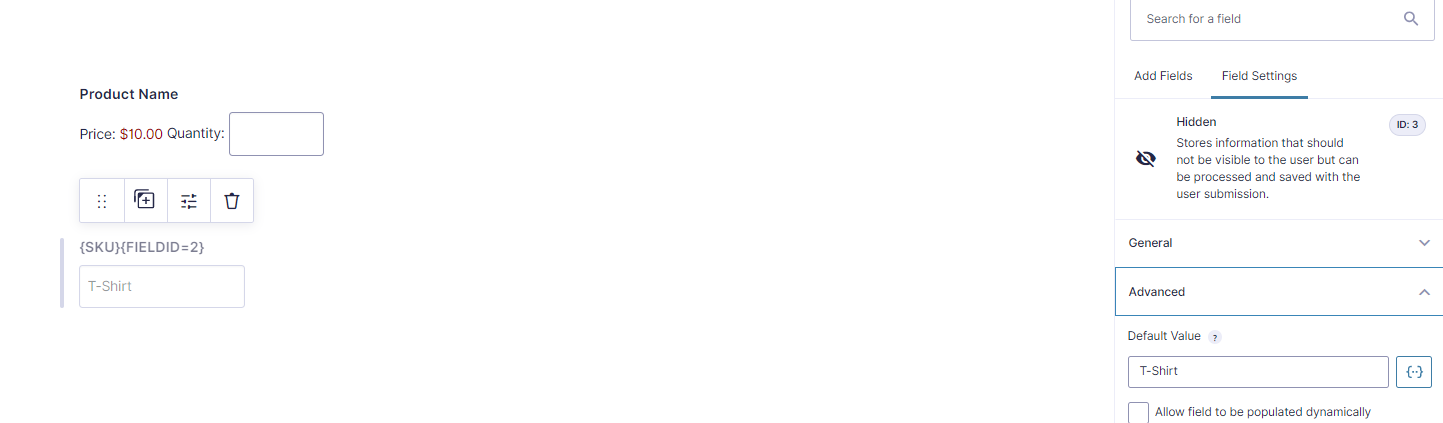
The Advanced tab is the value of the SKU.
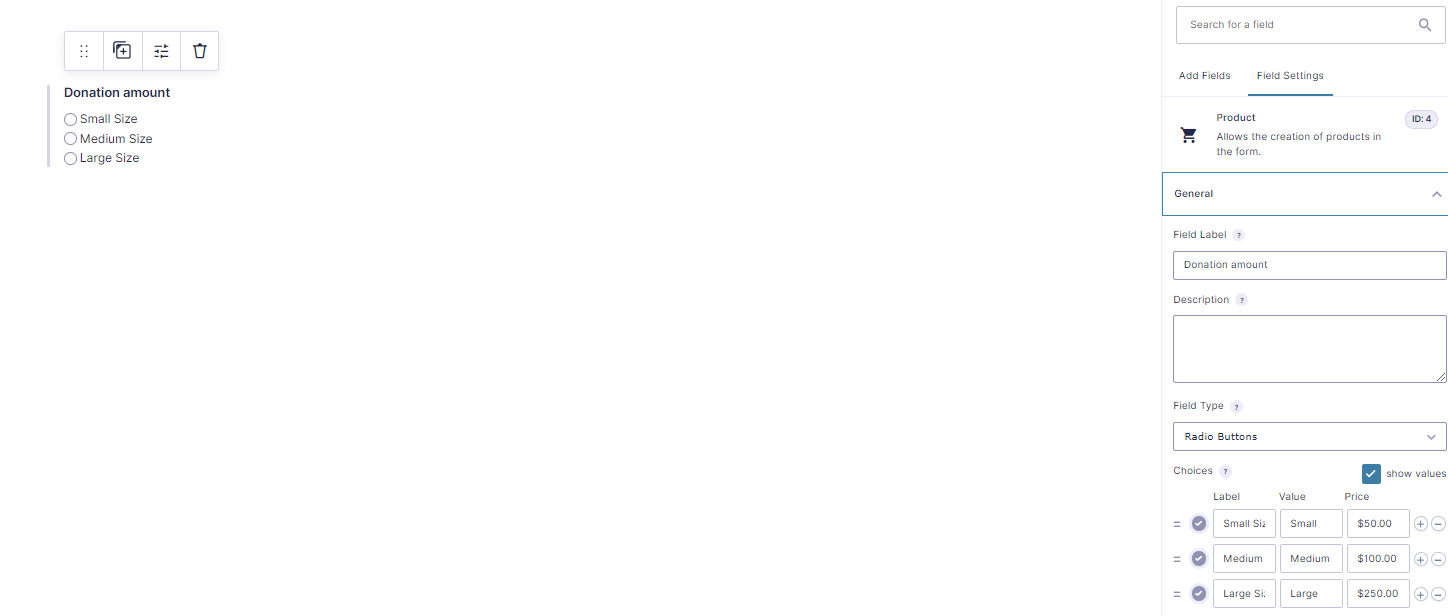
Example 2:
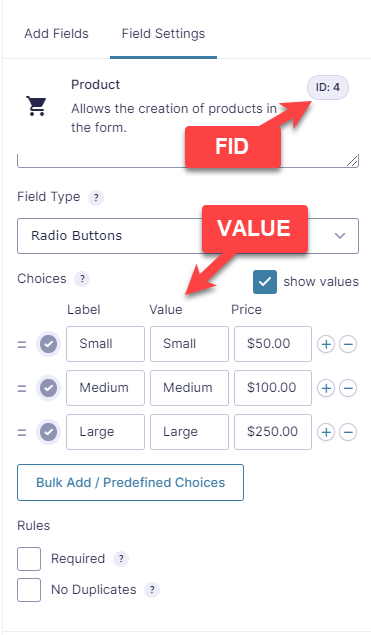
For products with options such as those listed in a pull down menu or a radio button, each option needs to be set up with an SKU. SKU's may be the same or different.
Hidden field format: {SKU}{FIELDID=fid}{OPTION=value}
- fid = Field ID of the product as listed in the Product listing
- value = Option's value- each option of a product has to be set up with a unique value and that value needs to be listed to identify the SKU's reference.
Each "Choice" requires a separate hidden field.
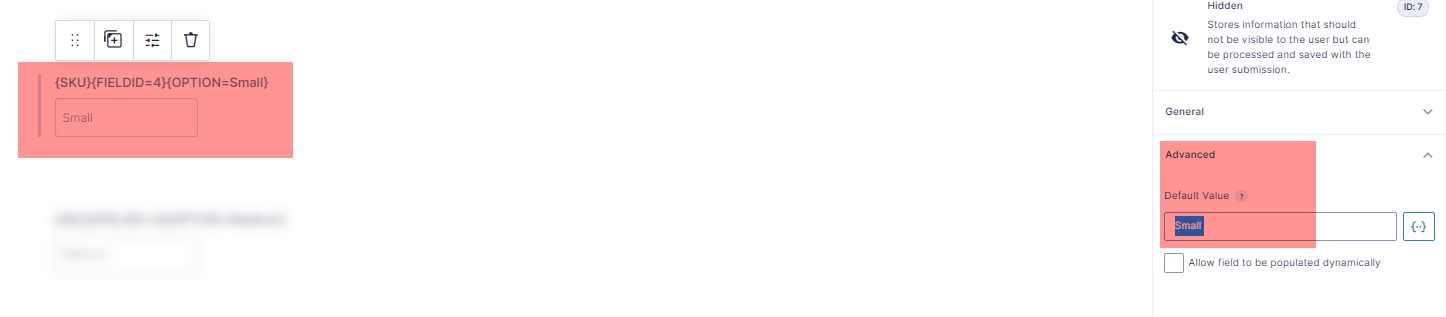
Option: Small
The field label: Reference the Field ID of the item as shown in the item's blue label area.
& the SKU value as set in the Advanced tab. SKU = Small
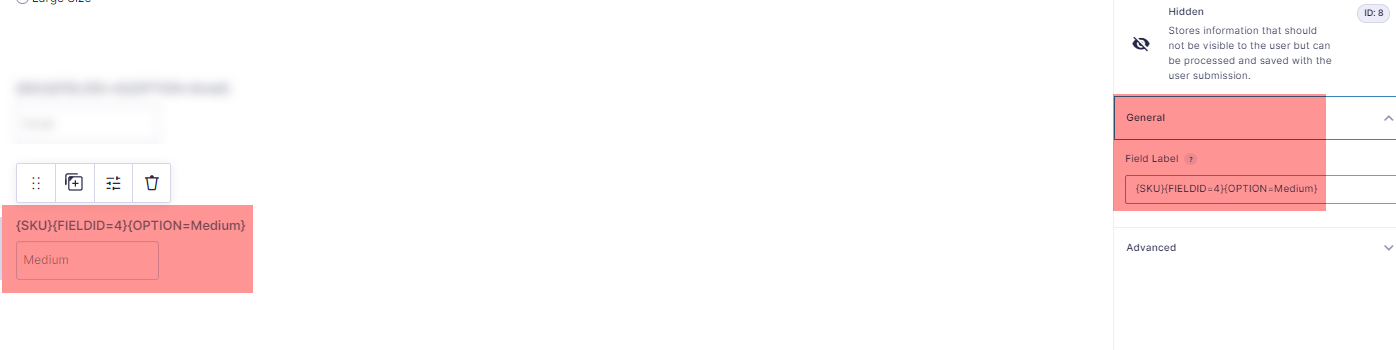
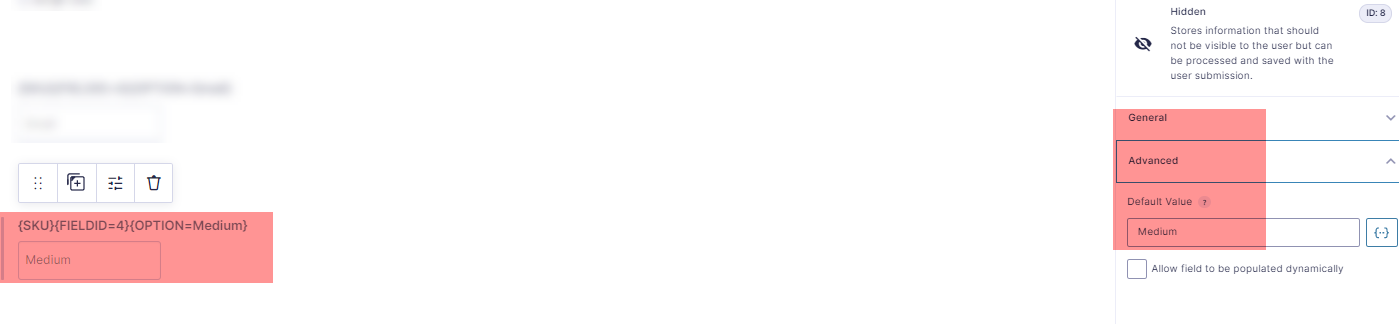
Option: Medium
& the SKU value as set in the Advanced tab. SKU = Medium
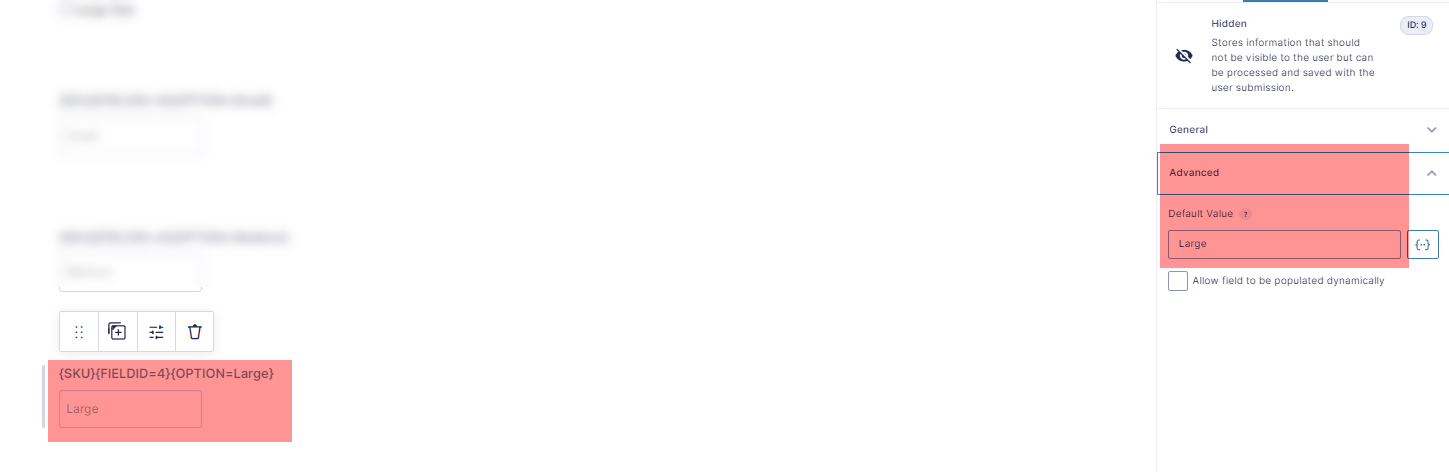
Option: Large
& the SKU value as set in the Advanced tab. SKU = Large
Assigning CONNECT Campaign URL Alias to the Form
Transactions will post to this selected Campaign. Campaign stats, fraud profile, receipt setting will all follow the assigned campaign settings.
To add the CONNECT Campaign URL Alias to the form::
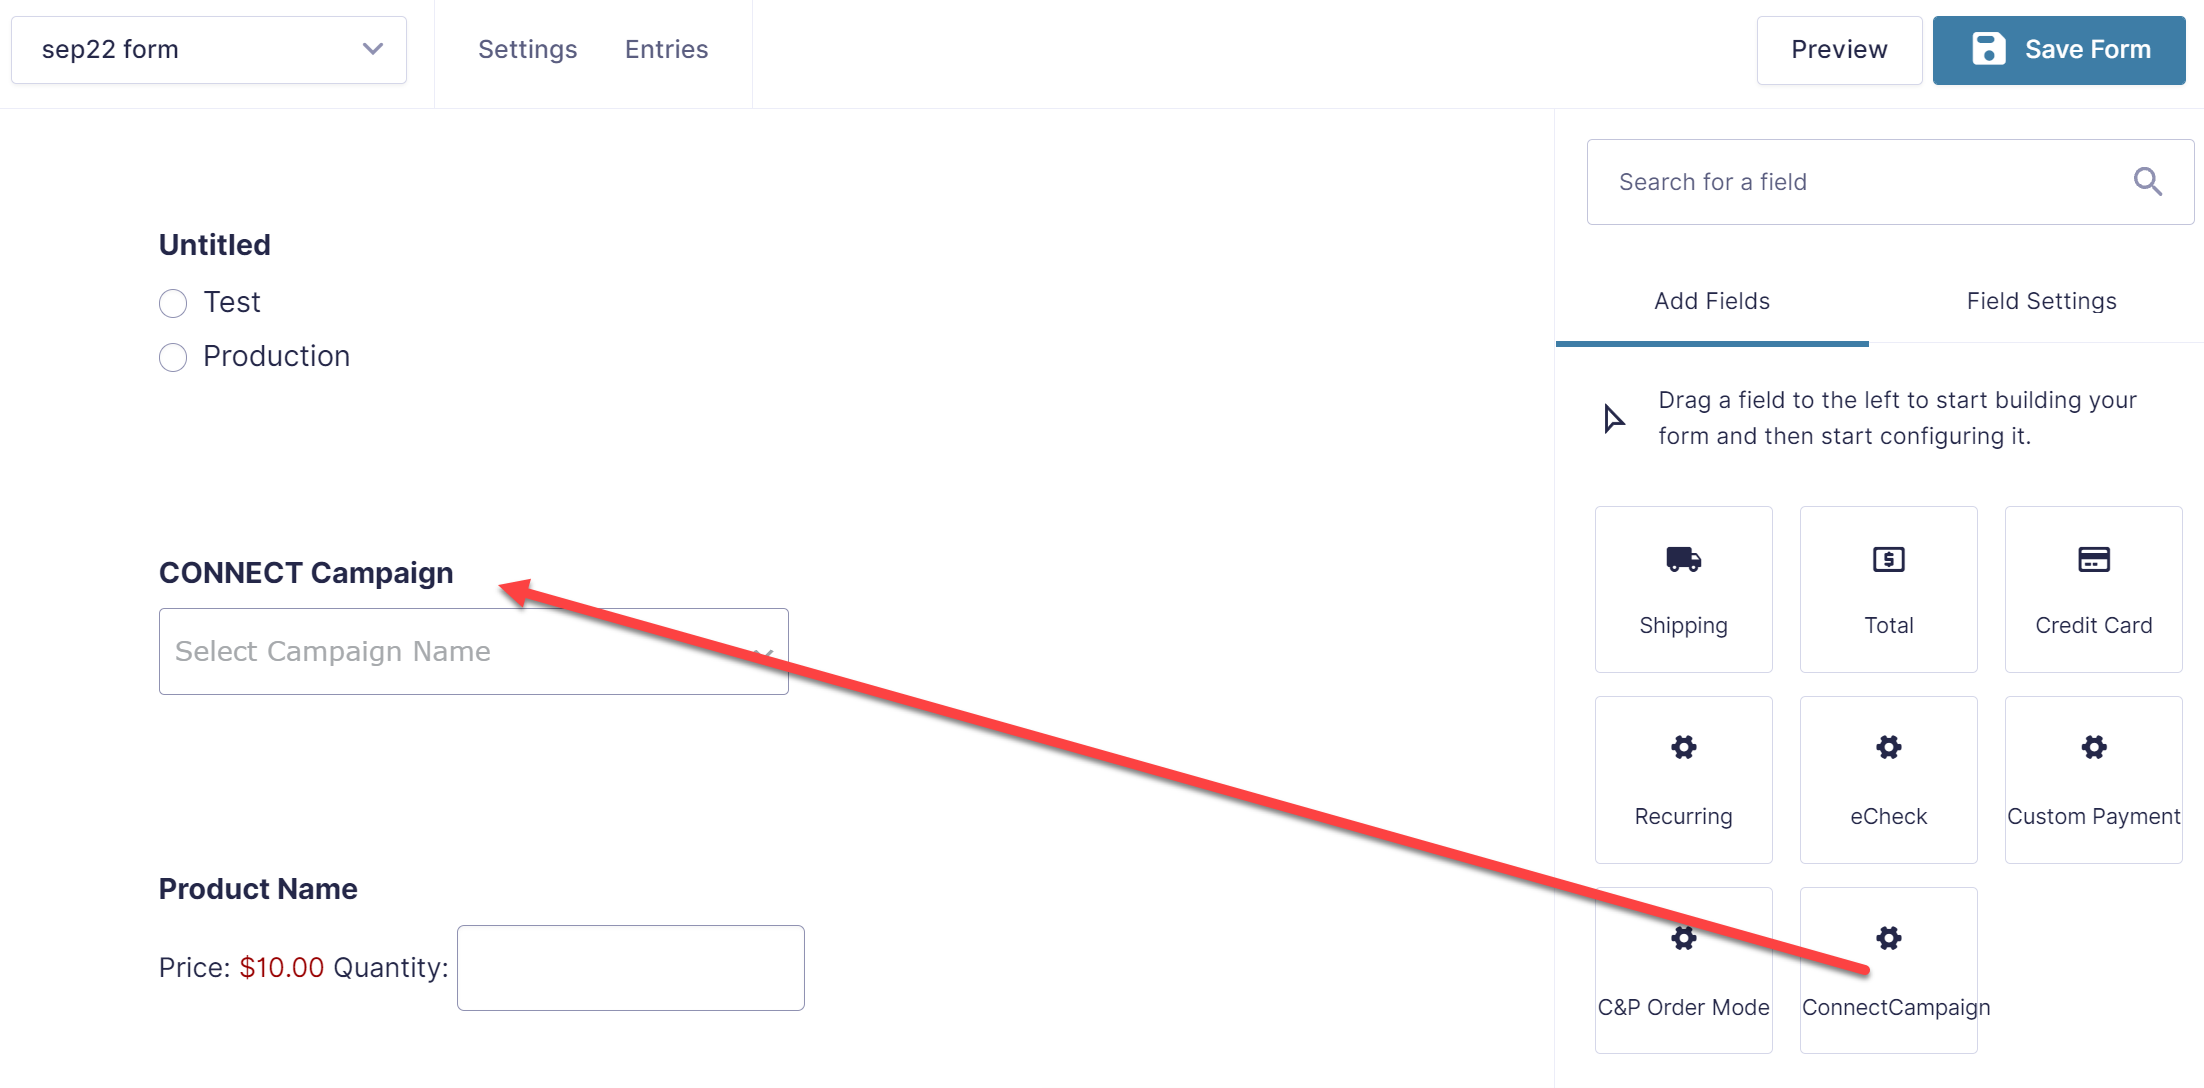
Adding CONNECT Campaign to the Form Editor
NOTE: Available from Click & Pledge Version 3.700.000 ONLY.
Step 1: From ‘Pricing Fields’ section, Drag and drop the ‘CONNECT Campaign’ field into the Form Editor.
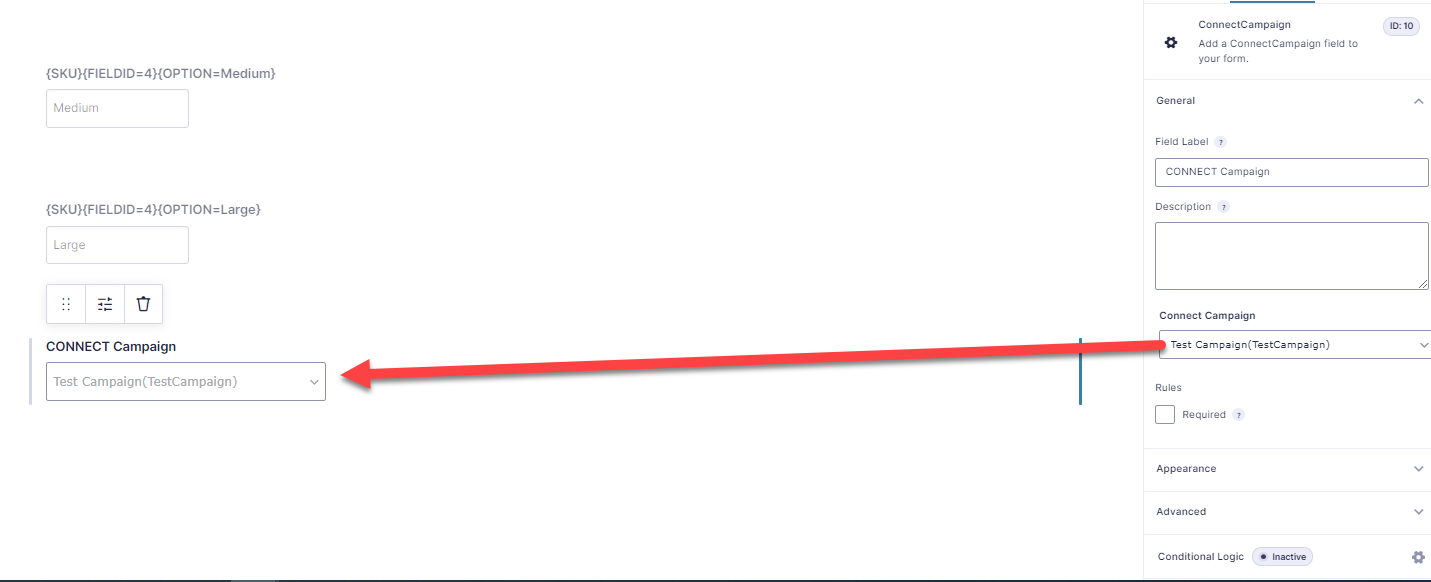
Step 2: Select CONNECT Campaign from the drop-down menu and click Update .
Custom Questions
The following fields are posted as custom questions:
The fields may be placed on the page and configured without any special considerations. The application will consider all the listed fields as custom questions by default.
Handling Donations when the option OTHER is selected
In the Donation page, If you are going to select the option “Other”, then please make sure to change these settings in the “Form Editor” page.
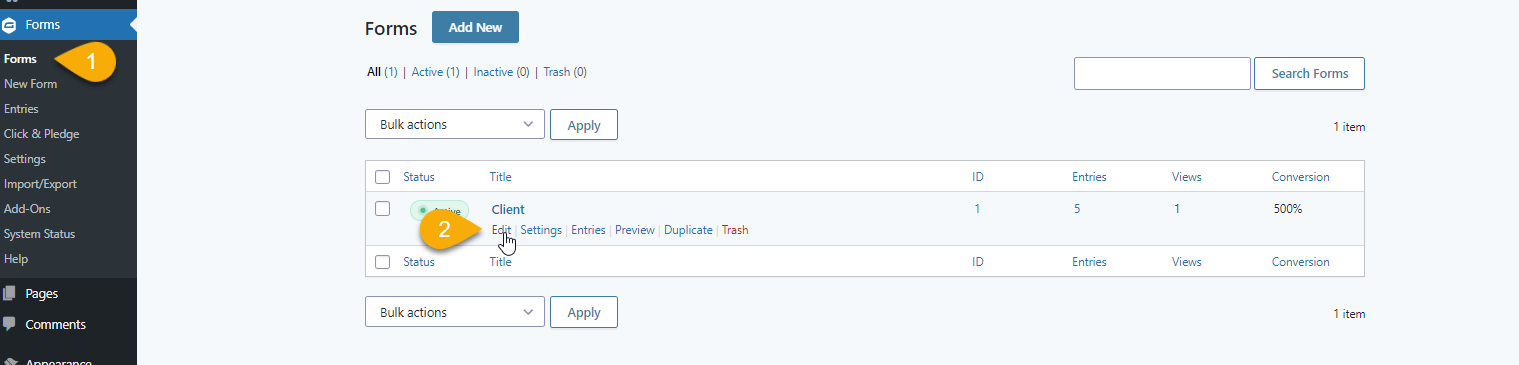
Step 1: Click on “Forms”.
Step 2: Select the Form name and click on “Edit”. It will redirect to the below screen.
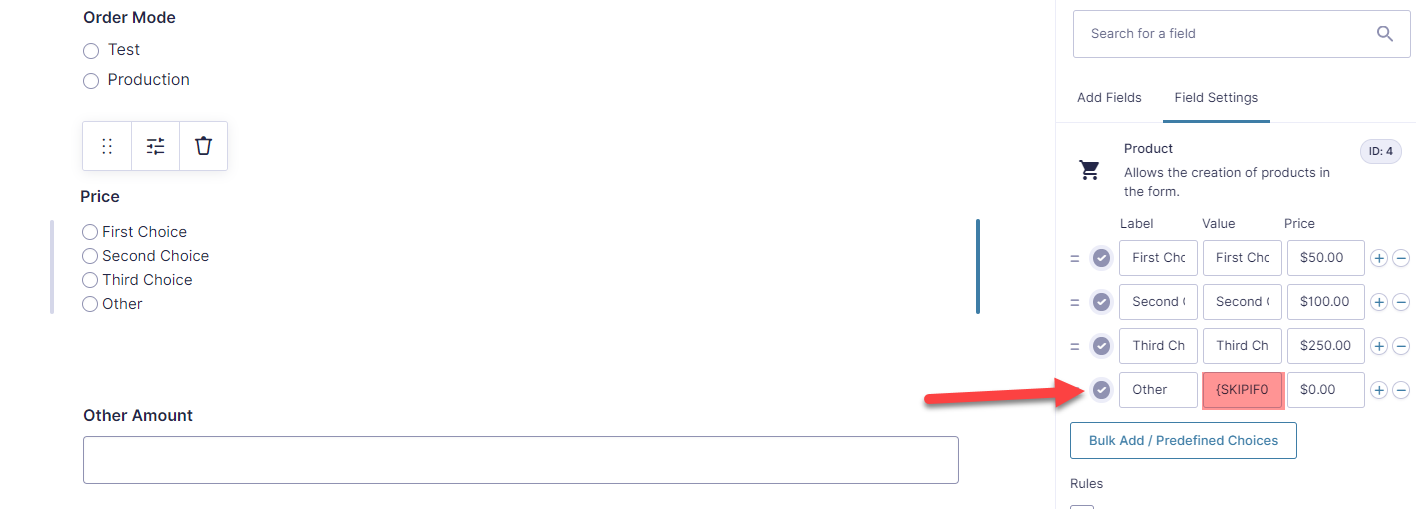
For the Label “Other”, change the Value to “{SKIPIF0}” so that it won’t post duplicate items to Salesforce Opportunity Object.
The Other field can be added by dragging it from Add Fields > Product from Pricing Fields as shown in the below Image:
Drag the Product:
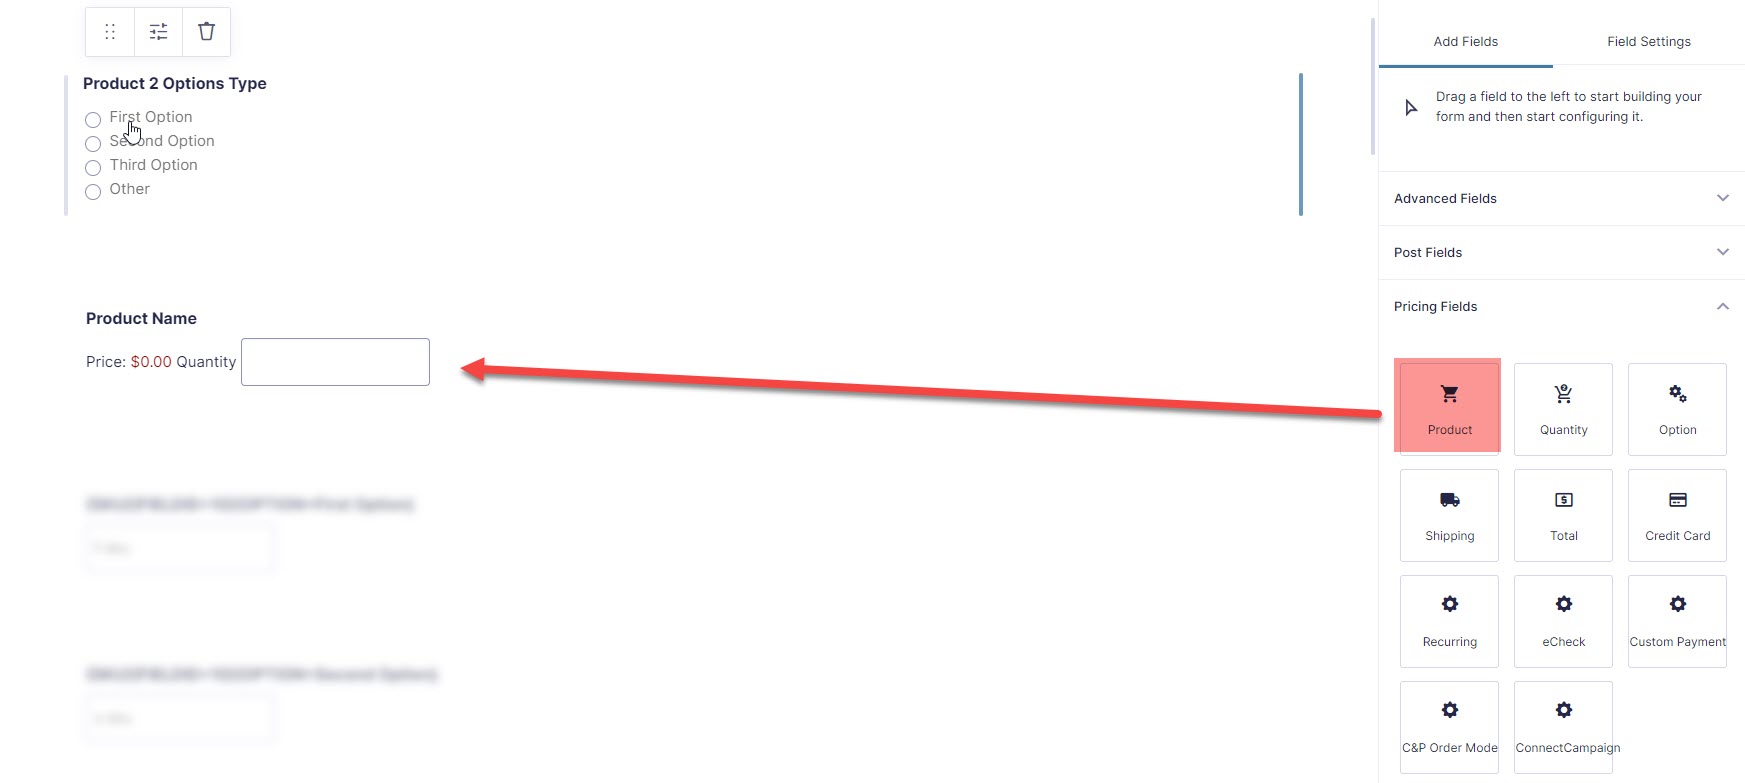
At Field Settings you need define the Field Label and Field Type.
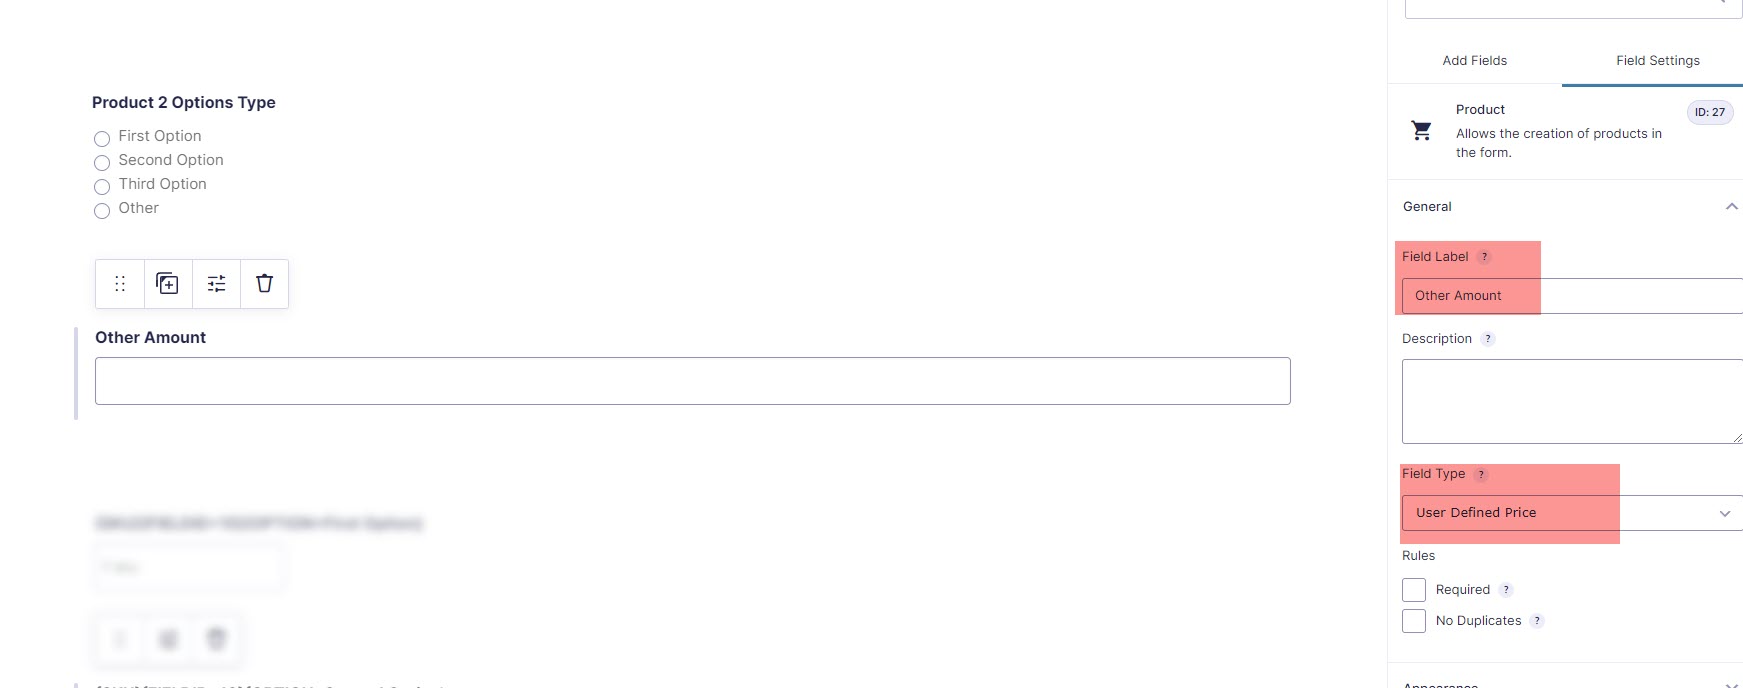
Please note that the Field Type should be "User Define Price".
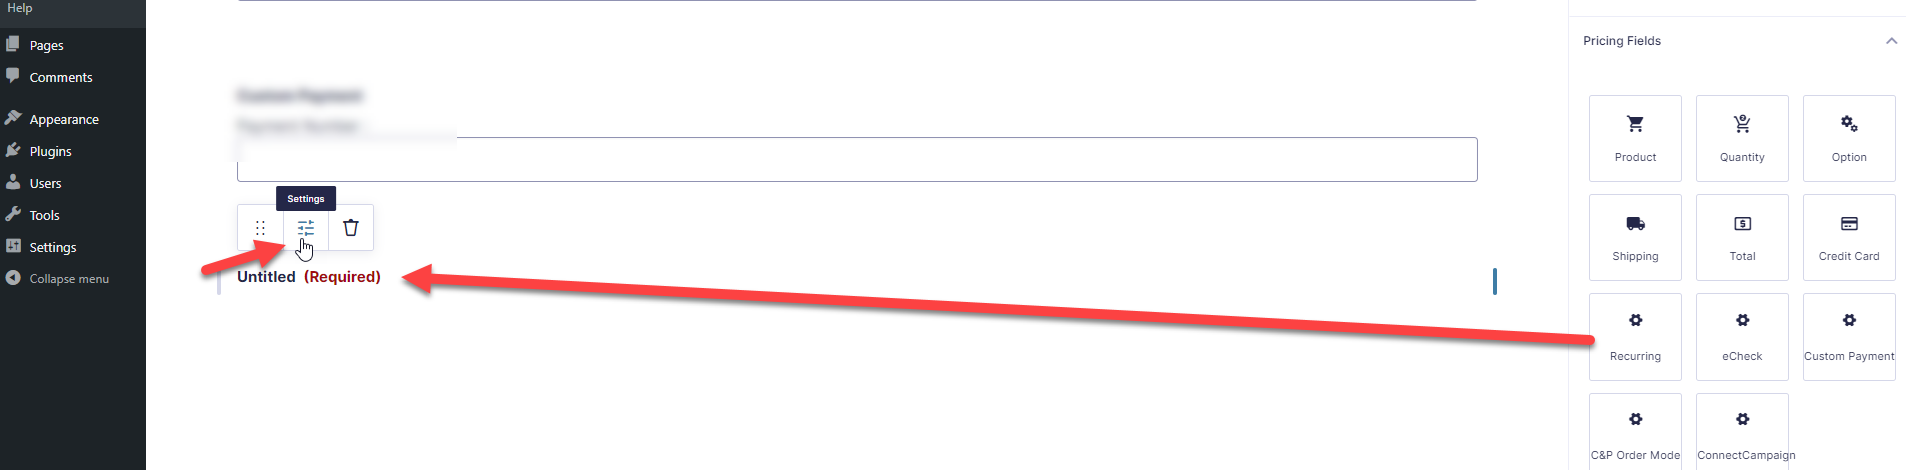
Label for Payment method when Payment methods are set to Conditional Logic
If there are multiple options for payment methods, please follow the below procedure to know how to set the conditional logic.
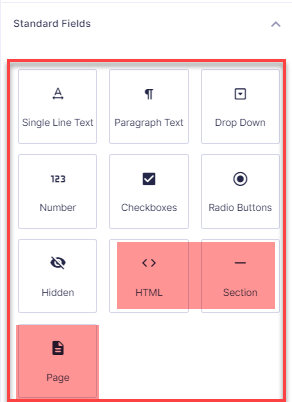
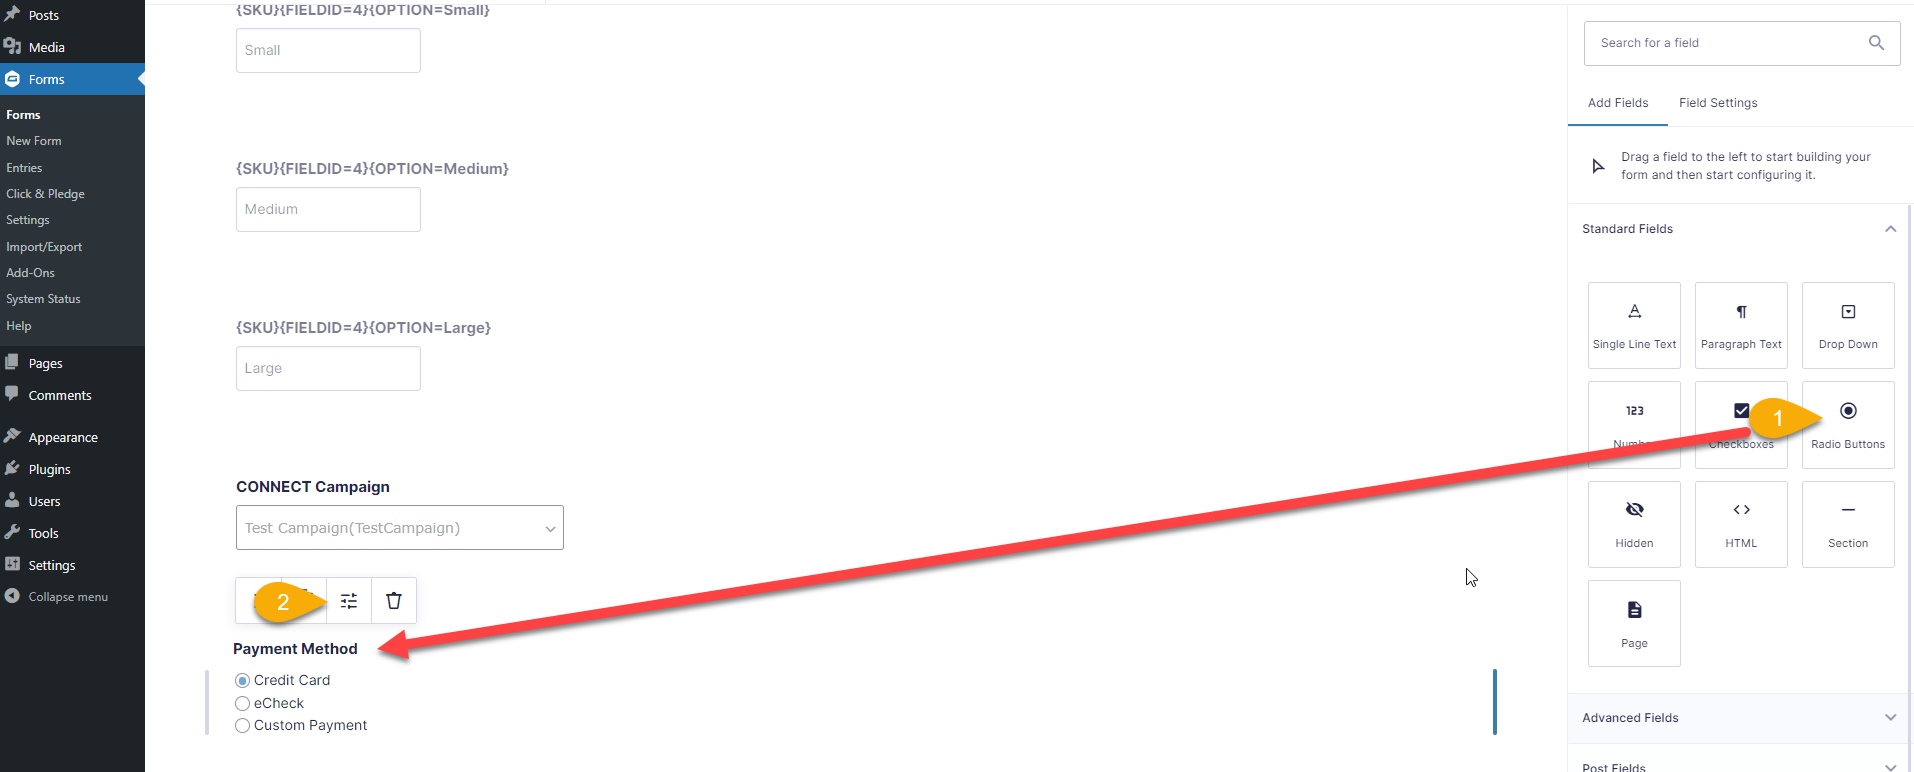
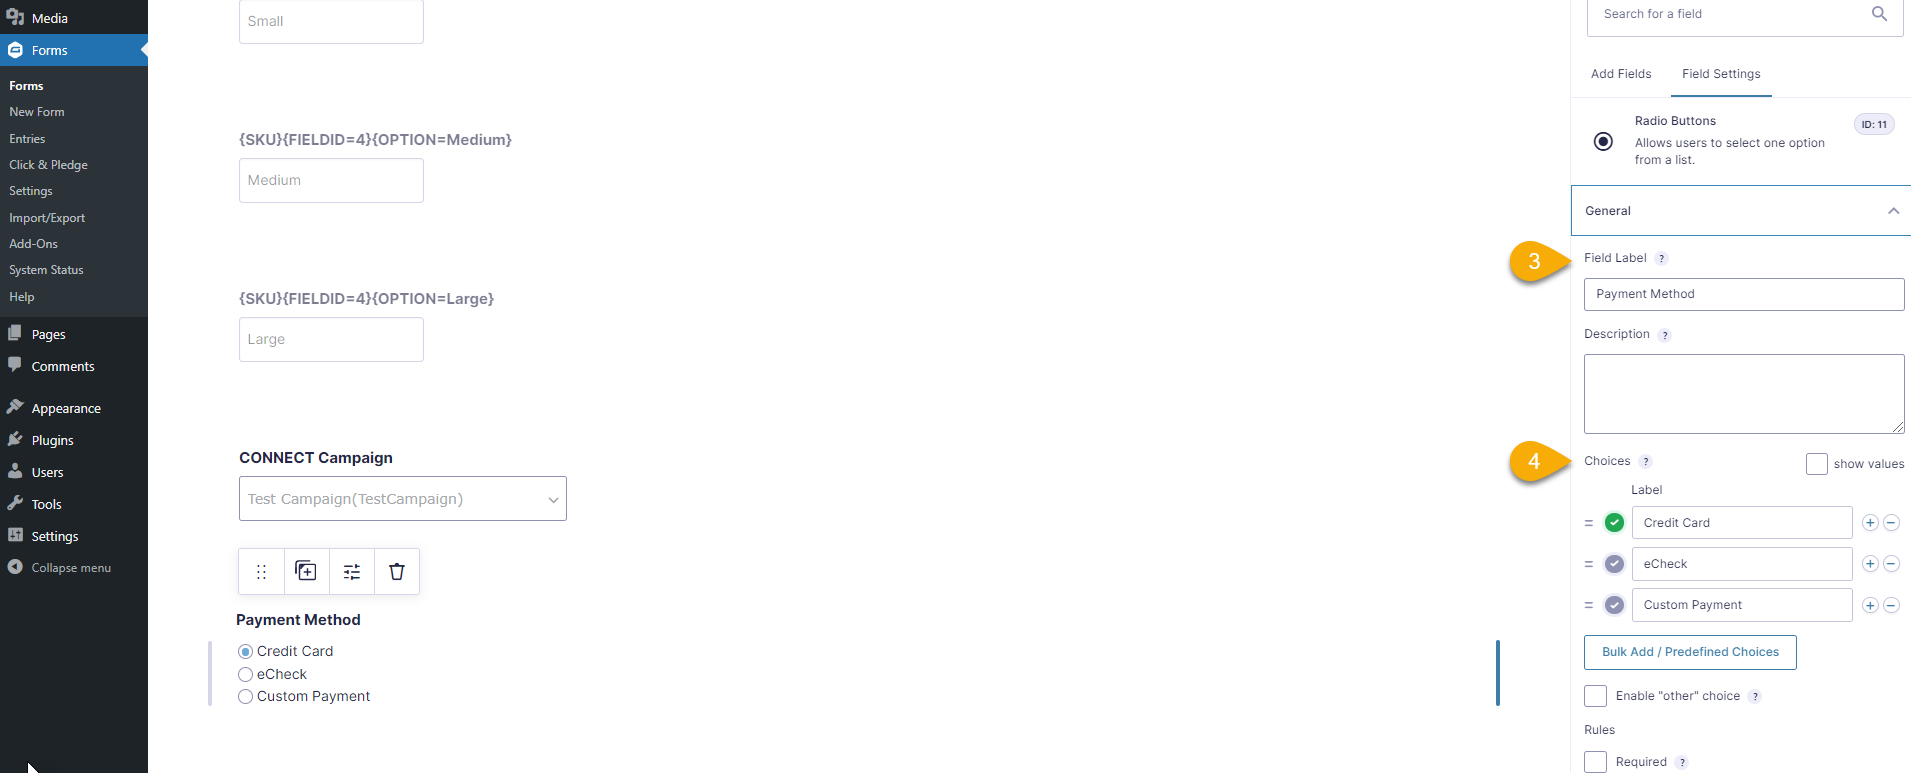
- From ‘Standard Fields’ section, Drag and drop the ‘Radio Button’ field into the Form Editor.
- Enter the Field Label as Payment Method . Make sure that label name will be any one of these: Payment Method / Select Payment Type / Select Payment Method
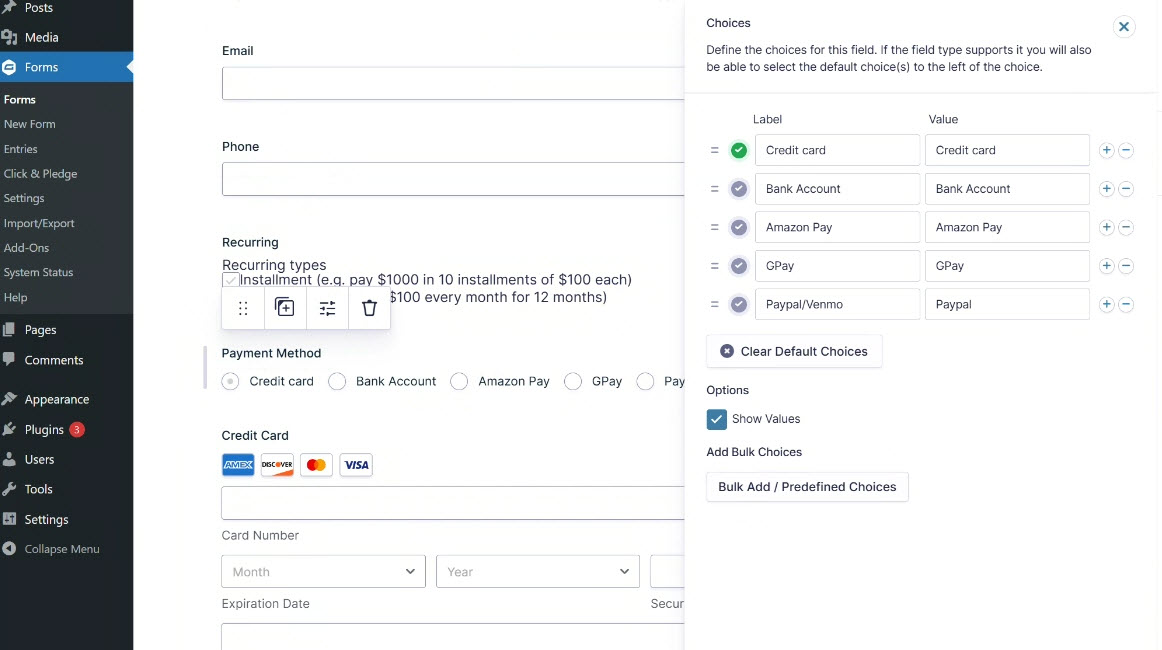
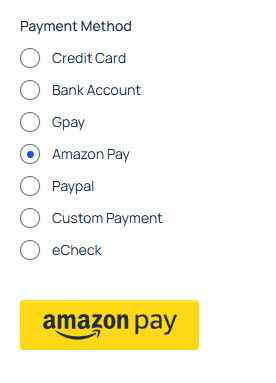
- Enter the Choices of the payment methods. Enable the radio button of the desired payment method so that it will be the default payment method in the payment page.
 4. Payment Method Values
When adding a Payment Method to the form, the Label can be customized; however, the Values must be set exactly as shown below for the payment methods to function properly:
-
Credit Card → CreditCard or Credit Card
-
eCheck → eCheck or e check
-
PayPal → paypal or pay pal
-
Google Pay → gpay or Gpay
-
Amazon Pay → Amazon Pay or amazon pay
-
Bank Account → Bank Account or bank account
To set the Conditional logic for the payment methods, follow the below steps:
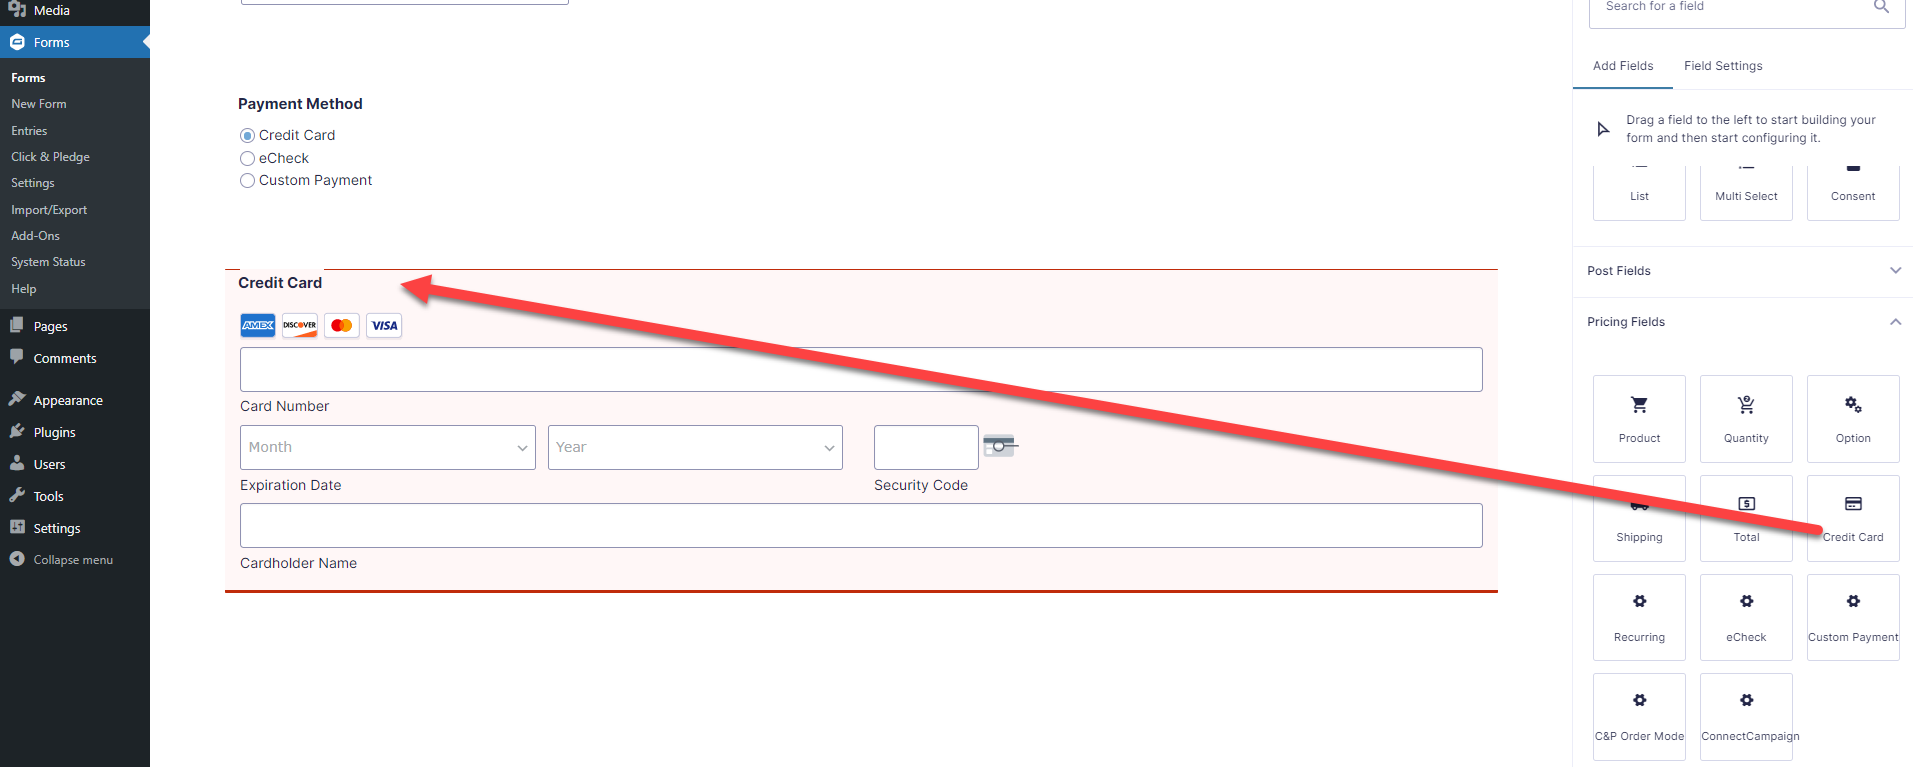
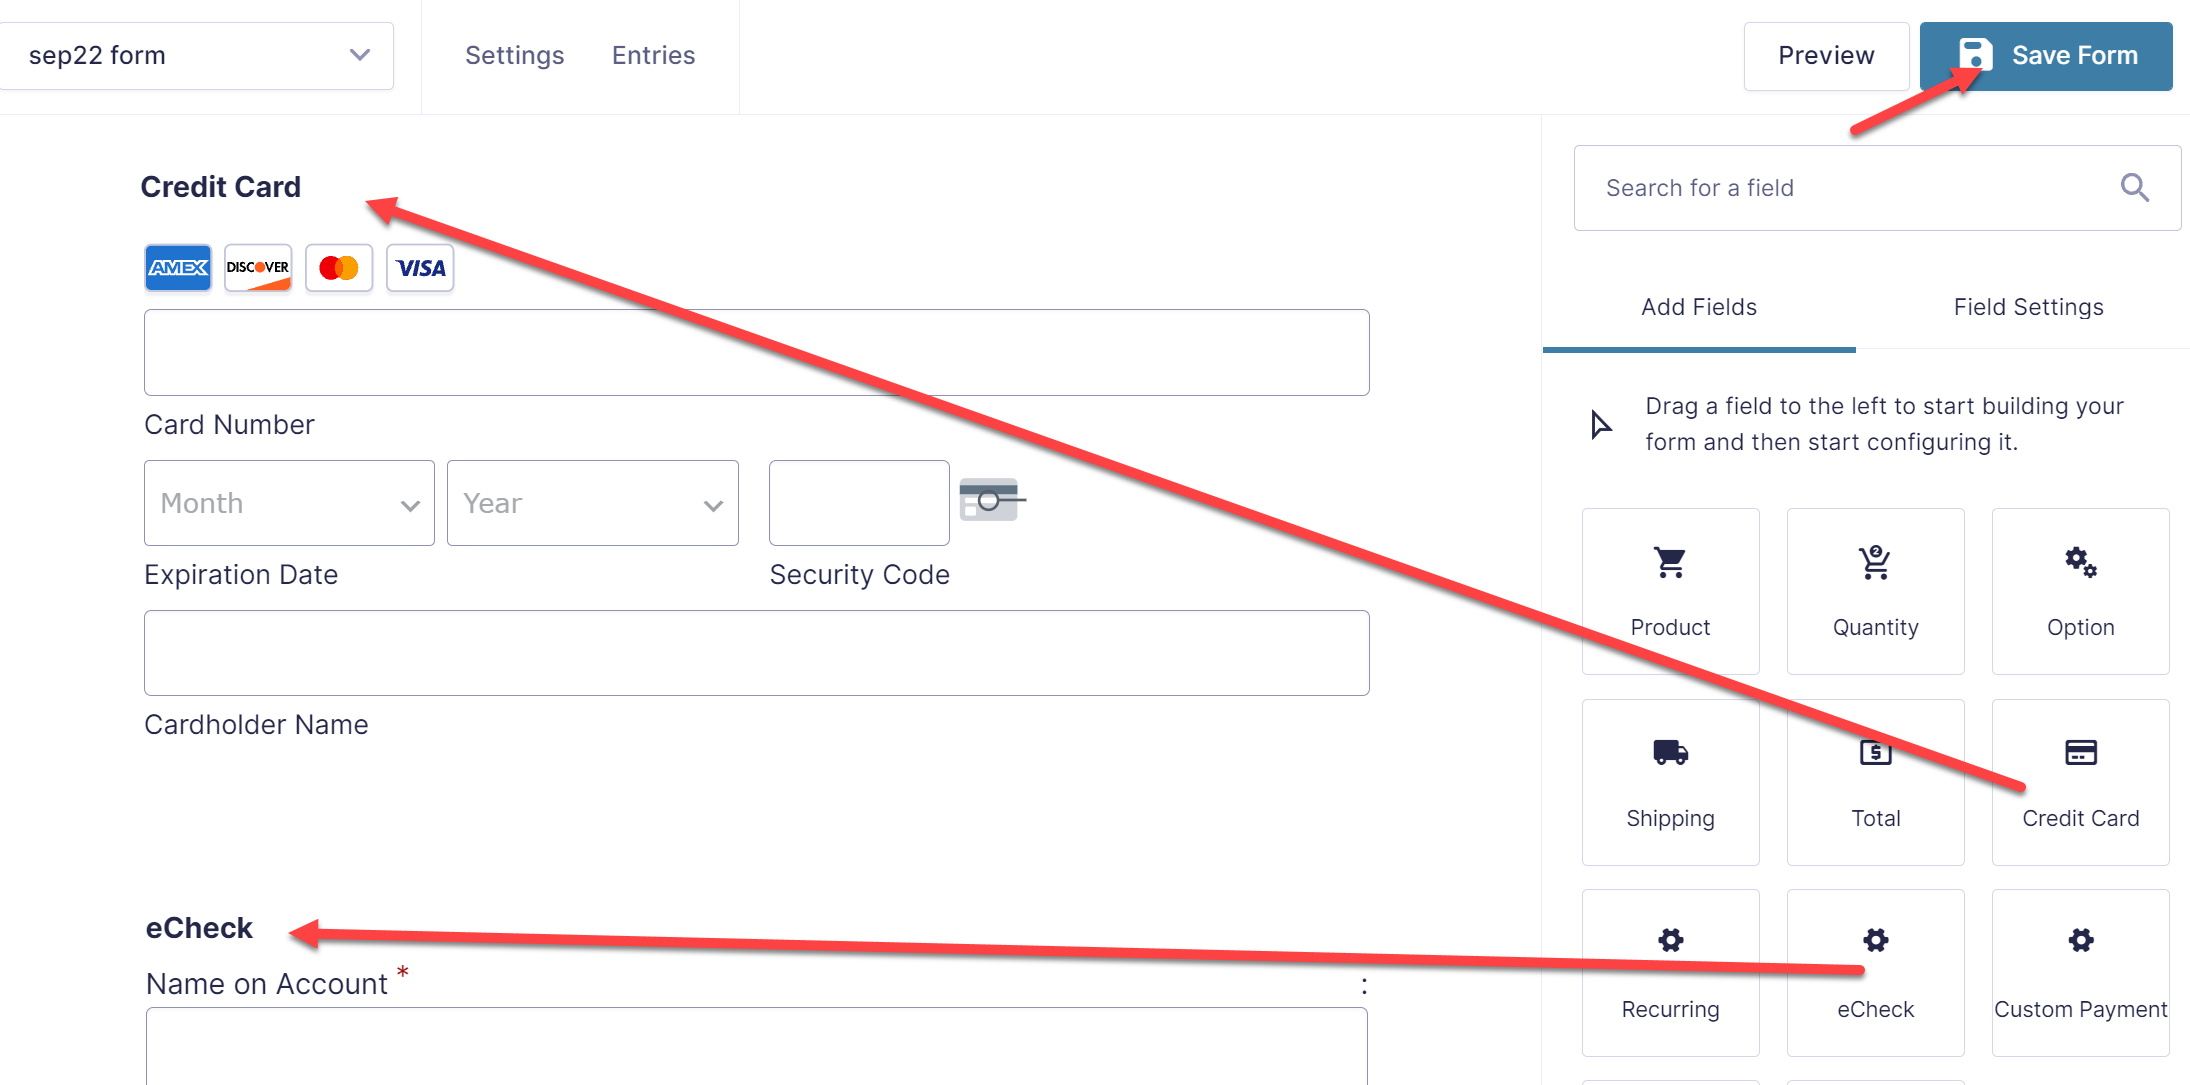
Credit Card:
- From ‘Pricing Fields’ section, Drag and drop the ‘Credit Card’ field into the Form Editor.
- Go to Advanced tab, Enable the checkbox for the field ‘Enable Conditional Logic’.
- Select Payment Method from the dropdown menu followed by IS condition and select Payment method as Credit Card .

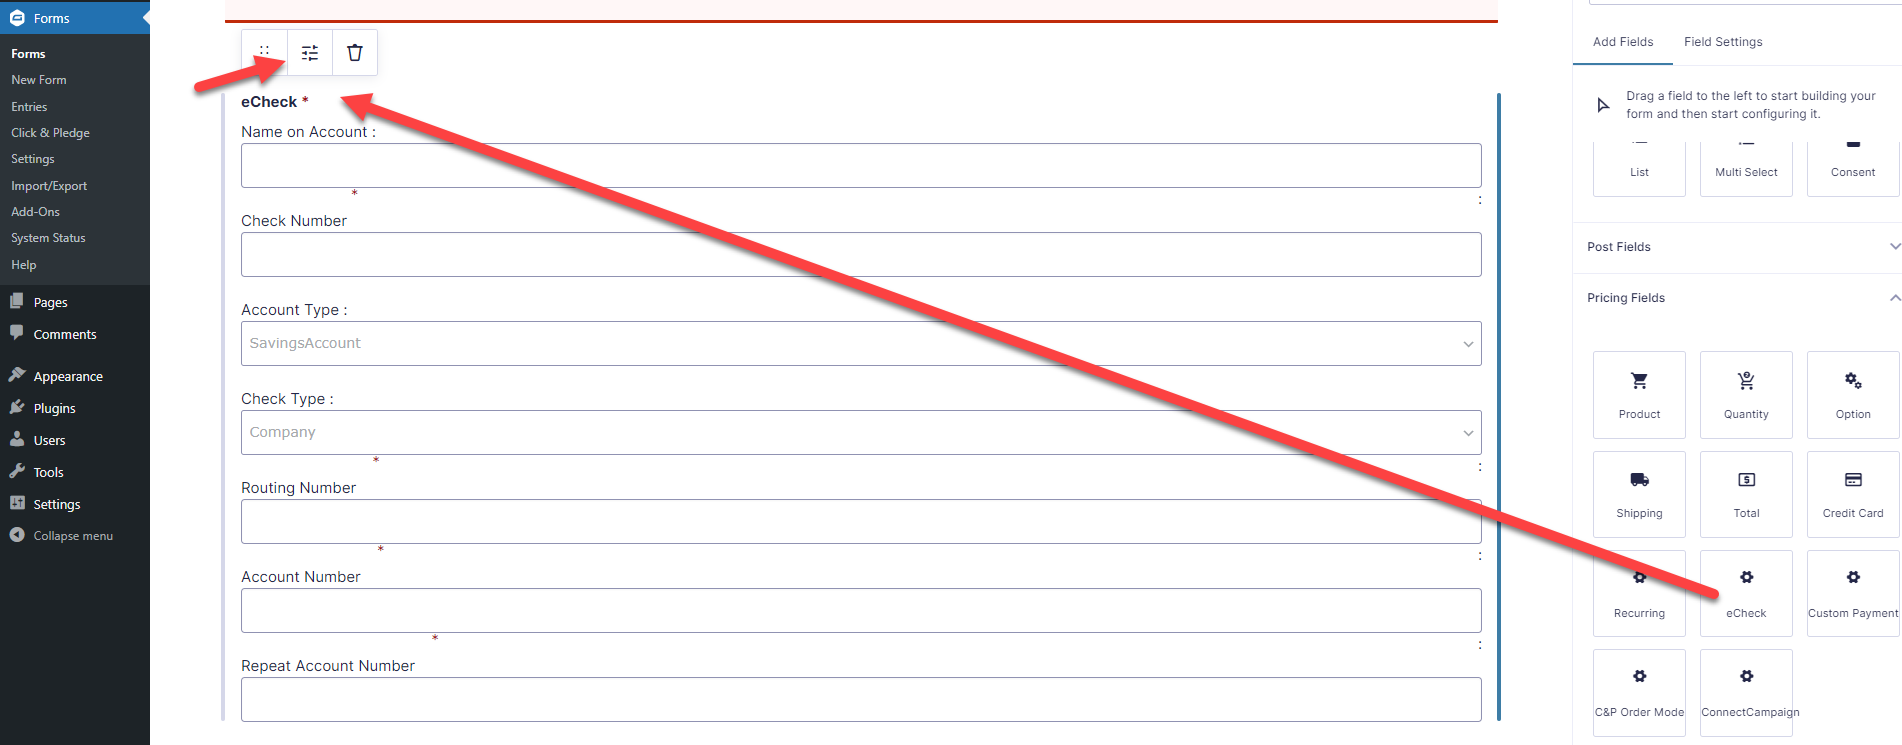
eCheck:
- From ‘Pricing Fields’ section, Drag and drop the ‘eCheck’ field into the Form Editor.
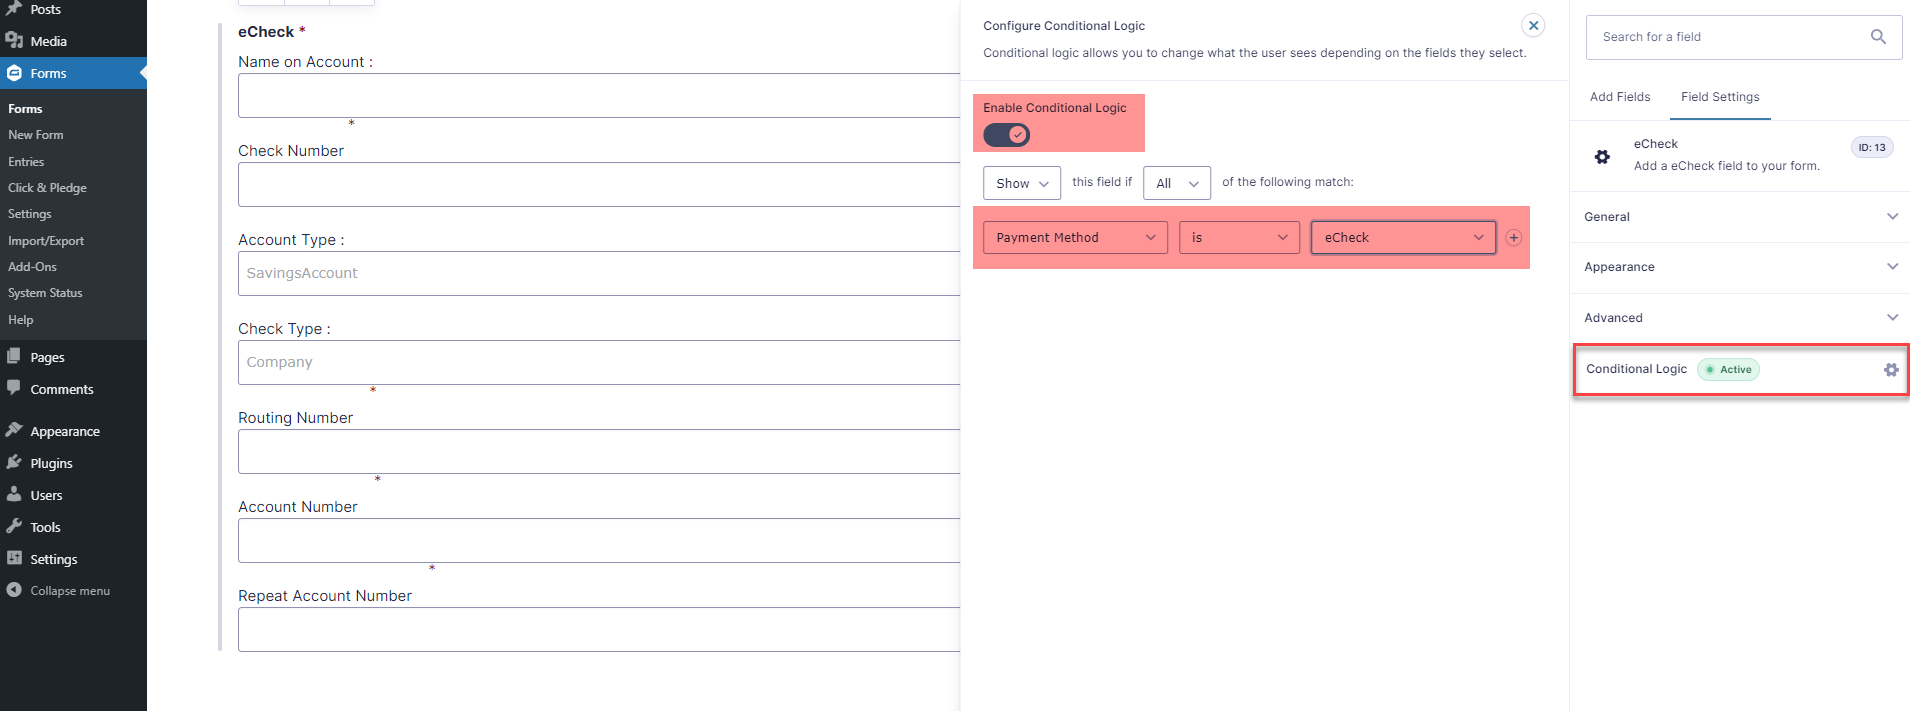
- Go to Advanced tab, Enable the checkbox for the field ‘Enable Conditional Logic’.
- Select Payment Method from the dropdown menu followed by IS condition and select Payment method as eCheck .
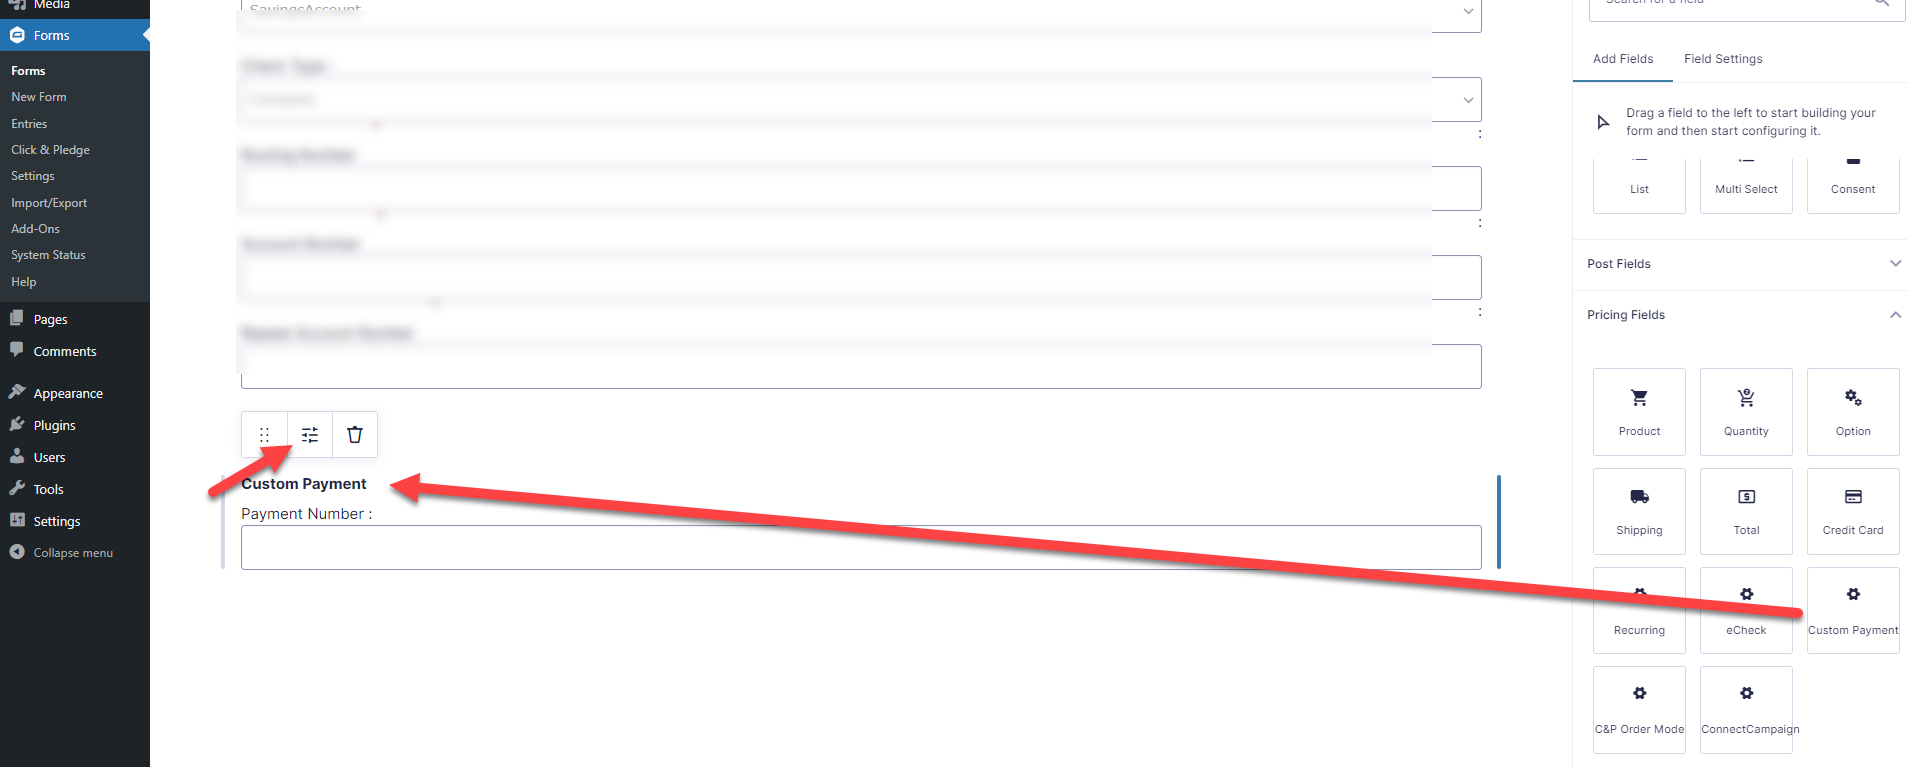
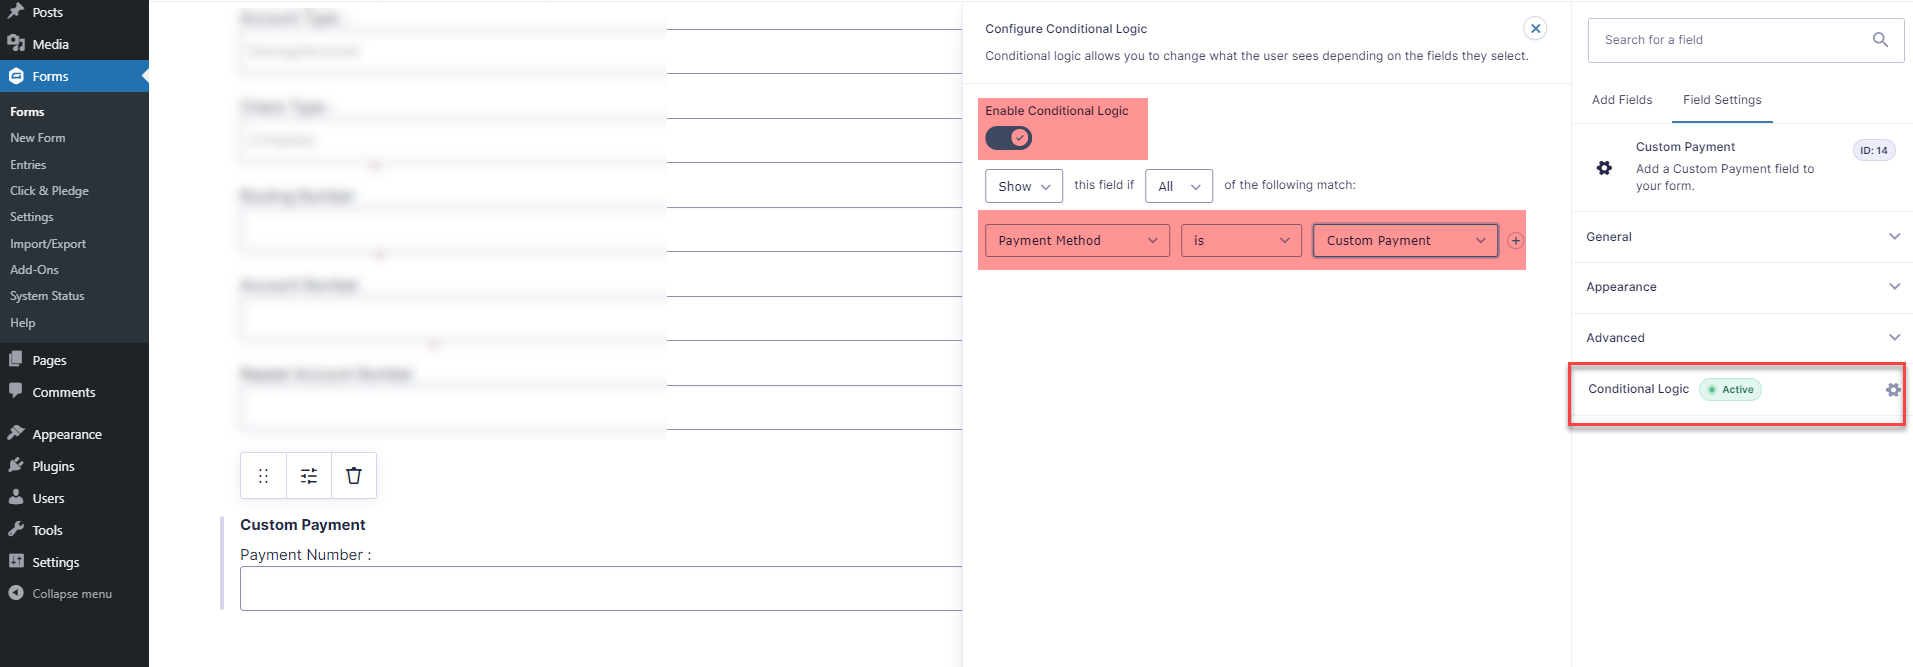
Custom Payment:
- From ‘Pricing Fields’ section, Drag and drop the ‘Custom Payment’ field into the Form Editor.
- Go to Advanced tab, Enable the checkbox for the field ‘Enable Conditional Logic’.
- Select Payment Method from the drop-down menu followed by IS condition and select Payment method as Custom Payment .
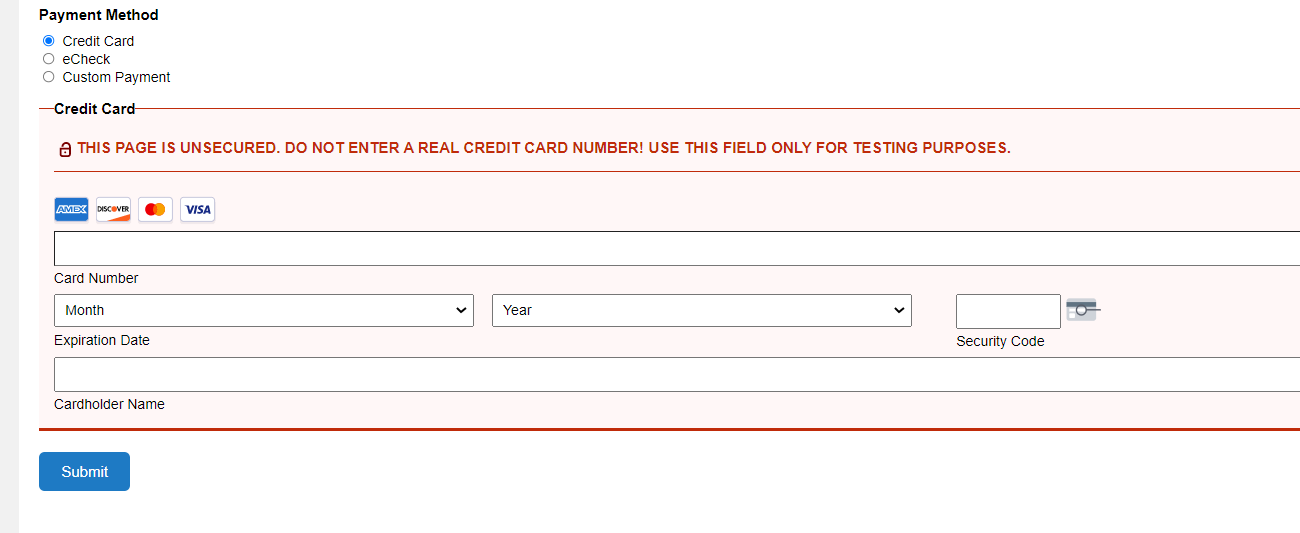
After updating the form, the payment page looks like the below screenshot. Select the desired payment method and process the donation.
APM (Alternate Payment Methods)
Please note that to work the APM (Alternate Payment Methods) you need to follow this step again (Required): General_Settings
Note:
- All APMs works only in the Production mode. Apple Pay is not supported in an iframe or on unregistered domains due to cross-domain restrictions and Apple's policies.
- When using Alternative Payment Methods (APM), it is required to add either reCAPTCHA v2 Invisible or reCAPTCHA v3 Invisible to your Gravity Form. This is necessary to ensure the form processes securely and avoids unexpected errors during submission.
To add APM (Alternate Payment Methods) navigate to Payment Methods and drag into the form.
Google Pay
Why doesn’t Google Pay show as a payment option?
- There are multiple conditions that must be satisfied to display Google Pay as a payment method.
- A patron needs to have a valid credit card saved to Google Pay.
- Google Pay only shows on Chrome, a web browser developed by Google. The Chrome browser needs to be an updated version.
- When using Chrome Google Pay needs to be connected.
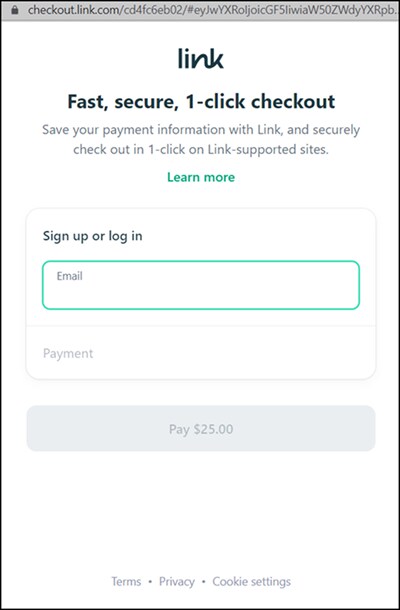
Link
If Google Pay is not available, there is an option on the page to use LINK, a credit card payment from Stripe that works like a wallet.
APM Options.
When "Pay with Link" is clicked, patrons will be able to Sign up or log in to Link to process the payment.
LINK.
PayPal and Venmo
PayPal & Venmo – Payout Process
Click & Pledge deposits your funds, minus our fees, to your respective PayPal/Venmo account. To transfer funds from your PayPal/Venmo account to your bank account consult PayPal/Venmo.
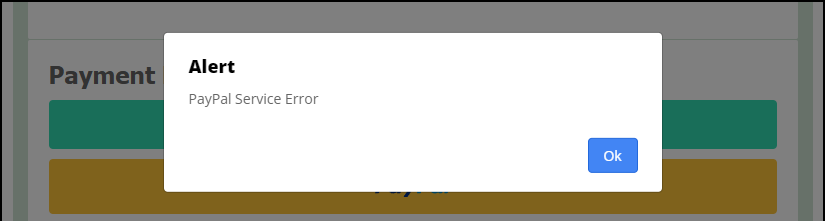
PayPal Service Error
If you see the error message "PayPal Service Error" when either the PayPal or Venmo button is selected on your donation form, you will need to contact PayPal to resolve the issue. PayPal may freeze your account if they need additional information concerning your transactions or account. PayPal does not alert Click & Pledge if there is an issue.
One common issue for the error is that the email address for the PayPal primary contact was not confirmed. When your account with PayPal is set up, for verification an email is sent to you. If the email PayPal sends is not confirmed, then PayPal will freeze your account. You will need to contact PayPal to resolve.
https://www.paypal.com/us/smarthelp/contact-us
Below is an image of the error.
We recommend you monitor your donation forms with PayPal frequently by selecting the PayPal and Venmo buttons on your donation form to ensure they are working as expected.
Since this is an issue with PayPal, you will need to work with them to resolve it.
Here are PayPal's Customer Support options: https://www.paypal.com/us/smarthelp/contact-us
You may also find the issue within your PayPal customer portal. Login to your PayPal account. Scroll down to Notifications and find the messages that have Red Flags. The Red Flag messages should detail your issue and help you resolve the problem. If not, reach out to PayPal for assistance.
https://www.paypal.com/us/smarthelp/contact-us
On the PayPal Dashboard find the Notifications with Red Flags
Bank Transfer
In addition to Credit Card payments, your Patrons have the option to donate to you from their bank account.
NACHA (National Automated Clearing House Association) implemented the Web Debit Account Validation Rule which requires Account Validation for online transactions being processed from a bank account. Using an OAuth connection, Bank Transfer will have the donor select their bank from a list and login to their bank account to complete the transaction. This process reduces fraud risk to zero.
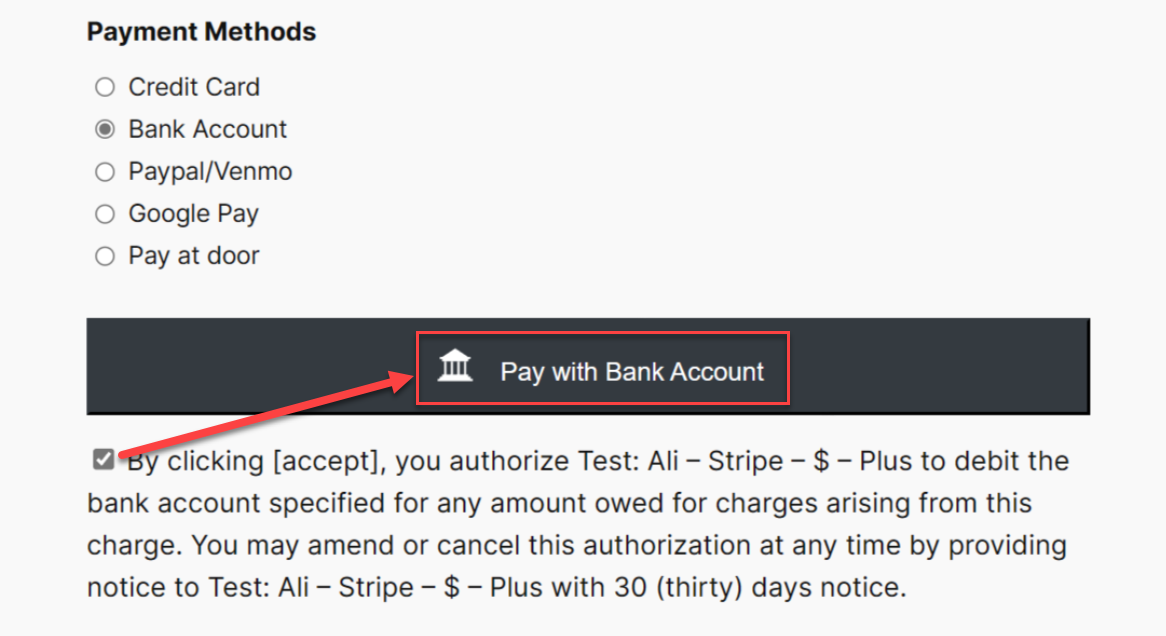
Following is the flow your Patrons will see for Bank Transfer.
Check the box to accept Terms & Conditions. Click "Pay with Bank Account".
Patron will select their Bank from the list provided or may use the Search filed to find their bank. When they Select their bank the will see the following screen.
Accept Bank Terms.
Once "Agree and continue" is clicked, the Patron will be taken to the login screen for their bank account to complete the transaction.
Amazon Pay
Amazon Pay® is now available! Amazon Pay® is already activated in your account if your organization is on Stripe.
How to Build a Gravity Form with Recurring and One-Time Options
Single/Double click on Recurring button (Pricing Fields > Recurring), so that it will appear in the form editor.

1. Field Label: Enter the Label of the form field. This is the field title the user will see when filling out the form.
2. Description: Enter the description for the form field. This will be displayed for the user and provide some direction on how the field should be filled out or selected.
3. The name mentioned here for the payment methods will be displayed in the external page.
4. By enabling the checkbox for “One time only”, the user can select either “One time only” or “Recurring” from the external page. If not selected, the user can perform only recurring transaction. SKU Suffixes allow you to create additional parameters to increase the flexibility of information included in a SKU. This is particularly helpful with Salesforce mapping.
5. Default Payment Options: The option which is selected here will be displayed as a default option in the external page.
6. The name mentioned here for the recurring types will be displayed in the external page.
7. Select either installment or subscription or both. The selected options will be displayed in the external page.
8. Default Recurring Type: The selected option will be displayed as the default recurring type in the external page.
NOTE: If both the options are selected in the step: 7, then only “Default Recurring Type” will appear.
9. The name mentioned here for the periodicity will be displayed in the external page.
10. The checkboxes which are selected will be displayed in the external page. SKU Suffixes allow you to create additional parameters to increase the flexibility of information included in a SKU. This is particularly helpful with Salesforce mapping.
11. The name mentioned here for the number of payments will be displayed in the external page.
12. Indefinite Only: If this option is selected then 998 times for installments and 999 times for subscription, the recurring option will be continued.
Open Field Only: If this option is selected, “Default number of payments” and “Maximum number of installments” can be given. The entries given here can be changed in the external page.

Indefinite + Open Field Only: If this option is selected, the default value will be 999 which can be changed accordingly in the external page.
NOTE: Make sure the range for installment is 2 to 998 and 2 to 999 for a subscription.
Fixed Number: If this option is selected, the number entered in this field remains constant.
13. Rules: Select the option to make the form field required. A required field will prevent the form from being submitted if it is not filled out or selected.
A recurring transaction can be done through Credit Card and eCheck. Here are the steps to add Credit Card and eCheck into the form editor.
Credit Card and eCheck can be added from Pricing Fields . Single/Double click on the button so that they will be added to the form editor.
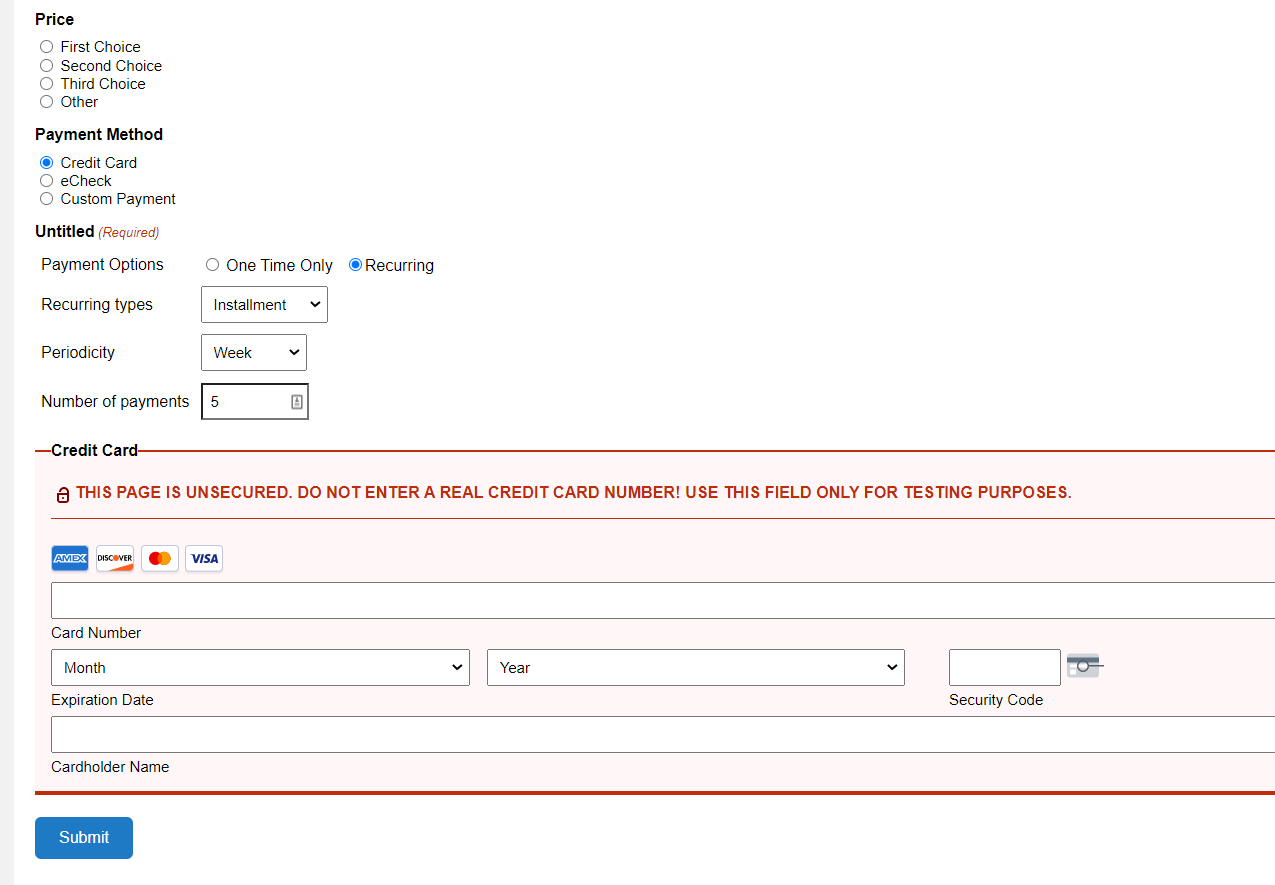
After adding all the required fields to the form editor, click on Update Form. The external page for above fields will look like this:
NOTE 1: If the plug-in is updated then the already existing forms will also be updated without any change in the settings which are already set for the form.
NOTE 2: If the settings want to be changed for Recurring process then delete the field and click on “Update form” button. Then select the recurring field from Pricing Fields tab.
Setting Campaign for a Product
NOTE: These steps are applicable only from Version 3.x and above.
Campaign feature provides a flexible method for tracking donations across different channels. The following steps clearly explain how to add a campaign to the product.
Step 1: Add the product to the form editor.
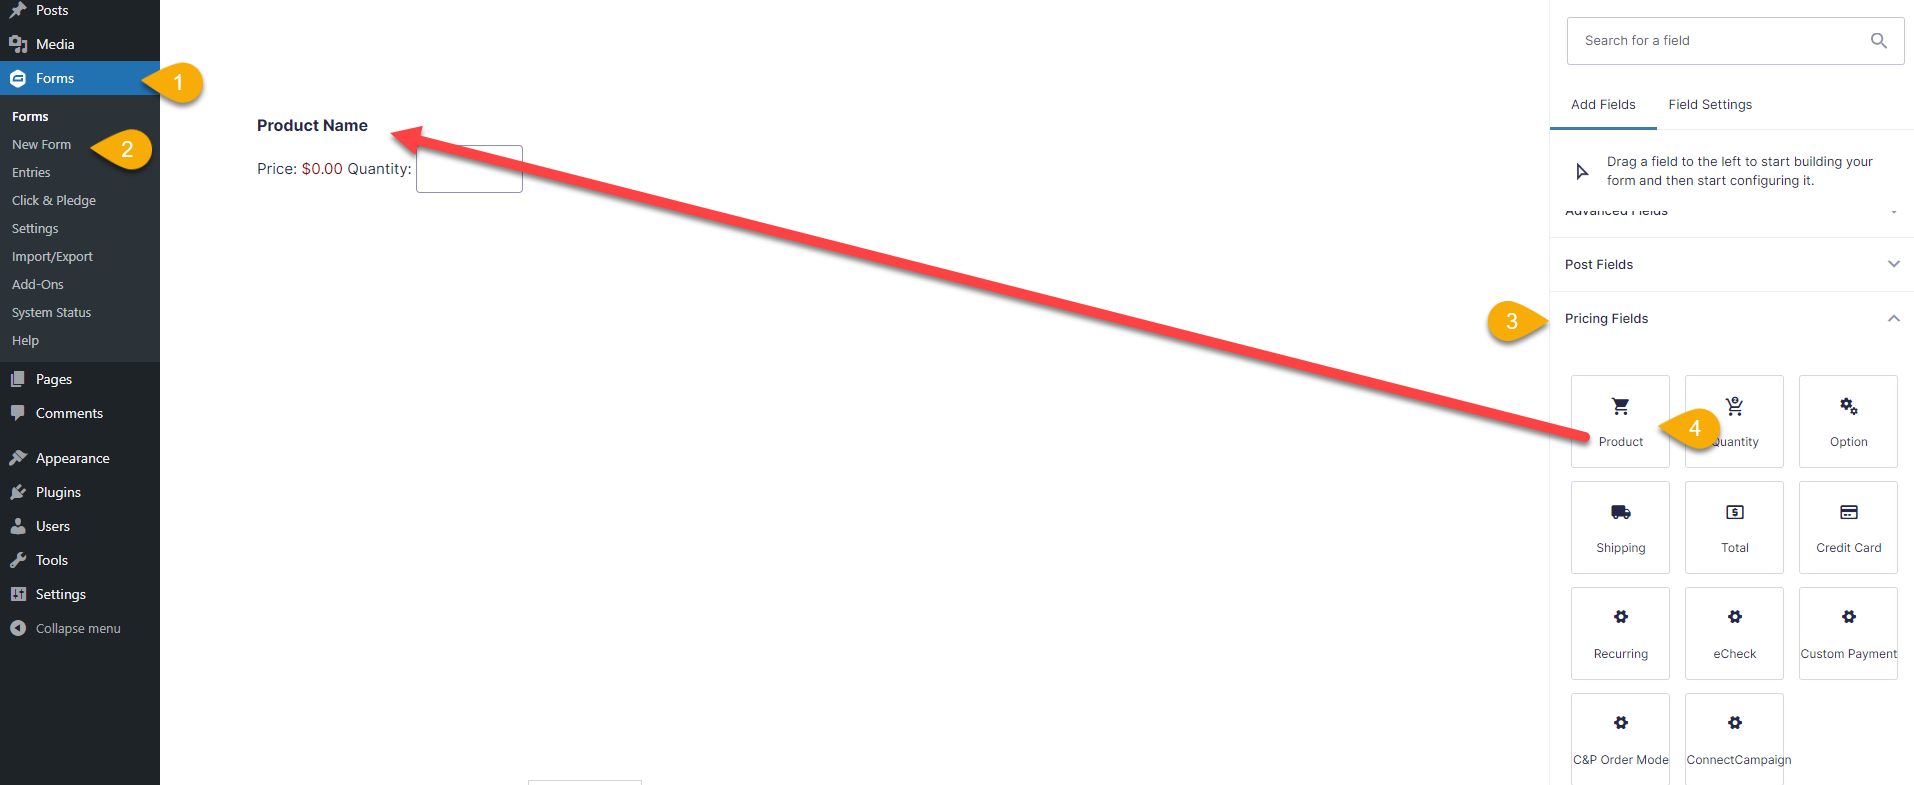
1. After login to the Gravity Forms, click on Form.
2. Select New Form and provide the forum name and description.
3. Click on Pricing Fields, so that the options will appear.
4. C lick or drag the Product button so that it will appear in the form editor.
Step 2: Add the Campaign to the form editor.
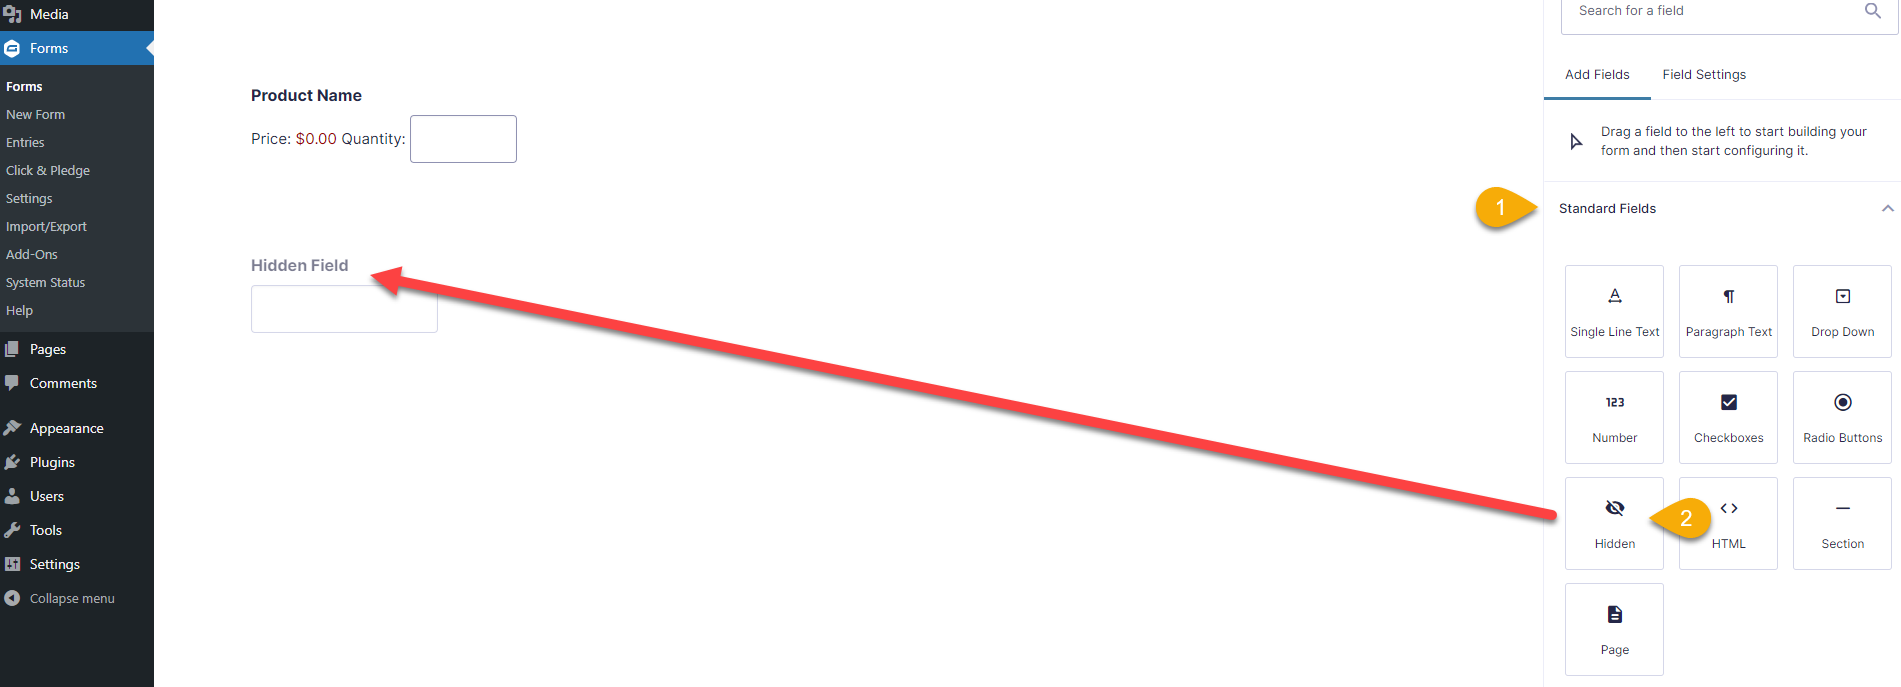
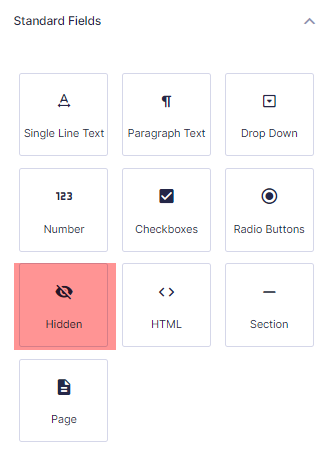
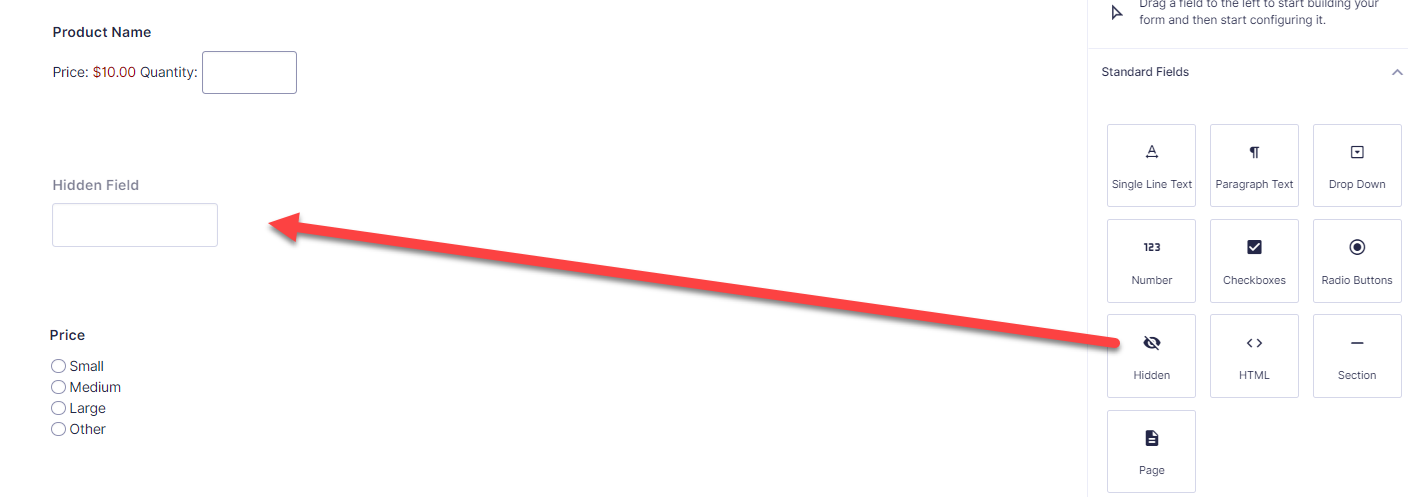
1. Click on Standard Fields, so that the options will appear.
2. Single/Double click on Hidden button so that it will appear in the form editor. Click on Hidden Field so that the Field Label column will be visible.
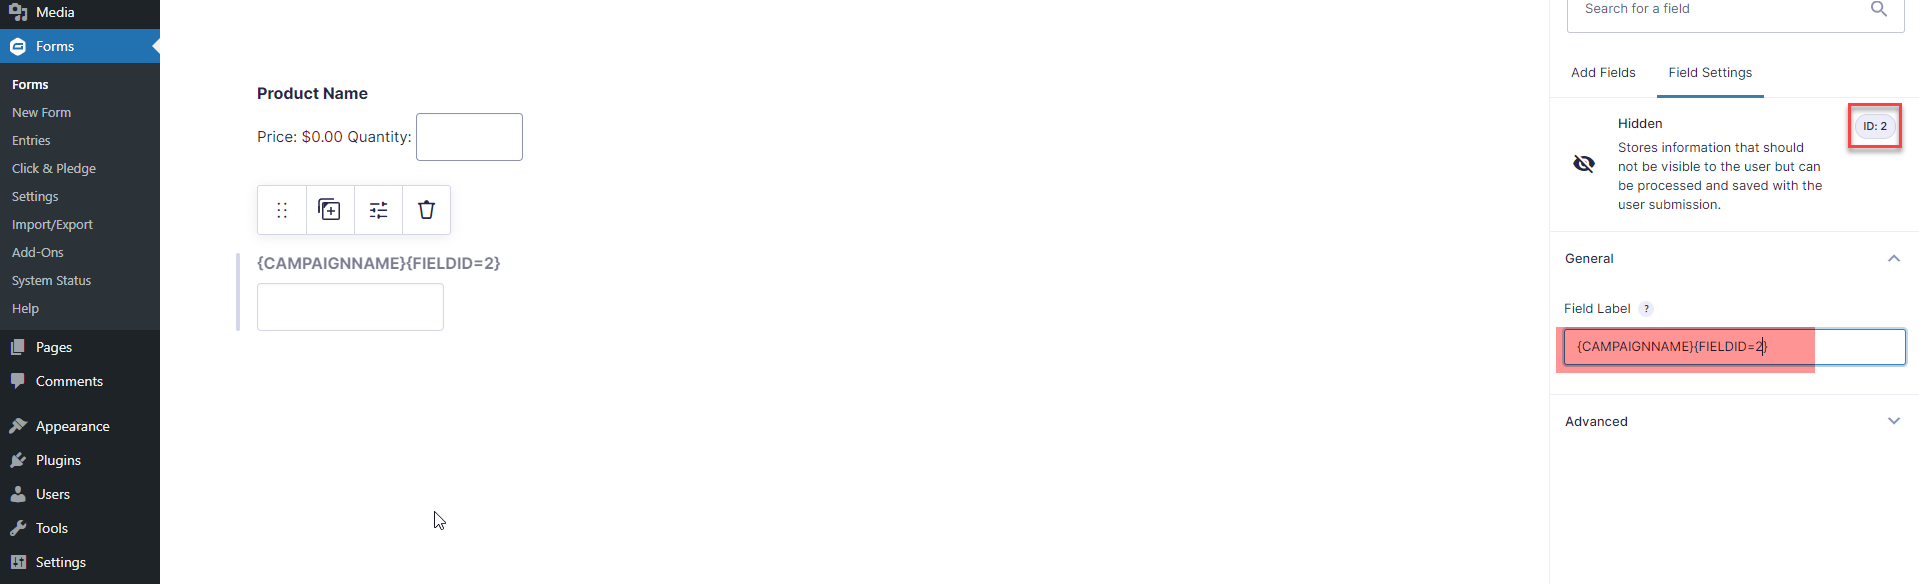
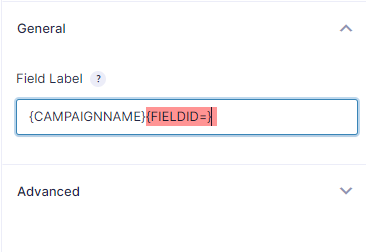
3. Replace the Field Label with {CAMPAIGNNAME}{FIELDID=} or {CAMPAIGNNAME}{FIELDID=1}.
Campaigns are of two types. They are Transaction Campaign and Item Campaign.
Transaction Campaign:
Transaction Campaign will have Empty Field id.
Eg: - {CAMPAIGNNAME}{FIELDID=}
Item Campaign:
Item campaign has the Product Field Id number instead of null.
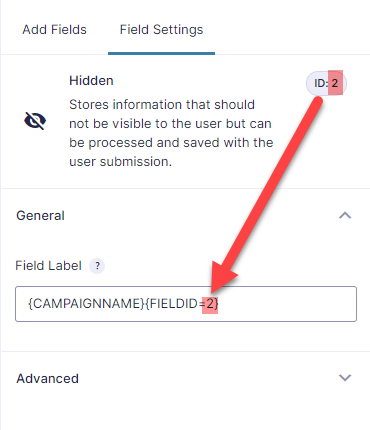
Campaign Name:
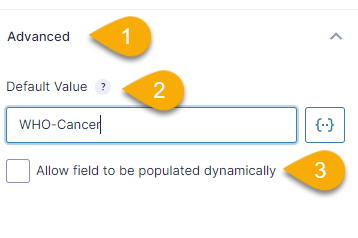
1. Click on Advanced button.
2. Default Value: If you would like to pre-populate the value of a field, enter it here.
3. Check this option to enable data to be passed to the form and pre-populate this field dynamically. Data can be passed via Query Strings, Shortcode and/or Hooks.
Example: 1
For products with options such as those listed in a pull-down menu or a radio button, each option needs to be set up with a Campaign. Campaigns may be the same or different.
Hidden field format: {CAMPAIGNNAME}{FIELDID=FID}{OPTION=VALUE}
- fid = Field ID of the product as listed in the Product listing
- value = Option's value- each option of a product has to be set up with a unique value and that value needs to be listed to identify the Campaign's reference.
Option: SMALL
The field label: Reference the Field ID of the item as shown in the item's blue label area.

& the Campaign value as set in the Advanced tab. Campaign = WHO-Cancer-Small

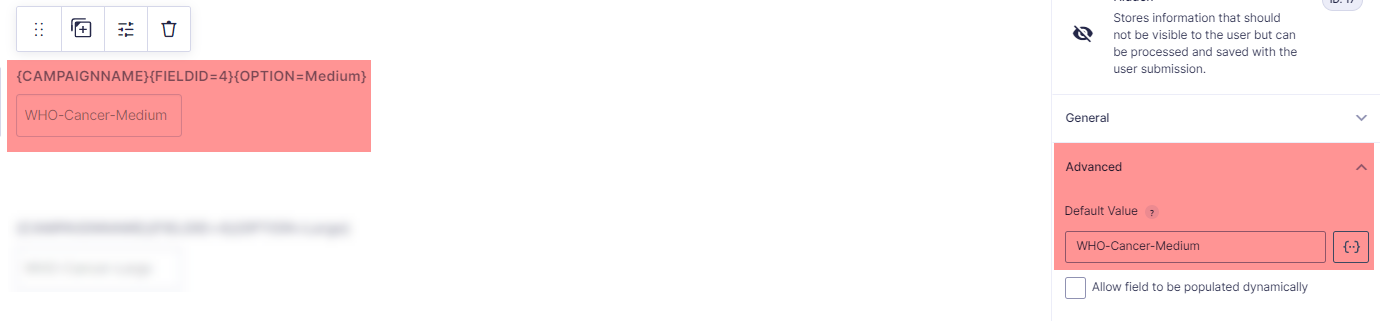
Option: Medium

& the Campaign value as set in the Advanced tab. Campaign = WHO-Cancer-Medium
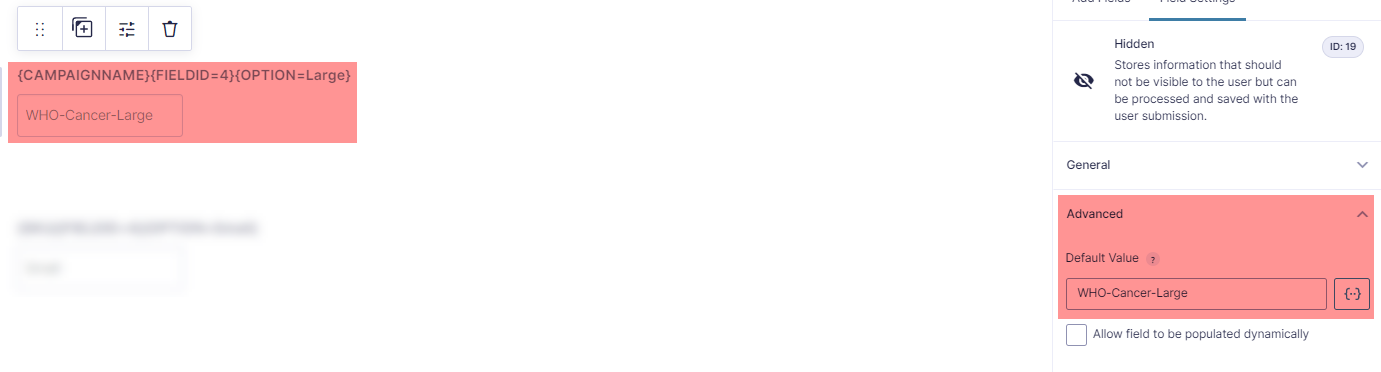
Option: Large

& the Campaign value as set in the Advanced tab. Campaign = WHO-Cancer-Large
Setting an Item Name for a Product
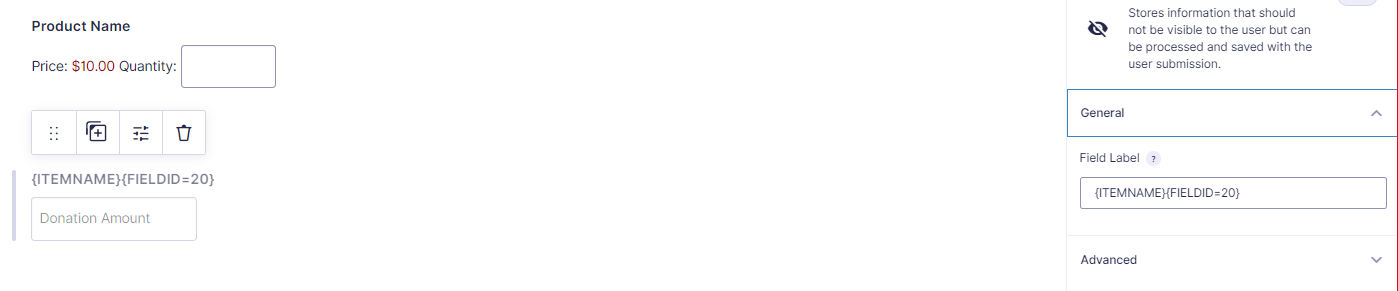
To set an Item Name for a Product, drag and drop a hidden field from Standard Fields (It is on your right side menu).
Set up the hidden field referencing the Field ID as in the Product setting.
Properties field label: {ITEMNAME}{FIELDID=fid} - Please note that all fields are case sensitive - ITEMNAME & FIELDID should be in all caps.
fid = Field ID of the product as listed in the Product Listing.
The Advanced tab is the value of the Product.
By doing this, the Product name will be replaced with hidden field value in API and receipt.
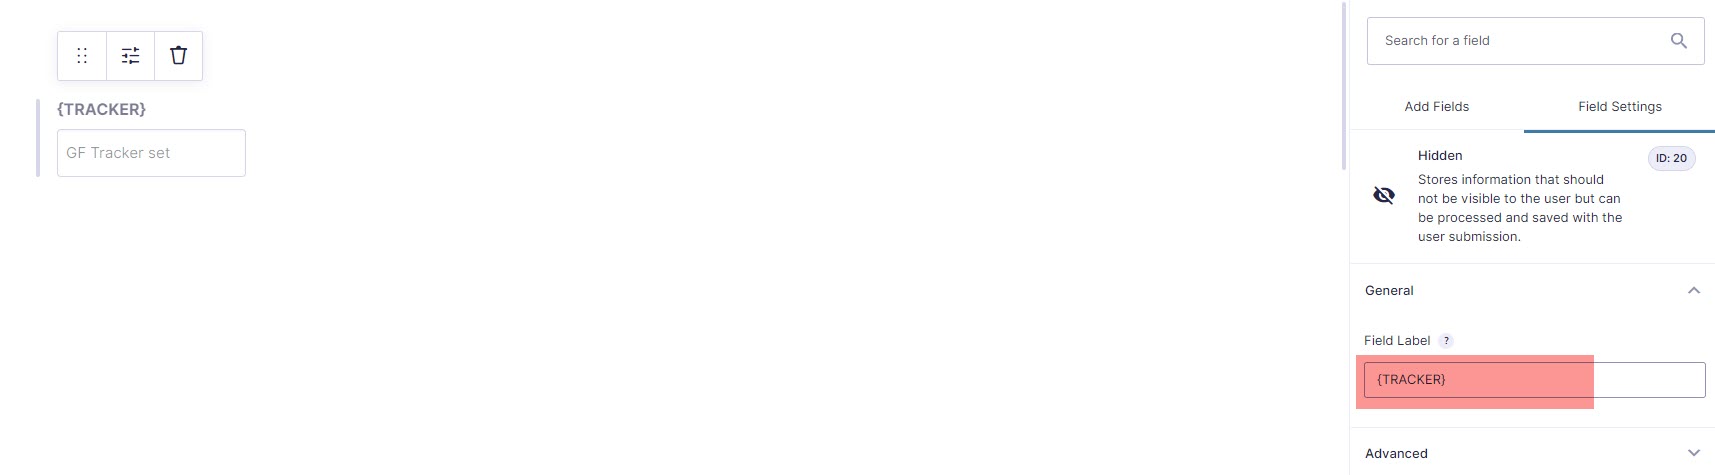
Setting up a Tracker for Transaction
Tracker can be added to the Transaction as hidden field.
Add a hidden field:
Set up the hidden field properties:
Properties field label: {TRACKER} - Please note that all fields are case sensitive - TRACKER should be in all caps.
The Advanced tab is the value of the TRACKER.

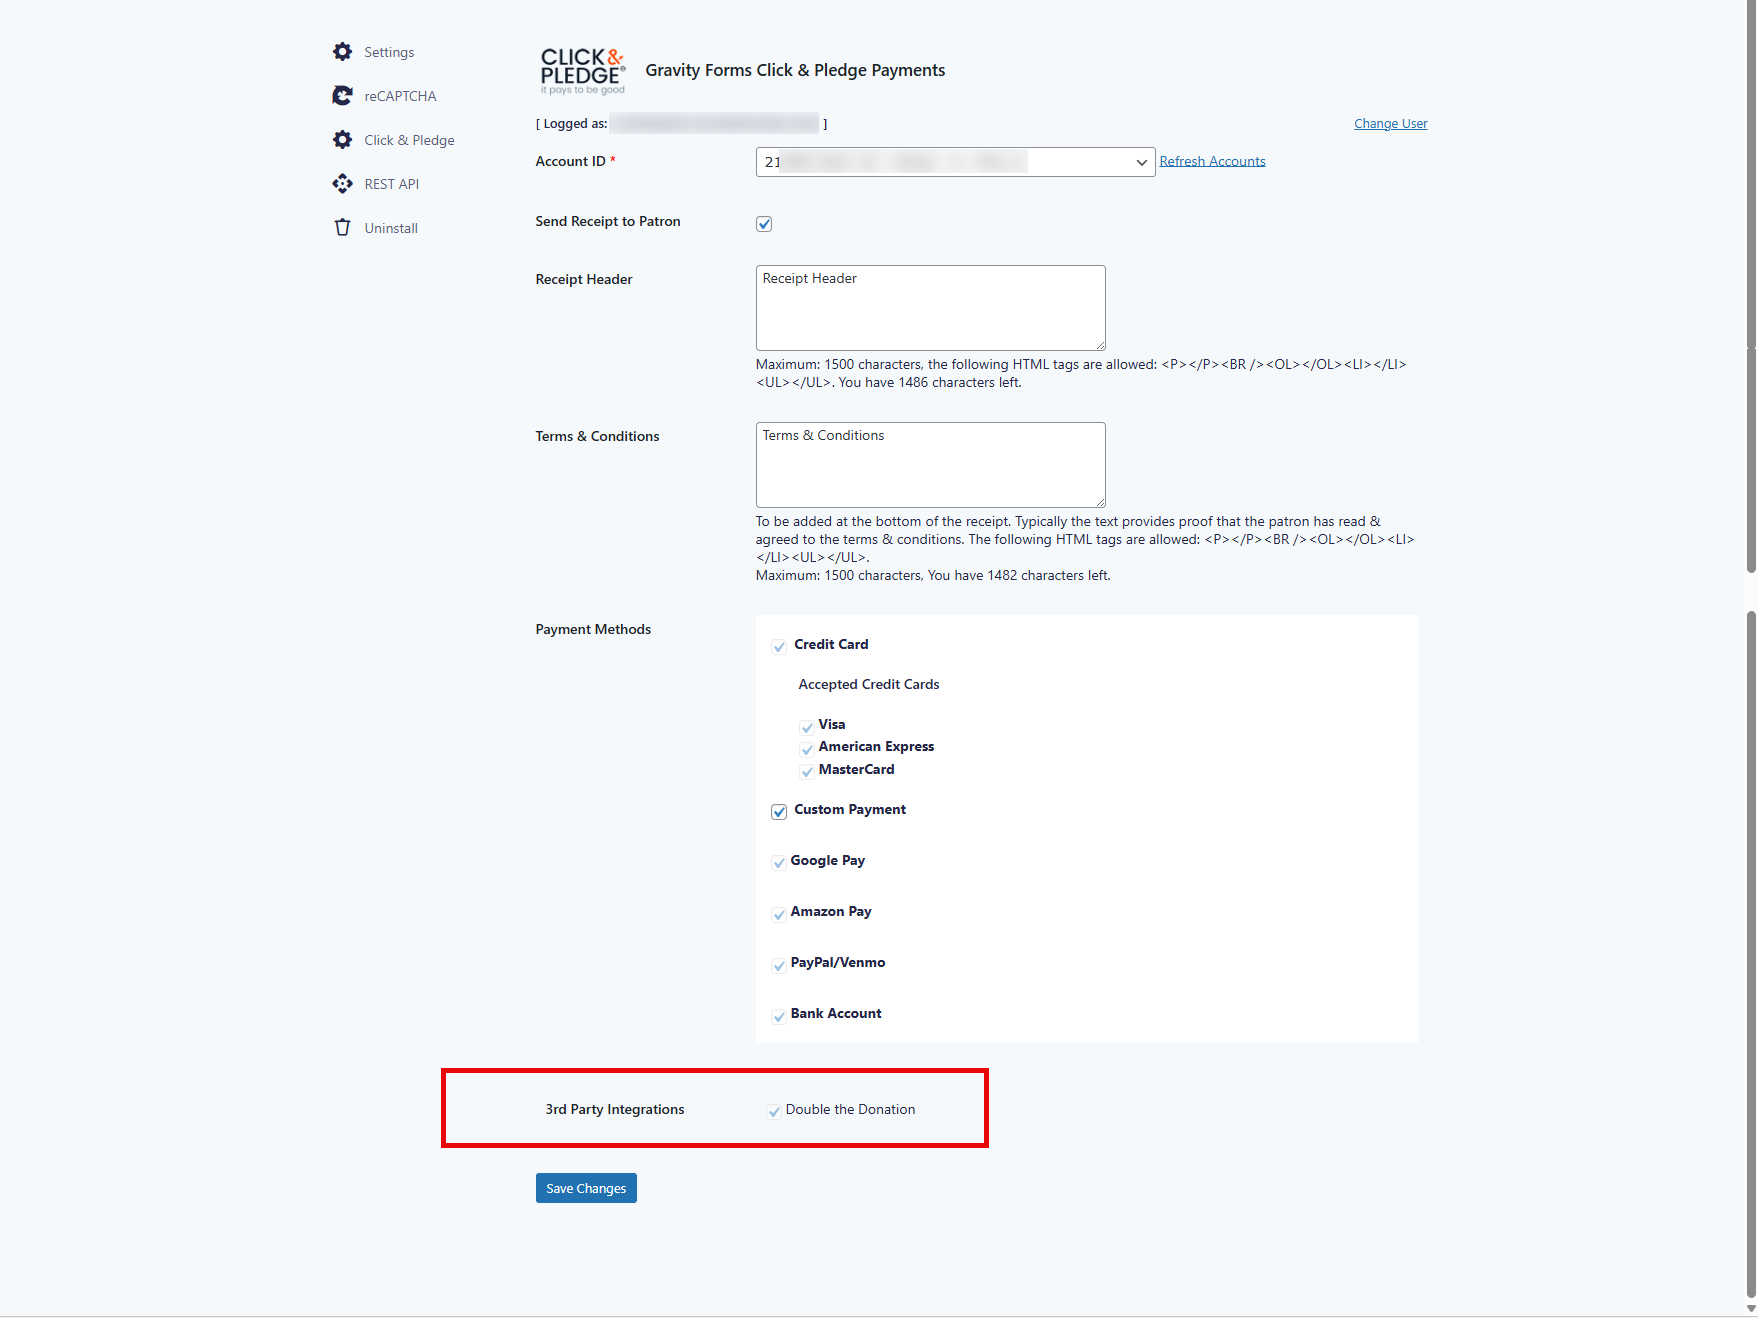
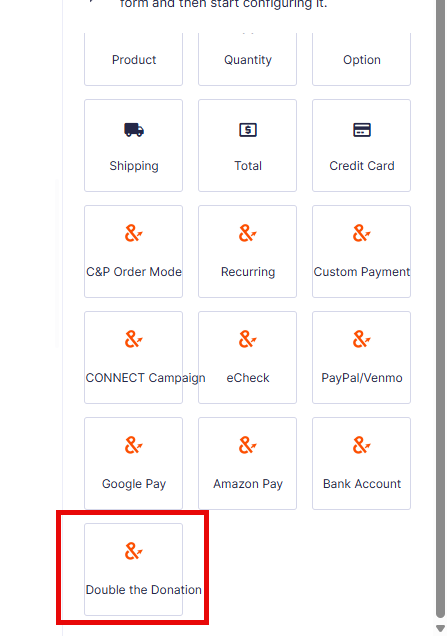
Addition of Double the Donation
When this feature is enabled, Double the Donation will be integrated into the form. This allows donors to check if their employer offers matching gift program.
Drag the Double the Donation to the form:
How to Add reCAPTCHA to Gravity Forms
reCaptcha v2 Settings:
Setting up Gravity Forms reCAPTCHA v2 in WordPress is incredibly easy and you don’t have to use a separate plugin.
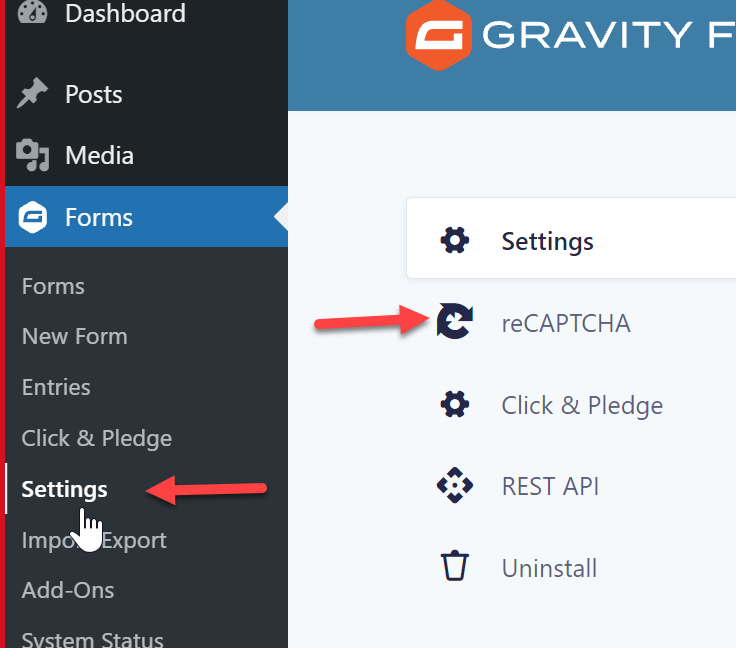
If you haven’t done so already, you’ll first need to sign up for a free reCAPTCHA API account. Once that’s done, head over to the Gravity Forms settings page by navigating to Forms > Settings from the WordPress admin panel. 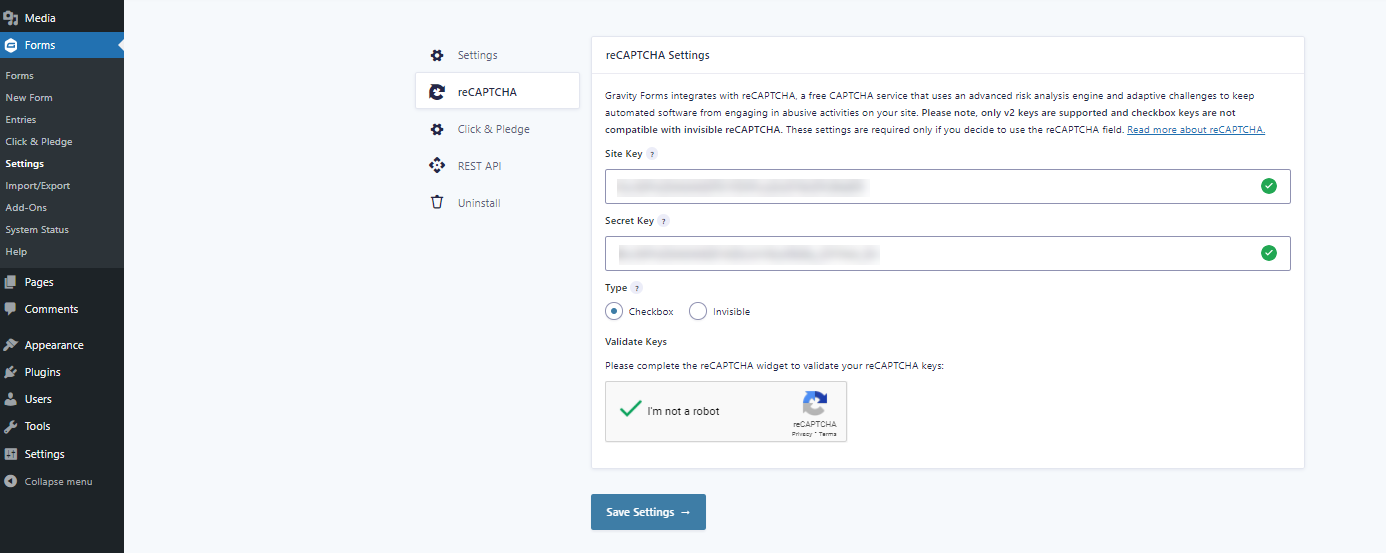
Enter the reCAPTCHA Site Key and Secret Key under the reCAPTCHA Settings option. You can also select which type of reCAPTCHA to add to your WordPress forms – Checkbox or Invisible. Click the Save Settings button to proceed.
Now, you can add Gravity Forms reCAPTCHA to any form (whether it’s a registration form or a contact form) using the form builder.
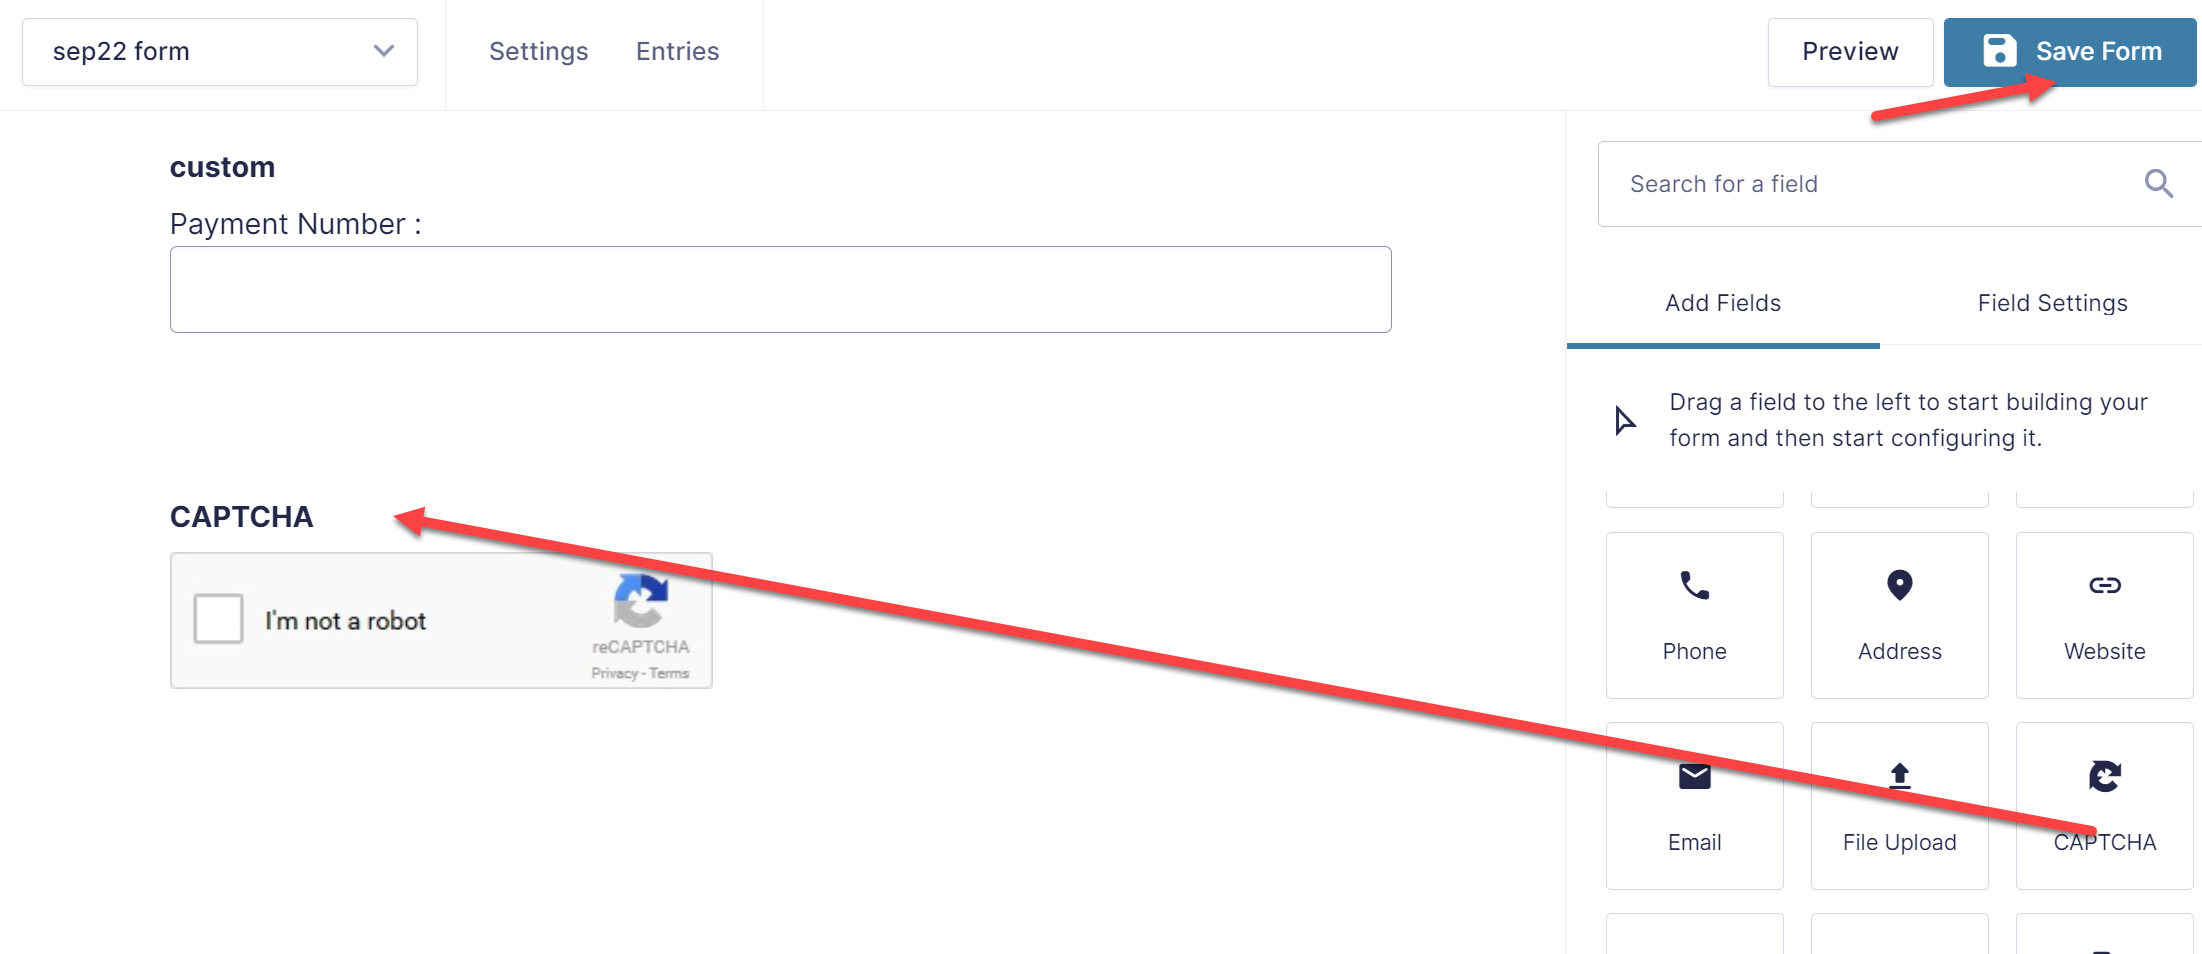
To add the reCAPTCHA field, simply drag and drop the CAPTCHA form field (under Advanced Fields) to your form. Click the Update button to continue.
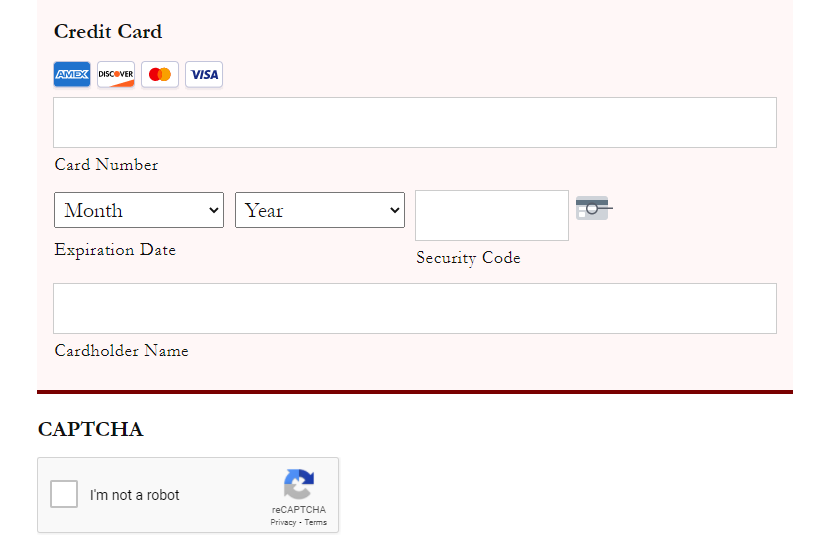
With reCAPTCHA, the external page looks like this:
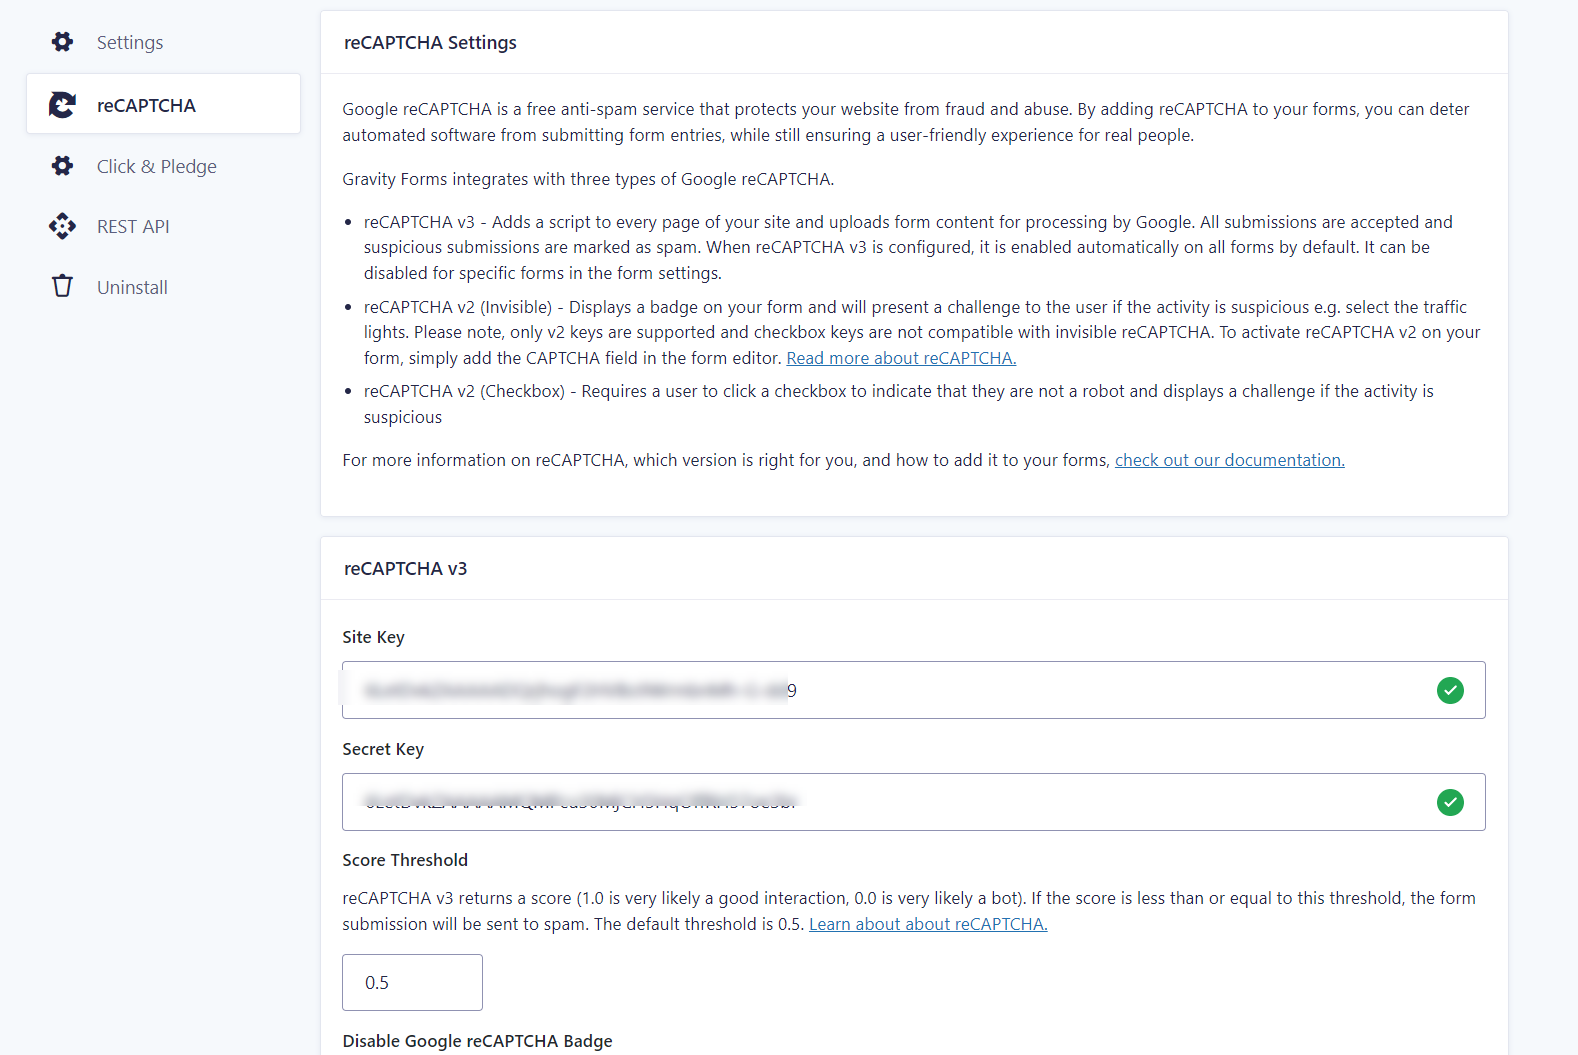
reCaptcha v3 Settings:
Please note that in order to use the reCaptcha v3, you will need to install the "Gravity Forms reCAPTCHA Add-On".
You’ll first need to sign up for a free reCAPTCHA API account. Once that’s done, head over to the Gravity Forms settings page by navigating to Forms > Settings from the WordPress admin panel.
Enter the reCAPTCHA Site Key and Secret Key under the reCAPTCHA Settings option.
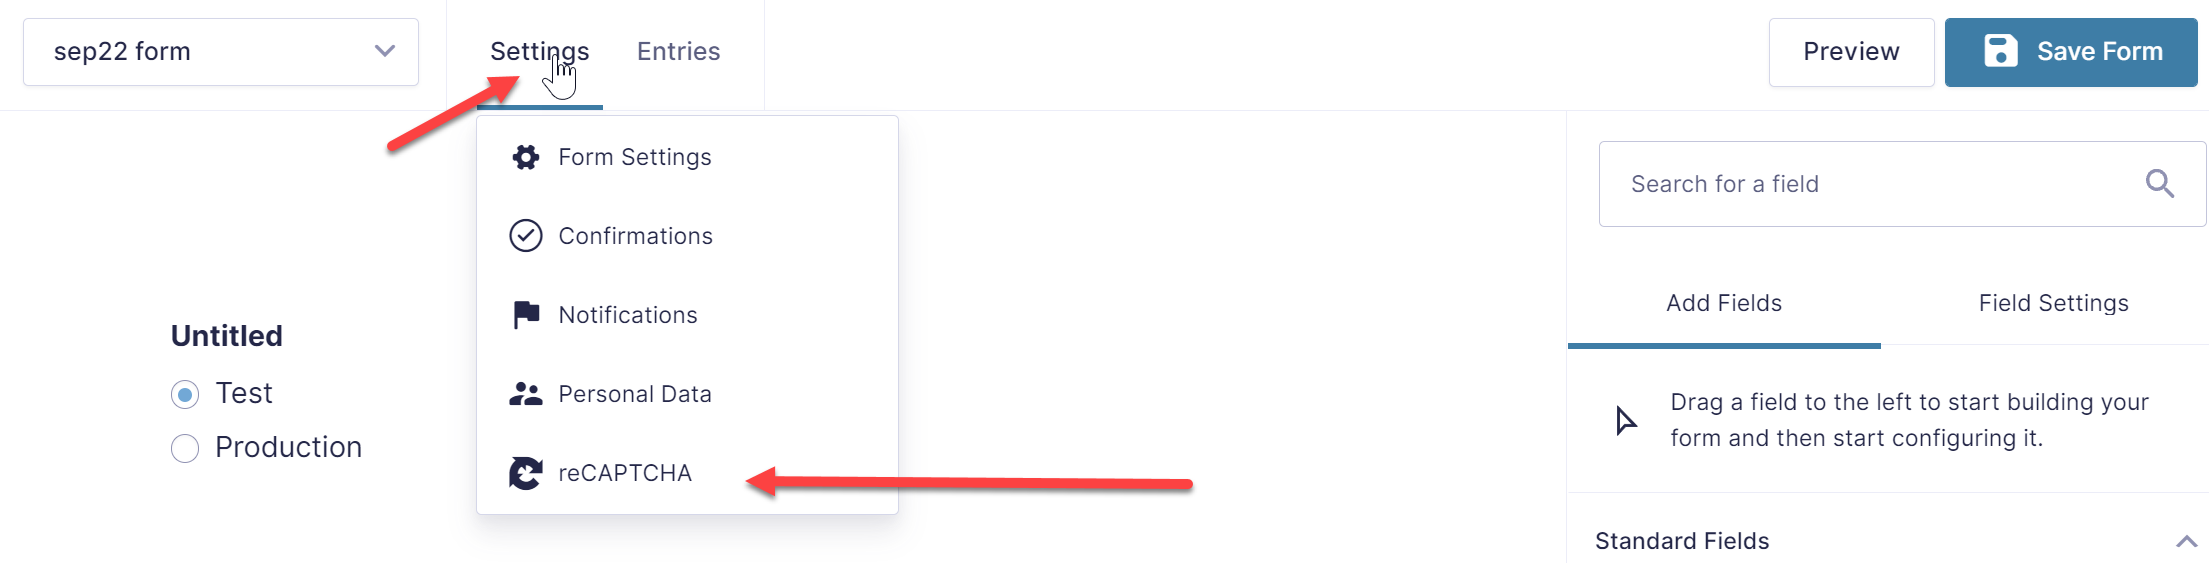
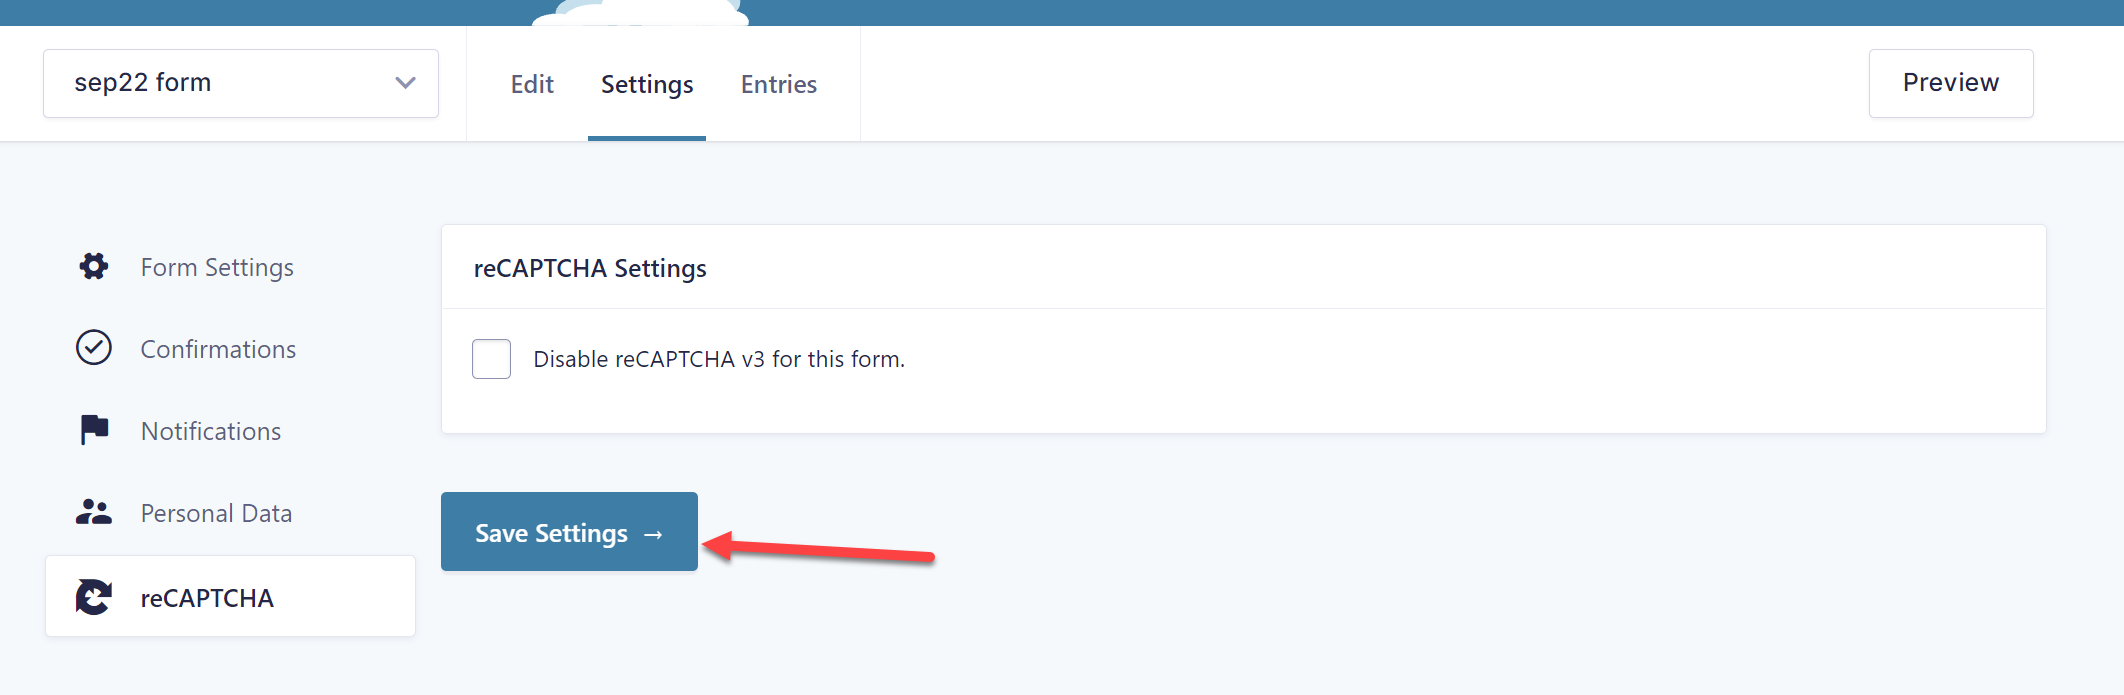
Please note that once you add the keys, it will apply to all the forms. If you don't want to apply for specific forms, you will need to check the box for "Disable reCAPTCHA v3 for this form" from form settings as shown below:
Please note that reCAPTCHA is mandatory. You can either use reCAPTCHA v2 or reCAPTCHA v3 settings but both simultaneously cannot be used.
Assign Gravity Form to Click and Pledge Payment Gateway
After creating the form with all the necessary parameters added, we need to assign the form to Click & Pledge Payment Gateway. To do so, go to Forms > Click & Pledge > Add New (Click it).
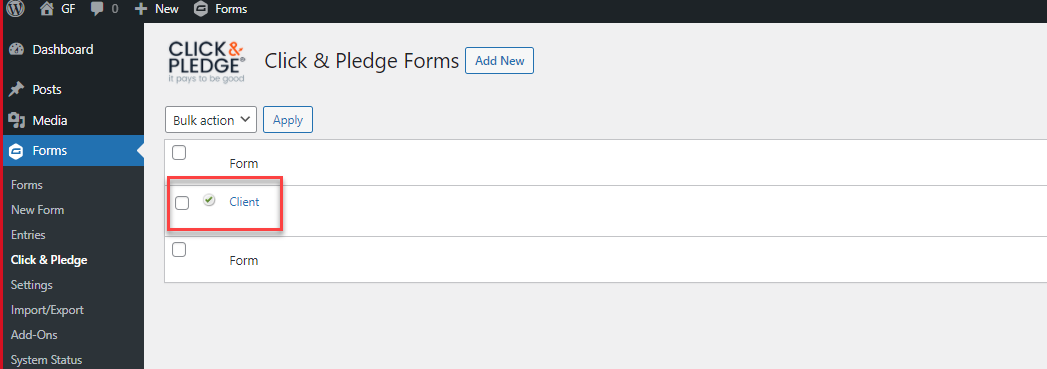
Select the created form and click
Save.
You can view the newly added form in the Click & Pledge Forms Dashboard.
To process the form from Click & Pledge payment gateway, the above procedure is mandatory.
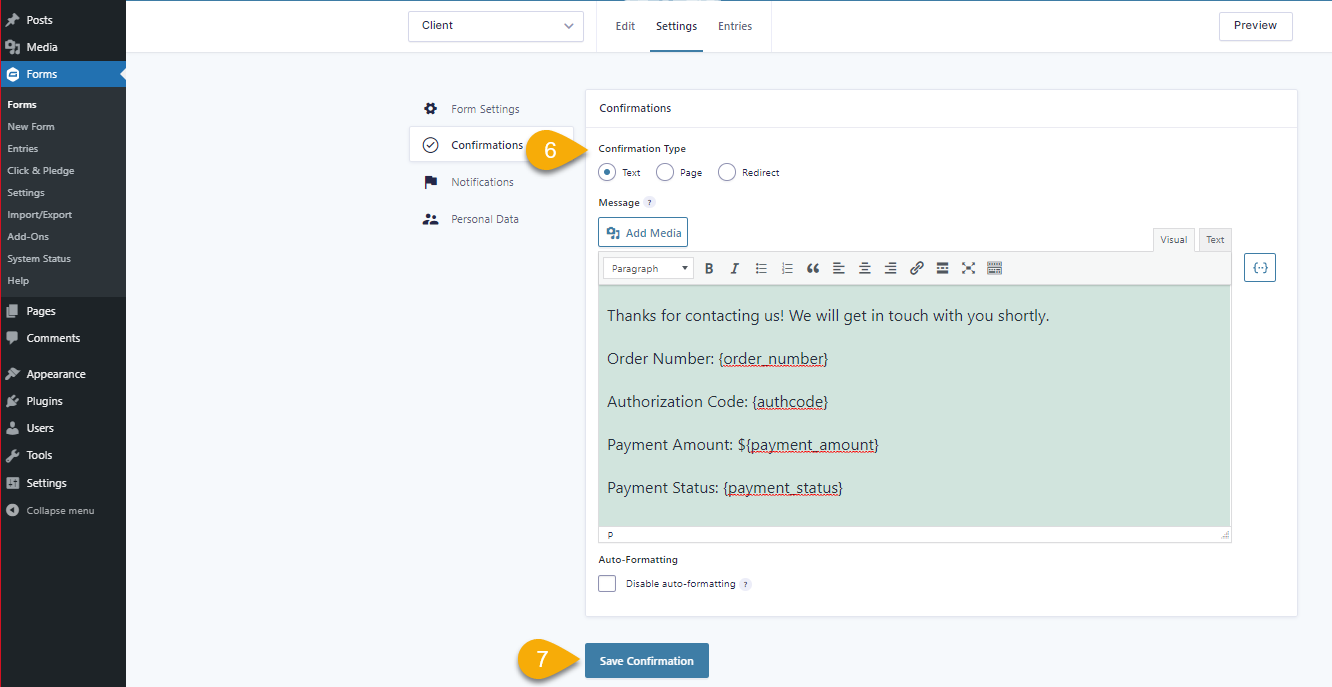
Addition of various parameters in the Thank You page
To add various parameters like order number, transaction Id, Auth Code, Payment Amount and Payment status in Gravity Forms Thank you Page, please follow the below steps:
Go to Gravity Form > Forms
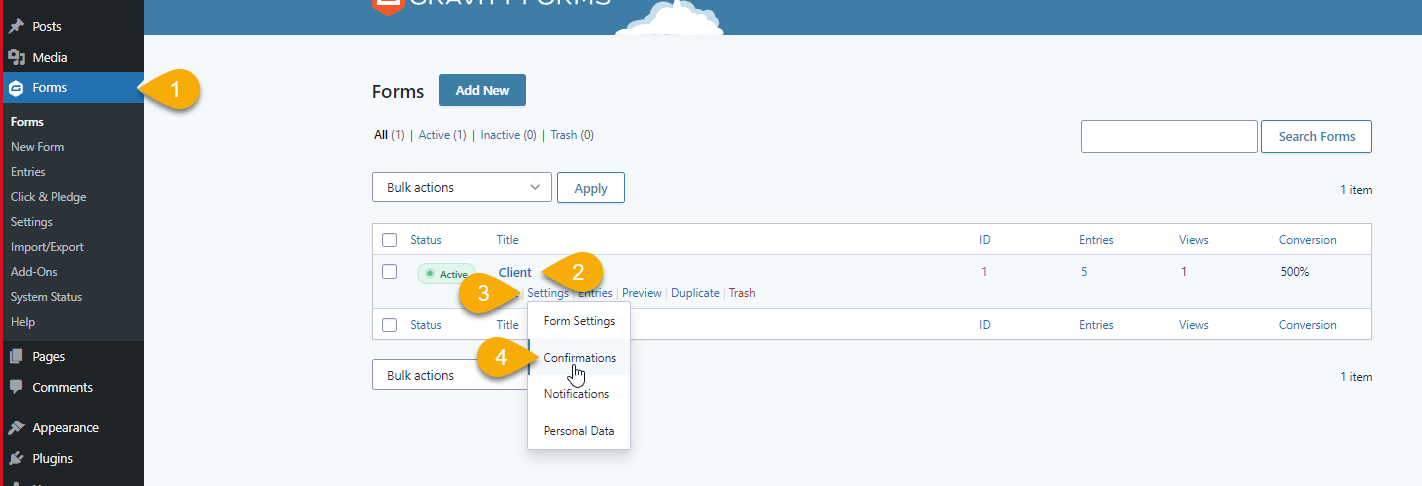
After selecting Confirmation, click on Edit.
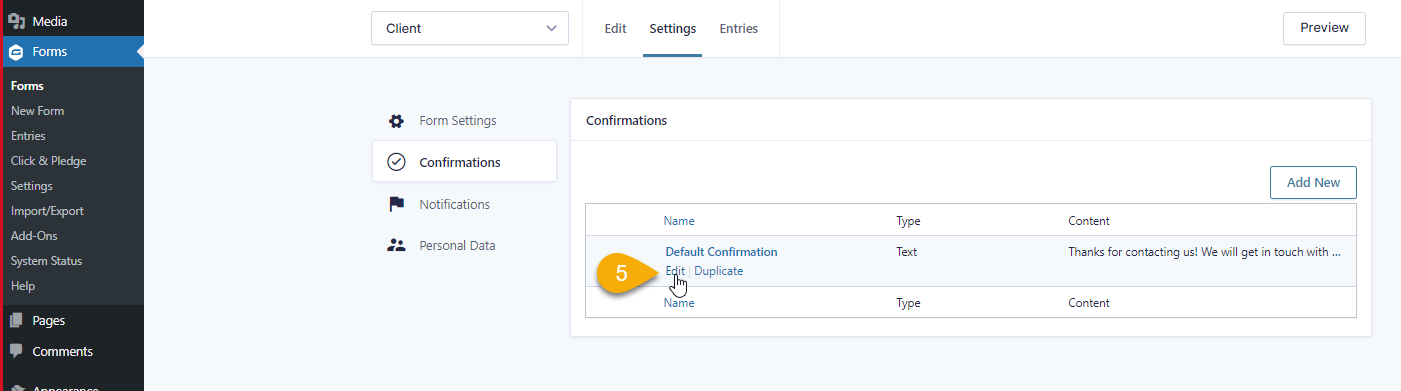
You may edit the confirmation page and customize the page as needed. The following parameters are present by default:
Transaction details:
Order Number: {order_number}
Authorization Code: {authcode}
Payment Amount: ${payment_amount}
Payment Status: {payment_status}
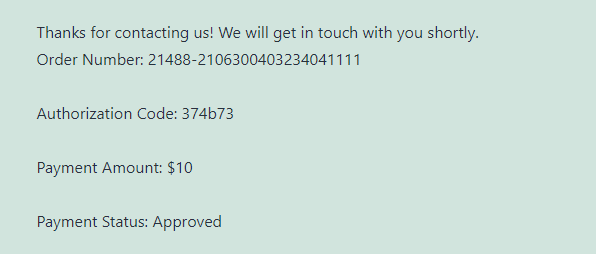
After successful transaction, Thank you page will appear like below:
 Uploading ....