Your Profile
Organization's information with Click & Pledge and other vendors is set up and maintained through the Profile section.

Account Information
Account Number
Organizations account number. This account number is used for all checkout page identifications and should be available for support requests.
Organization Name
The name of the organization as it appears in the receipt and checkout pages.
Primary Contact
The name of the person that should be contacted in case of questions or account issues. It is important that this information is kept up-to-date. Account may be disabled if the primary contact cannot be contacted in case of questions.
Contact Email Address
Email address of organization's primary contact. This information must be kept up-to-date. Account may be disabled if emails sent to this address are bounced or are not answered in a timely manner.
Tax ID/EIN
Organization Tax ID or Employer's ID number. The information is used in the receipt and is important for organizations that receive tax deductible contributions.
Your Website Address
Organization's website address where the Click & Pledge button is located. Websites are routinely checked to ensure proper operation of the Click & Pledge links and buttons. Accounts whose websites cannot be reached over an extended period of time are subject to suspension.
Mailing Address
Primary address of the organizations. Checks and payments are sent to the mailing address, therefore it is important that the address is up-to-date.
Auto Settlement
Enabling this feature forces the system to submit all daily transactions for settlement at 11:00 p.m. It is strongly recommended that auto-settlement option is left un-checked. It is a safe practice to review all payments prior to settlement since the fees associated with settling a payment that has been made in error may exceed the intended payment. Example: A donor making a mistake in making a donation of $50 and accidentally charging $5,000. If this payment is made at 10:58 p.m. and it settles at 11:00 p.m. the fees associated with crediting back the charge will exceed the intended $50 donation. Once a transaction has settled the bank will NOT reverse its processing fees. This option is not available for some gateways.
Do Not Send Receipt
By default all Click & Pledge patrons are automatically sent a receipt via email. If you choose you can disable the automated receipts. To disable receipts emailed to patrons update this field to "yes." Notification receipts to your organization will not be affected. This only applies to patron receipts.
Receipt Reply To Email
Email address used as the return address for the receipt. The email address listed here will receive all replies from the receipts sent to the patron. Make sure this email is a valid email that responds to the patrons in case of any questions.
Receipt/Email Notification
A copy of all receipts is emailed to the address(es) listed. Separate each email with semi-colon (;).
Phone
Organization's primary phone number. The number is used in case of inquiries or issues with the account. It is important that this information be kept up-to-date as any security validation or confirmation needs to be done over the phone using the number listed.
Fax
Organization's fax number. The fax number to be used in case of inquiries or issues with the account.
Tax Deductible Donations
Are donations to the organization tax-deductible? This information is used by default in the receipt if donations to the organization are tax-deductible. The information may be customized for each checkout page.
Time Zone
Select organization's time zone. All schedules are based on the time zone selected. Receipt time-stamp reflects the time in your time zone at the time of payment.
Use Timezone for Receipt & Report
If the option is set to YES (true) then the receipt and reports will show the time zone as set in the above field. Click & Pledge's data center is located in Blacksburg, Virginia and is in Eastern Standard Time (GMT: -05:00) so by default all receipts will reflect the time in EST. While this may not be important throughout the year, it may be important on December 31 at 11 p.m. Pacific Time which is next year 2 a.m. EST and may be an issue if the patron uses the receipt for taxes.
Sector / Sub-Sector
Select the sector & sub-sector that best describes your organization.
Convenience Fee Fixed Amount
Convenience fee may be added to payments transacted in the Virtual Terminal. Convenience Fees can not be added to public payment pages per VISA and MasterCard guidelines. The fee may be added as a percentage plus a fixed amount, e.g. 3% + $0.50. In this example the fixed amount is $0.50 and should be entered as: 0.50
Convenience Fee Rate
Convenience fee may be added to payments transacted in the Virtual Terminal. Convenience Fees can not be added to public payment pages per VISA and MasterCard guidelines. The fee may be added as a percentage plus a fixed amount, e.g. 3% + $0.50. In this example the rate is 3% and should be entered as: 3
API Information
Application Programming Interface (AP) is a comprehensive set of web services used by programmers to develop applications and forms using the Click & Pledge's platform. Refer to the API section of the manual for details. Read more
API Account Information
Information presented here is fixed and may not be edited or changed.
Account ID
Account number used by PaaS, FaaS, and RaaS web services to identify the service request.
Active
Only active API accounts may post to the web services. All accounts are active by default.
Account Type
Production & Test are the two modes of operation. By default all accounts are set to Production.
API (PaaS / FaaS) Account GUID
The GUID is a unique global identifier for an account. It is a required parameter for PaaS & FaaS.
Allowed URLs
Sites posting to the API platform may be restricted to a set site. Any other domain posting to the API will be rejected. The domain should be listed in full. There are no limits on the number of URL's that may be listed. See the following examples:
Please note that an SSL key is issued to a the complete path of a site (except with wildcard SSL keys) so the key is either issued to www.mysite.com or mysite.com and as a result each variation has to be added.
FaaS Security Service
The added security through the Hash Response code provides an additional level of authentication for server responses. Using a secret key programmers may match the Hash code sent by the server with the calculated field internally to ensure the response is coming through the Click & Pledge platform and not through another server. The feature was requested as an additional security measure through the forum - READ THE THREAD.
The hash text is of the following format (brackets included)
[Secret Key][Order Number][Amount]
Example:
Secret key = Jackie ate an apple at 11 p.m.
Order Number = 12345656789
Amount = $10.00
String to be hashed: [Jackie ate an apple at 11 p.m.][12345656789][10.00]
Secret Key
The secret key will be combined with the Order Number and the amount and hashed using the selected algorithm. There is a 50 characters limit for the secret key.
Hash Algorithm
The following are the available algorithms
- MD5
- SHA-1
- SHA-256
- SHA-348
- SHA-512
Reporting Services
Enabling Reporting Services (RaaS)
Only enabled RaaS accounts may request data from the RaaS services. RaaS services are required for such applications as the ClickIts and the Flash & Silverlight forms.
Report Key
The key is required for any application utilizing the RaaS service calls.
Enable Account Total (AC) Report
The RaaS services expose various statistics from each account. The Account Total report reveals total payments received through a set tracker or for the entire account. The total is a critical account attribute and not required for any of the ClickIts. The service is available if used by a custom program. By default this is set to FALSE for security reasons.
Enable Social Network Comment
The Social Network report retrieves the last 20 comments posted to the platform as social comments. Enabling it exposes those values for custom programs. By default this is set to FALSE.
3rd Party
A number of 3rd party sites and services are integrated with many aspects of the payment platform. To activate each service please follow the instructions provided in each tab.

Constant Contact
Constant Contact is a provider of eNewsletter and mass email broadcasting company. Patrons may subscribe to various newsletters directly from the checkout pages by checking the box next to the listed newsletter name as provided below. Constant Contact offers a discount to all Click & Pledge clients that apply through the partner page at:
http://clickandpledge.constantcontact.com/Enable Constant Contact
Constant Contact may be enabled for the account by checking the box in this field. Once enabled the option will appear for each checkout page.
Login Information
Username & Password used for Constant Contact account.
eNewsletter
Names of newsletters as listed in Constant Contact separated by semicolon. Each checkout page will show the names in the order listed and will subscribe the patron to the list if checked during the checkout process. Names have to match those listed in Constant Contact.
MailChimp
MailChimp is an eNewsletter and mass email broadcasting company. Patrons may subscribe to various newsletters directly from checkout pages by checking the box next to the listed newsletter name.
Enable MailChimp
MailChimp may be enabled for the account by checking the box in this field. Once enabled the option will appear on each checkout page.
Login Information
Enter API key available inside your MailChimp account.
eNewsletter
Enter the names of newsletters as listed in MailChimp account separated by semicolon.
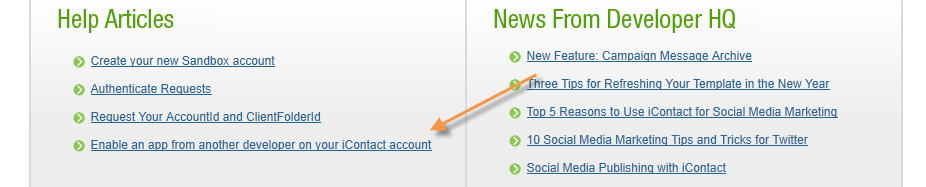
iContact
iContact is an ENewsletter and mass emailing broadcast company. iContact is available on the Salesforce App Exchange. There are 2 processes to add iContact to your Click & Pledge account. You must first activate the iContact API services, then add iContact integration to your Click & Pledge account.
I. Activate iContact API services so Click & Pledge can send information to iContact when a transaction has been processed.
1. Login to your iContact account
2. Scroll to very bottom of the page to Connect area and select Developer/API

3. On next page select 'Enable an app from another developer on your iContact account'
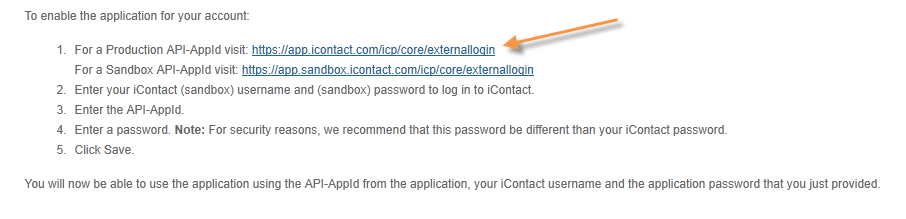
5. Finish enabling program and get API URL
A. On the next page, copy the Application ID and paste to the Application ID text box.
B. Create a password - this will need to be a new password that is not associated with your iContact login.
C. Copy API URL (you will need this for your Click & Pledge account)
II. Instructions to add iContact integration to your Click & Pledge account
1. Login to your Click & Pledge account
2. Click on 'Account Info'
3. Click on '3rd Party' tab under 'Profile'
4. Select iContact (on menu bar)
5. Click 'Enable iContact'checkbox
6. Enter iContact information (please note the password will be the API password you created inside your iContact account, not your iContact login.
7. Enter API URL (see iContact set up instructions step 5C)
8. Enter the List Names (from iContact) into the eNewsletter box. Be sure to separate the List Names with a semicolon (;).
9. Click on 'Submit'
Once you have done these steps you will need to edit your checkout pages and select the iContact integration for that page.
Salesforce
Click & Pledge Donor Management + Salesforce offers a comprehensive CRM for nonprofits for FREE. Once enabled all checkout pages post the complete patron and purchase information in "real-time" to the Salesforce account. Learn more about the Salesforce Donor Management:
READ MOREEnable Salesforce
Once enabled all checkout pages will post their respective data directly to Salesforce in "real-time". No further activation is necessary since the activation enables all checkout pages.
Login Information
Enter the login information to Salesforce. Watch the video about connecting Salesforce to Click & Pledge.
Social Networks
Social Network Activation
A number of social network links may be added to the "Thank you" page for each checkout page. By enabling and adding the link to those fan or personal pages the icons will provide a link in the Thank you page.
Twitter
Auto Post
A customized Twitter message may be posted to a Twitter account upon completion of each transaction. Two optional variables provide further customization of the message:
- &firstname : Patron's first name will be replaced prior to posting. For privacy reasons only first name may be used for posting.
- &donation : Amount of donation will be replaced prior to posting.
For example: John Smith donates $20 to the organization. The following:
Since Twitter has a limitation of 140 characters for each post it is recommended that you use a URL shortening site such as TinyURL to redirect your patrons to your site.
Fraud Service
Enable Fraud Service
Each transaction is evaluated in "real-time" against a number of proprietary algorithms as well as third party databases for fraud. The service is FREE and performed by default on all transactions. Disabling this feature will stop the fraud analysis. It is highly recommended that this service stays enabled.
Restrictions
Through restrictions you may remove any country or US States from the list of pull down menus in all the checkout pages. By default all countries & US States are listed in all checkout pages.

Country
Country Restriction
Check the checkbox next to each country that should NOT appear in the pull down list of countries. Once checked the country will not appear in the list. Any payment initiating from the IP address listed for the removed country will be declined.
State
State Restriction
Check the checkbox next to each state that should NOT appear in the pull down list of US States. Once checked the state will not appear in the list. Since IP addresses are not state specific the system will not perform any validation test for the mailing address if a different state is selected.
Receipt
Receipt numbers and signatures may be added to receipts.

Receipt Number
Receipt number will show at top of reciept. It is a variable within the administrative system's reporting section.
Serial Number Activation
Check the checkbox to activate receipt serial numbers
Separator
Use dropdown box to select either dashes or slashes to separate field in you are including
Prefix
Insert a maximum of 10 alpha-numeric characters that will appear at beginning of receipt number. Optional field. e.g. ABC
Date format
Use dropdown box to select date format to receipt number, e.g. 20120607, or 07062012, or 2012/07/12, etc.
Seed
Insert a number that you wish to begin the count. There is a maximum of 10 digits, e.g. 1000
Increment
Choose the increment you wish to have as your numbering pattern e.g. 1
Signature
Receipt signature will show at bottom of receipt. A text box field is provided. Customization can be created using HTML. An signature image can be dropped in to the code. The image must be hosted on organization's own server not at Click & Pledge.
 Uploading ....